1、简介
地平线旭日X3派是一款面向生态开发者的嵌入式AI开发板,接口兼容树莓派,具有5Tops端侧推理与4核ARM A53处理能力。可同时多路Camera Sensor的输入并支持H.264/H.265编解码。结合地平线的高性能AI工具链与机器人开发平台,助力开发者快速落地解决方案。当前主流的深度学习框架主要有Pytorch、TensorFlow、PaddlePaddle等,将这些框架训练得到的模型部署到地平线的终端设备上,需要很长的链路来进行转换,包括一系列前处理、后处理等等,基于此,本文介绍由PaddlePaddle团队和众多开发者维护的FastDeploy项目,助力开发者更加快速便捷的进行模型的推理部署。-
FastDeploy 是一款全场景、易用灵活、极致高效的 AI 推理部署工具。提供开箱即用的云边端部署体验, 支持超过 150+ Text, Vision, Speech和跨模态模型,并实现端到端的推理性能优化。包括图像分类、物体检测、图像分割、人脸检测、人脸识别、关键点检测、抠图、OCR、NLP、TTS等任务,满足开发者多场景、多硬件、多平台的产业部署需求。-
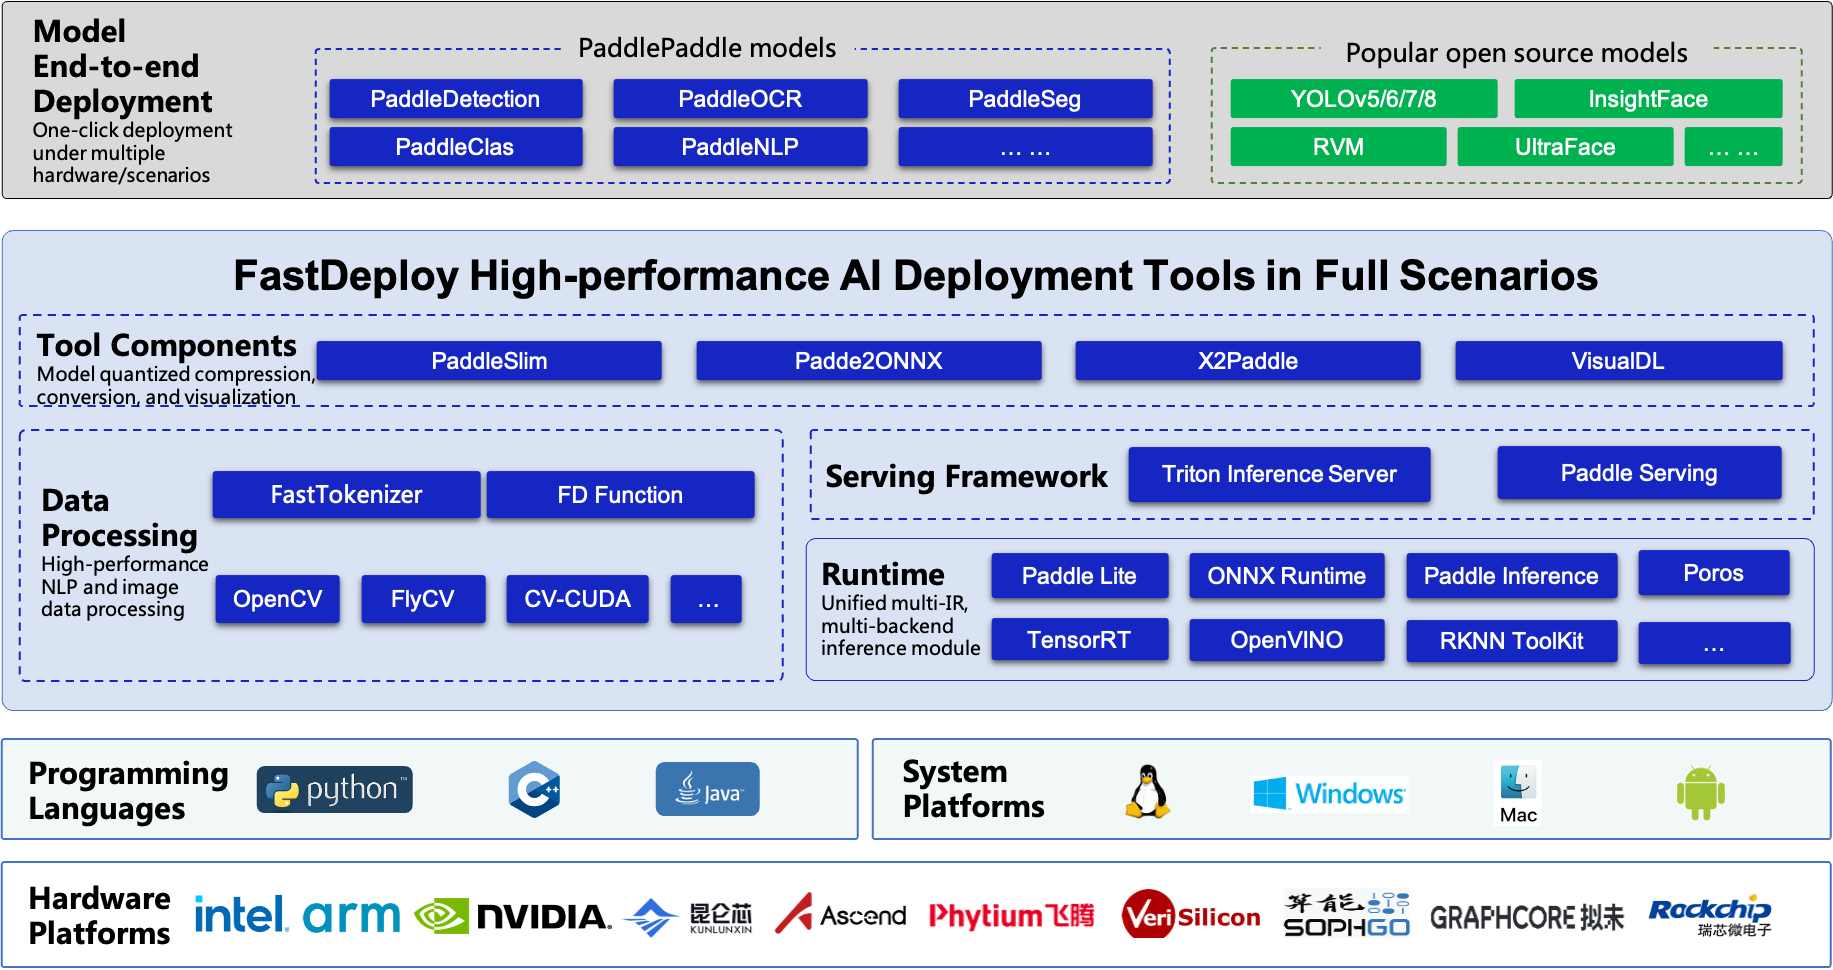
目前,在地平线X3派上已经集成了FastDeploy的模型推理,只需数行代码就可以完成模型的部署,下面将详细介绍从Paddle模型到地平线部署全流程。
2、模型训练及转换
以检测模型为例,PaddleDetection是一个基于PaddlePaddle的目标检测端到端开发套件,在提供丰富的模型组件和测试基准的同时,注重端到端的产业落地应用,通过打造产业级特色模型|工具、建设产业应用范例等手段,帮助开发者实现数据准备、模型选型、模型训练、模型部署的全流程打通,快速进行落地应用。官方github有十分详尽的训练教程,具体可以参考https://github.com/PaddlePaddle/PaddleDetection。-
此处提供PPYOLOE模型在COCO数据集上的训练权重作为示例,具体的模型下载路径如下:-
https://bj.bcebos.com/fastdeploy/models/ppyoloe_plus_crn_m_80e_coco.tgz-
解压之后的文件如下:

由于地平线提供的模型转换工具暂时不支持Paddle模型直接导出为Horizon模型,因此需要先将Paddle模型导出为ONNX模型,再将ONNX模型转为Horizon模型。-
PPDetection模型在地平线上部署时要注意以下几点:
- 模型导出需要包含Decode
- 由于地平线不支持NMS,因此输出节点必须裁剪至NMS之前
- 由于地平线 Div算子的限制,模型的输出节点需要裁剪至Div算子之前
2.1 Paddle转换为ONNX模型
静态图转ONNX模型,注意,这里的save_file请和压缩包名对齐
paddle2onnx --model_dir ppyoloe_plus_crn_m_80e_coco \
            --model_filename model.pdmodel \
            --params_filename model.pdiparams \
            --save_file ppyoloe_plus_crn_m_80e_coco/ppyoloe_plus_crn_m_80e_coco.onnx \
            --enable_dev_version True \
            --opset_version 11
由于导出的ONNX IR Version和地平线不一致,因此,要手动更改ONNX IR Version,可参考以下Python代码:
import onnx
model = onnx.load("ppyoloe_plus_crn_m_80e_coco/ppyoloe_plus_crn_m_80e_coco.onnx")
model.ir_version = 7
onnx.save(model, "ppyoloe_plus_crn_m_80e_coco/ppyoloe_plus_crn_m_80e_coco.onnx")
2.2 ONNX模型裁剪
由于Paddle2ONNX版本的不同,转换模型的输出节点名称也有所不同,请使用Netron对模型进行可视化,并找到以下蓝色方框标记的NonMaxSuppression节点,红色方框的节点名称即为目标名称。例如,使用Netron可视化后,得到以下图片:-
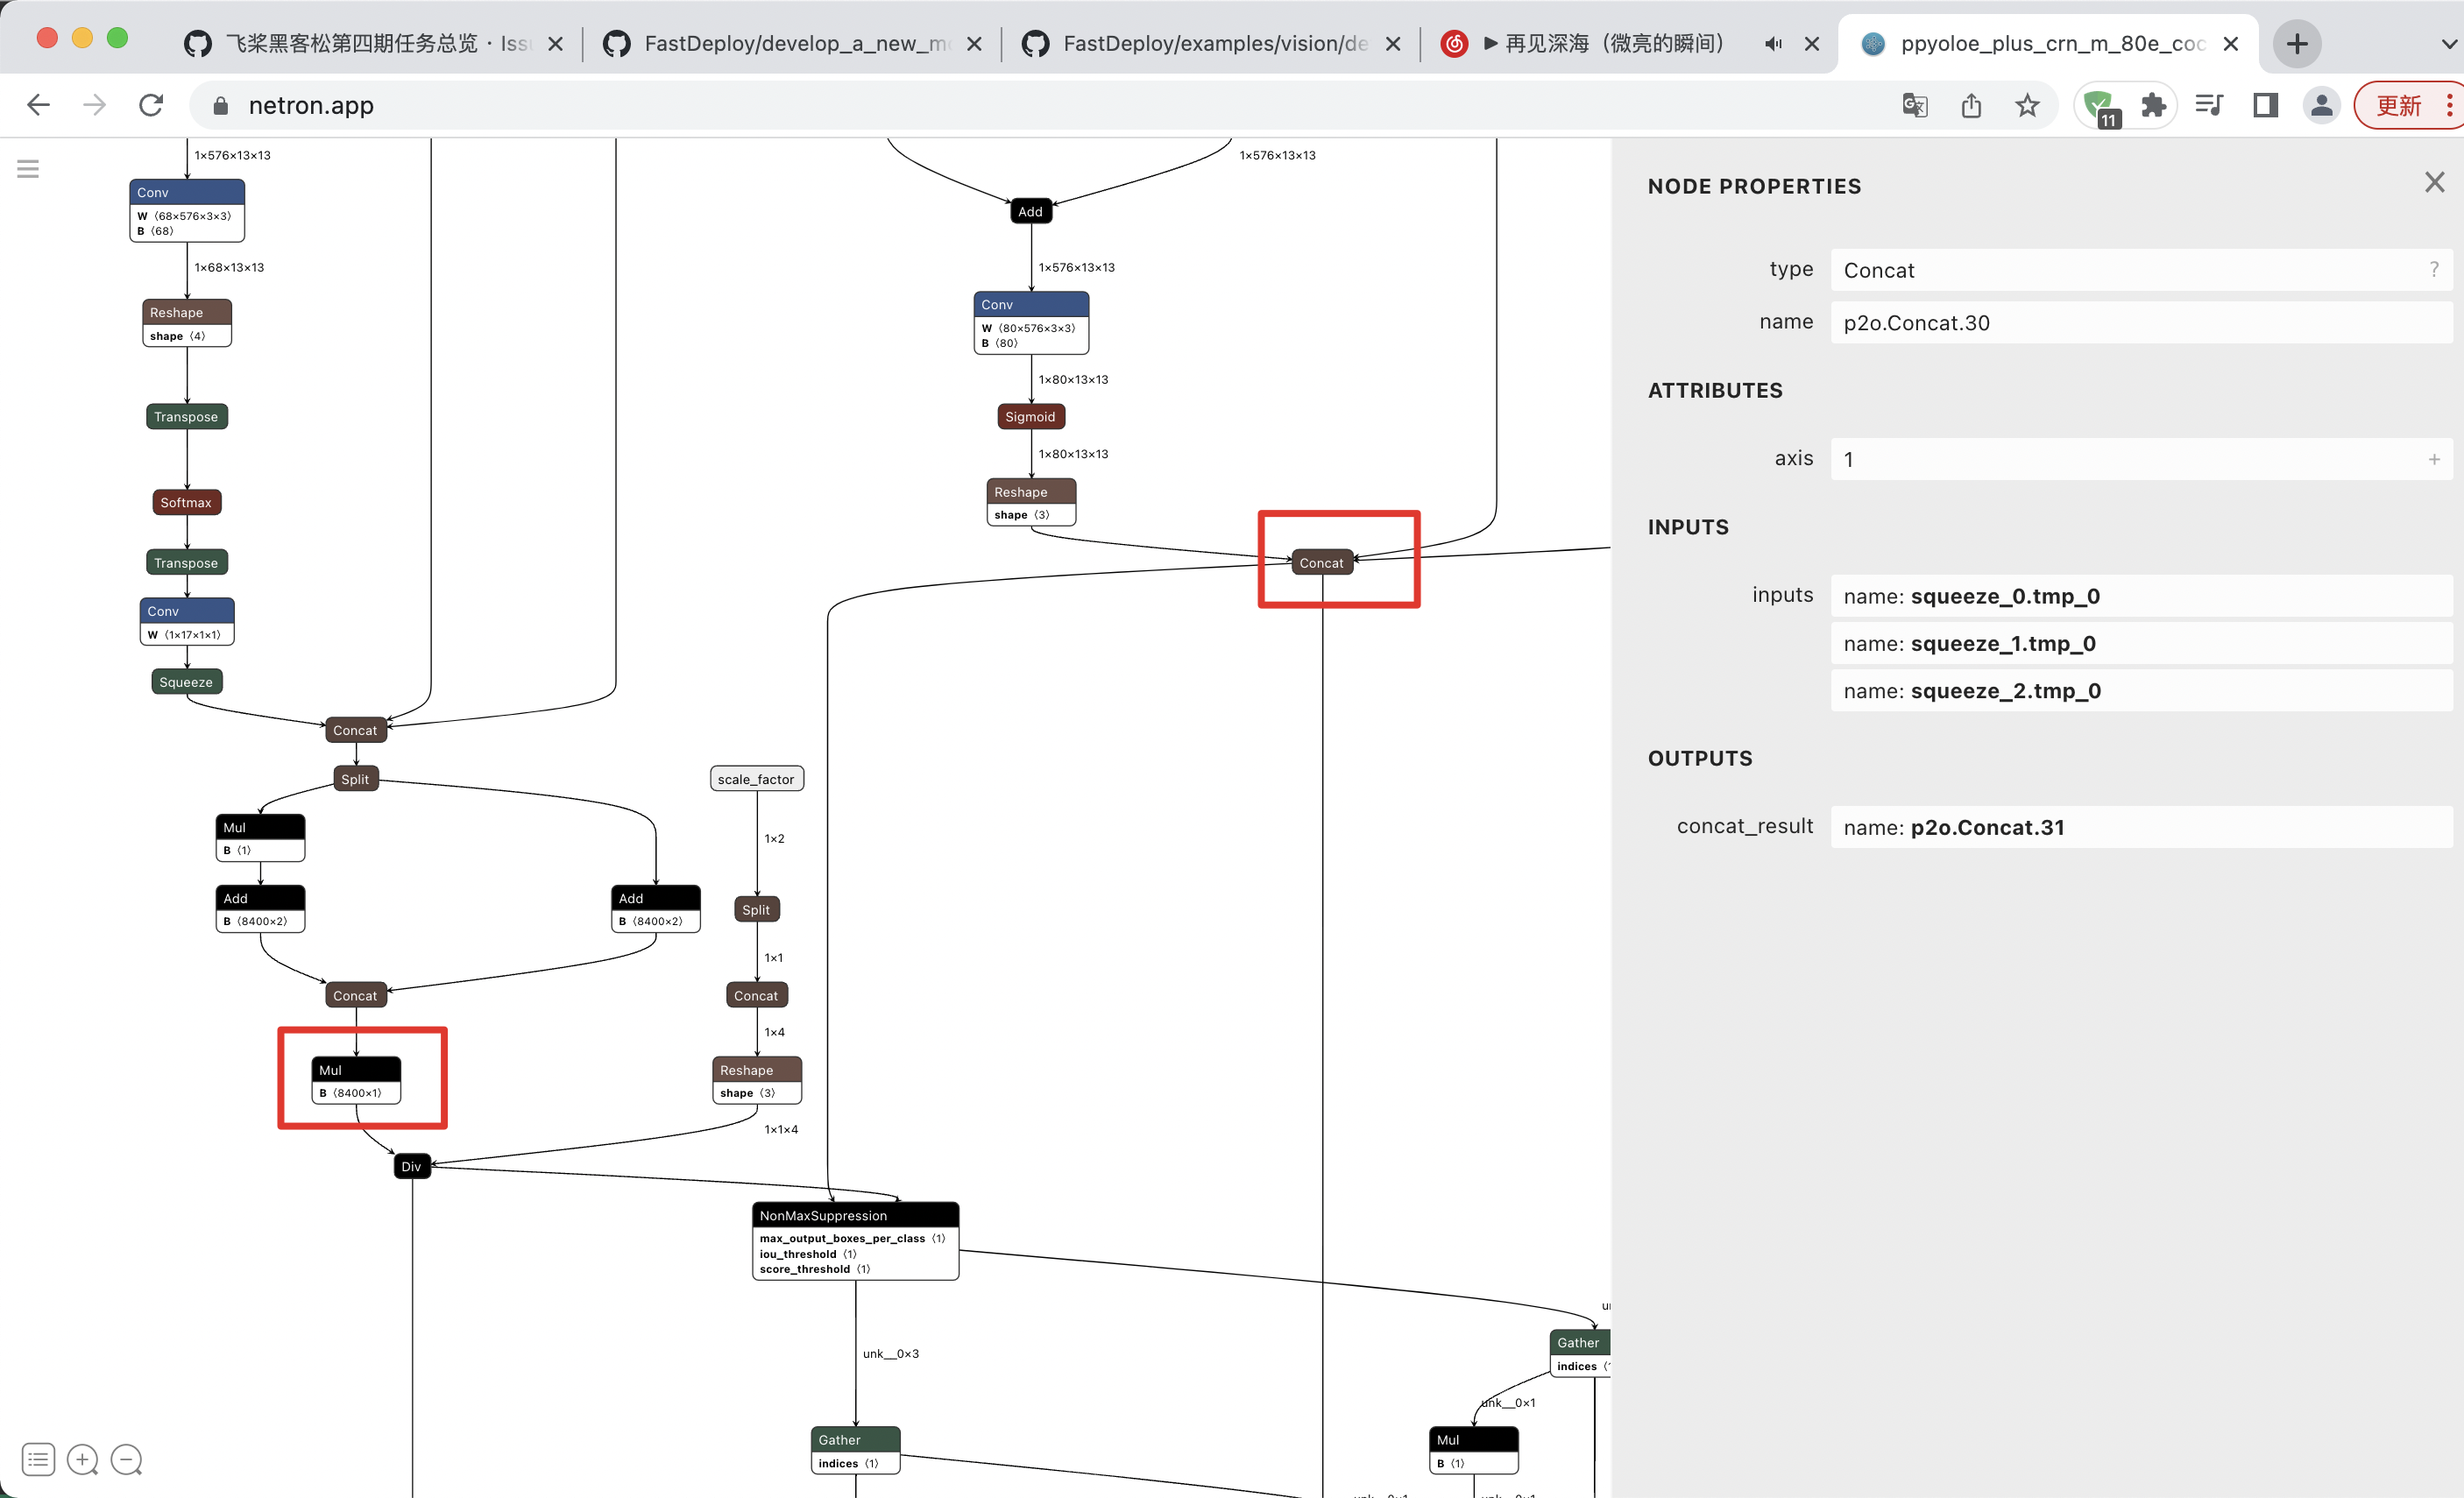
找到NonMaxSuppression节点,可以看到红色方框标记的两个节点名称为p2o.Mul.290和p2o.Concat.29,因此需要将输出截止到这两个结点。-
可以参考以下python代码,对输出进行剪裁:
import argparse
import sys


def parse_arguments():
    parser = argparse.ArgumentParser()
    parser.add_argument(
        '--model',
        required=True,
        help='Path of directory saved the input model.')
    parser.add_argument(
        '--output_names',
        required=True,
        nargs='+',
        help='The outputs of pruned model.')
    parser.add_argument(
        '--save_file', required=True, help='Path to save the new onnx model.')
    return parser.parse_args()


if __name__ == '__main__':
    args = parse_arguments()
    import onnx
    model = onnx.load(args.model)
    output_tensor_names = set()
    for node in model.graph.node:
        for out in node.output:
            output_tensor_names.add(out)

    for output_name in args.output_names:
        if output_name not in output_tensor_names:
            print(
                "[ERROR] Cannot find output tensor name '{}' in onnx model graph.".
                format(output_name))
            sys.exit(-1)
    if len(set(args.output_names)) < len(args.output_names):
        print(
            "[ERROR] There's dumplicate name in --output_names, which is not allowed."
        )
        sys.exit(-1)

    output_node_indices = set()
    output_to_node = dict()
    for i, node in enumerate(model.graph.node):
        for out in node.output:
            output_to_node[out] = i
            if out in args.output_names:
                output_node_indices.add(i)

    # from outputs find all the ancestors
    import copy
    reserved_node_indices = copy.deepcopy(output_node_indices)
    reserved_inputs = set()
    new_output_node_indices = copy.deepcopy(output_node_indices)
    while True and len(new_output_node_indices) > 0:
        output_node_indices = copy.deepcopy(new_output_node_indices)
        new_output_node_indices = set()
        for out_node_idx in output_node_indices:
            for ipt in model.graph.node[out_node_idx].input:
                if ipt in output_to_node:
                    reserved_node_indices.add(output_to_node[ipt])
                    new_output_node_indices.add(output_to_node[ipt])
                else:
                    reserved_inputs.add(ipt)

    num_inputs = len(model.graph.input)
    num_outputs = len(model.graph.output)
    num_nodes = len(model.graph.node)
    print(len(reserved_node_indices), "xxxx")
    for idx in range(num_nodes - 1, -1, -1):
        if idx not in reserved_node_indices:
            del model.graph.node[idx]
    for idx in range(num_inputs - 1, -1, -1):
        if model.graph.input[idx].name not in reserved_inputs:
            del model.graph.input[idx]
    for out in args.output_names:
        model.graph.output.extend([onnx.ValueInfoProto(name=out)])
    for i in range(num_outputs):
        del model.graph.output[0]

    from onnx_infer_shape import SymbolicShapeInference
    model = SymbolicShapeInference.infer_shapes(model, 2**31 - 1, True, False,
                                                1)
    onnx.checker.check_model(model)
    onnx.save(model, args.save_file)
    print("[Finished] The new model saved in {}.".format(args.save_file))
    print("[DEBUG INFO] The inputs of new model: {}".format(
        [x.name for x in model.graph.input]))
    print("[DEBUG INFO] The outputs of new model: {}".format(
        [x.name for x in model.graph.output]))
若将上述脚本命名为prune_onnx_model.py ,则运行以下命令,对模型进行剪裁:
python prune_onnx_model.py --model ppyoloe_plus_crn_m_80e_coco/ppyoloe_plus_crn_m_80e_coco.onnx \
            --output_names p2o.Mul.290 p2o.Concat.29 \
            --save_file ppyoloe_plus_crn_m_80e_coco/ppyoloe_plus_crn_m_80e_coco_cut.onnx
至此,paddle2onnx部分完成。
2.3 ONNX模型转地平线模型
地平线的模型转换以及量化工具均封装在提供的docker镜像中,在进行模型转换前请确保地平线提供的Docker镜像已经安装完成,具体可参考[开发机部署] https://developer.horizon.ai/api/v1/fileData/doc/ddk_doc/navigation/ai_toolchain/docs_cn/horizon_ai_toolchain_user_guide/prerequisites.html#id4-
由于地平线不支持直接从paddle模型到horizon模型的转换,因此,首先要将paddle的模型转换为ONNX模型,地平线目前主要支持的opset版本是opset10和opset11,ir_version <= 7,转换过程需特别注意,具体可参考地平线提供的官方文档。-
转换为ONNX模型之后,开始进行地平线模型的转换,可参考官方文档进行转换,此处给出模型转换示例。-
进入docker实例,cd至如下目录:
cd ddk/samples/ai_toolchain/horizon_model_convert_sample/04_detection/03_yolov5s/mapper
该目录下有01_check.sh,02_preprocess.sh,03_build.sh,在模型转换阶段主要用这三个脚本就可完成,下面详细介绍使用这三个脚本的注意事项。-
01_check.sh,对模型以及运行环境进行检查,只需要修改caffe_model为自己的ONNX模型路径就可以完成。
set -ex
cd $(dirname $0) || exit

model_type="onnx"
caffe_model="ppyoloe_plus_crn_m_80e_coco/ppyoloe_plus_crn_m_80e_coco_cut.onnx"
march="bernoulli2"

hb_mapper checker --model-type ${model_type} \
                  --model ${caffe_model} \
                  --march ${march}
02_preprocess.sh,准备量化所需的数据格式,FastDeploy选择以下的配置。
python3 ../../../data_preprocess.py \
  --src_dir ../../../01_common/calibration_data/coco \
  --dst_dir ./calibration_data_rgb_uint8 \
  --pic_ext .rgb \
  --read_mode opencv \
  --saved_data_type uint8
03_build.sh ,将ONNX模型转换为Horizon可运行的模型,其中转换需要进行参数的配置,包括输入数据格式等。-
FastDeploy对模型路径的配置如下:
model_parameters:
  # the model file of floating-point ONNX neural network data
  onnx_model: 'ppyoloe_plus_crn_m_80e_coco/ppyoloe_plus_crn_m_80e_coco_cut.onnx'

  # the applicable BPU architecture
  march: "bernoulli2"

  # specifies whether or not to dump the intermediate results of all layers in conversion
  # if set to True, then the intermediate results of all layers shall be dumped
  layer_out_dump: False

  # the directory in which model conversion results are stored
  working_dir: 'model_output_rgb'

  # model conversion generated name prefix of those model files used for dev board execution
  output_model_file_prefix: 'ppyoloe_640x640_m_rgb'
对模型量化参数的配置如下:
calibration_parameters:

  # the directory where reference images of model quantization are stored
  # image formats include JPEG, BMP etc.
  # should be classic application scenarios, usually 20~100 images are picked out from test datasets
  # in addition, note that input images should cover typical scenarios
  # and try to avoid those overexposed, oversaturated, vague,
  # pure blank or pure white images
  # use ';' to seperate when there are multiple input nodes
  cal_data_dir: './calibration_data_rgb'

  # calibration data binary file save type, available options: float32, uint8
#   cal_data_type: 'float32'

  # In case the size of input image file is different from that of in model training
  # and that preprocess_on is set to True,
  # shall the default preprocess method(skimage resize) be used
  # i.e., to resize or crop input image into specified size
  # otherwise user must keep image size as that of in training in advance
  # preprocess_on: False

  # The algorithm type of model quantization, support default, mix, kl, max, load, usually use default can meet the requirements.
  # If it does not meet the expectation, you can try to change it to mix first. If there is still no expectation, try kl or max again.
  # When using QAT to export the model, this parameter should be set to load.
  # For more details of the parameters, please refer to the parameter details in PTQ Principle And Steps section of the user manual.
  calibration_type: 'max'

  # this is the parameter of the 'max' calibration method and it is used for adjusting the intercept point of the 'max' calibration.
  # this parameter will only become valid when the calibration_type is specified as 'max'.
  # RANGE: 0.0 - 1.0. Typical options includes: 0.99999/0.99995/0.99990/0.99950/0.99900.
  max_percentile: 0.9999
其余参数选择默认值,运行03_build.sh
set -e -v
cd $(dirname $0)
config_file="./yolov5s_config.yaml"
model_type="onnx"
# build model
hb_mapper makertbin --config ${config_file}  \
                    --model-type  ${model_type}
至此,在同路径下model_output_rgb会生成转换完成的模型文件(后缀为.bin)
3、模型部署
模型转换完成之后,可以拉取FastDeploy仓库进行部署,仓库链接为https://github.com/PaddlePaddle/FastDeploy
3.1 FastDeploy编译
首先把仓库pull到本地
git clone https://github.com/PaddlePaddle/FastDeploy.git
下面介绍如何编译在Horizon上运行的推理部署代码。
cd FastDeploy

# 如果您使用的是develop分支输入以下命令
git checkout develop

mkdir build && cd build
cmake ..  -DCMAKE_C_COMPILER=/opt/gcc_linaro_6.5.0_2018.12_x86_64_aarch64_linux_gnu/gcc-linaro-6.5.0-2018.12-x86_64_aarch64-linux-gnu/bin/aarch64-linux-gnu-gcc \
          -DCMAKE_CXX_COMPILER=/opt/gcc_linaro_6.5.0_2018.12_x86_64_aarch64_linux_gnu/gcc-linaro-6.5.0-2018.12-x86_64_aarch64-linux-gnu/bin/aarch64-linux-gnu-g++ \
          -DCMAKE_TOOLCHAIN_FILE=./../cmake/toolchain.cmake \
          -DTARGET_ABI=arm64 \
          -WITH_TIMVX=ON \
          -DENABLE_HORIZON_BACKEND=ON \
          -DENABLE_VISION=ON \
          -DCMAKE_INSTALL_PREFIX=${PWD}/fastdeploy-0.0.0 \
          -Wno-dev ..
make -j16
make install
确保交叉编译工具gcc_linaro_6.5.0_2018.12_x86_64_aarch64_linux_gnu,安装在/opt目录下。之后,FastDeploy的产物libfastdeploy.so,会生成在对应的目录中,之后,基于此,可进行不同模型的开发和部署。
3.2 检测模型部署
将fastdeploy编译完成之后,进入examples/vision/detection/paddledetection/horizon/cpp,这是PPYOLOE的示例demo,程序如下所示:
// Copyright (c) 2022 PaddlePaddle Authors. All Rights Reserved.
//
// Licensed under the Apache License, Version 2.0 (the "License");
// you may not use this file except in compliance with the License.
// You may obtain a copy of the License at
//
//     http://www.apache.org/licenses/LICENSE-2.0
//
// Unless required by applicable law or agreed to in writing, software
// distributed under the License is distributed on an "AS IS" BASIS,
// WITHOUT WARRANTIES OR CONDITIONS OF ANY KIND, either express or implied.
// See the License for the specific language governing permissions and
// limitations under the License.

#include "fastdeploy/vision.h"

void HorizonInfer(const std::string& model_dir, const std::string& image_file) {
  auto model_file =
      model_dir + "/ppyoloe_640x640_rgb_s.bin";
  auto params_file = "";
  auto config_file = model_dir + "/infer_cfg.yml";

  auto option = fastdeploy::RuntimeOption();
  option.UseHorizon();
  option.UseHorizonNPUBackend();

  auto format = fastdeploy::ModelFormat::HORIZON;

  auto model = fastdeploy::vision::detection::PPYOLOE(
      model_file, params_file, config_file, option, format);

  model.GetPreprocessor().DisablePermute();
  model.GetPreprocessor().DisableNormalize();
  model.GetPostprocessor().ApplyNMS();
  fastdeploy::vision::DetectionResult res;
  auto im = cv::imread(image_file);
  for(int i = 0; i < 100; i++){

  fastdeploy::TimeCounter tc;
  tc.Start();
  if (!model.Predict(&im, &res)) {
    std::cerr << "Failed to predict." << std::endl;
    return;
  }
  tc.End();
  tc.PrintInfo("PPDet in Horizon");
  // std::cout << res.Str() << std::endl;
  }

  auto vis_im = fastdeploy::vision::VisDetection(im, res, 0.5);
  cv::imwrite("infer_horizon.jpg", vis_im);
  std::cout << "Visualized result saved in ./infer_horizon.jpg" << std::endl;
}

int main(int argc, char* argv[]) {
  if (argc < 3) {
    std::cout
        << "Usage: infer_ppyoloe_demo path/to/model_dir path/to/image, "
           "e.g ./infer_ppyoloe_demo ./ppyoloe_model_dir ./test.jpeg"
        << std::endl;
    return -1;
  }

  HorizonInfer(argv[1], argv[2]);

  return 0;
}
修改模型地址,通过编译之后可实现模型的推理,编译命令如下,注意修改上面编译FastDeploy的路径:
mkdir build && cd build

cmake ..  -DCMAKE_C_COMPILER=/opt/gcc_linaro_6.5.0_2018.12_x86_64_aarch64_linux_gnu/gcc-linaro-6.5.0-2018.12-x86_64_aarch64-linux-gnu/bin/aarch64-linux-gnu-gcc \
          -DCMAKE_CXX_COMPILER=/opt/gcc_linaro_6.5.0_2018.12_x86_64_aarch64_linux_gnu/gcc-linaro-6.5.0-2018.12-x86_64_aarch64-linux-gnu/bin/aarch64-linux-gnu-g++ \
          -DFASTDEPLOY_INSTALL_DIR= Path of downloaded fastdeploy sdk \
至此,可通过FastDeploy实现在地平线终端上的模型推理。
4、总结
通过Paddle训练模型,使用FastDeploy进行部署,可以快速将模型部署到终端,可以极大提高开发者的开发效率。本文提供了一个端到端的部署教程,欢迎大家批评指正!

