四年经典老电赛选手,暑假在家里摸鱼,没多余材料,出于锻炼技术和兴趣使然,在家参与了今年电赛。主控使用旭日X3派,远程连接使用MobaXterm,有OpenCV和PyQt5库就能运行,理论上树莓派等Linux板子搭建好环境都能用。第一次玩OpenCV项目,如有问题请见谅。代码工程及思路PPT同时也在Github平台发布,链接:https://github.com/ryhxf/2024-NUEDC-E-
希望点个Star!
详解教程已发布在B站,最终演示效果在视频开头,链接:https://www.bilibili.com/video/BV167YBeDEdY/?vd_source=9b34f7929a65a06b390a29951e1e499f
注意:运行前环境库(OpenCV+PyQt5)需配好,代码第2行和第369行需根据个人情况修改和注释。-
代码(362-367行的使用的图片路径需要自行修改,可自行改成想要的图)
1.图像预处理部分(739行)参数可调,个人觉得可用可不用
blurred = cv2.GaussianBlur(frame, (5, 5), 0) # 高斯模糊
kernel = np.ones((5, 5), np.uint8) # 5*5的卷积核
opened = cv2.morphologyEx(blurred, cv2.MORPH_OPEN, kernel) # 开运算
# cv2.imshow("opened", opened) #测试处理后图片
2.转换成灰度图部分(748行)
# 转换为灰度图像
gray = cv2.cvtColor(opened, cv2.COLOR_BGR2GRAY)
3.裁剪图像(并画出切割区域)(773行)左1/8和右1/8块不要,同时加上偏移量
# 取图像的中间部分
height, width = gray.shape
left = width // 8
right = width * 7 // 8
gray = gray[:, left:right]
# 在原图上画出切割的区域
cv2.rectangle(frame, (left, 0), (right, height), (255, 0, 0), 2)


# 加上偏移量
x += left
4.边缘检测和查找轮廓(784行)低阈值50和高阈值150可修改
# 使用Canny边缘检测
edges = cv2.Canny(gray, 50, 150, apertureSize=3)
# cv2.imshow('edges', edges) # 测试边缘检测
# 查找轮廓
contours, _ = cv2.findContours(edges, cv2.RETR_TREE, cv2.CHAIN_APPROX_SIMPLE)
5.寻找面积最大的轮廓且面积大于一定值,得到大矩形(无旋转)
# 寻找面积最大的轮廓
max_area = 0
largest_contour = None
for contour in contours:
    area = cv2.contourArea(contour)
    if area > max_area:
        max_area = area
        largest_contour = contour
6.使用旋转矩形,cv2.minAreaRect()获取矩形的中心坐标、宽高和旋转角度等(816行)
# 获取旋转矩形的中心点坐标、宽高和旋转角度
rect = cv2.minAreaRect(largest_contour)
7.cv2.boxPoints()函数获取4个顶点,然后计算得到旋转矩形的各种信息并绘制出来(817行)
# 获取旋转矩形的四个角点
box = cv2.boxPoints(rect)

# 将角点坐标转换为整数
box = np.intp(box)
# 给每个角点的x坐标加上偏移量
box[:, 0] += left

# 计算四个角点的中心点
center_points = np.mean(box, axis=0)
小方格排序问题解决(3个小步骤)-
(1)在一开始算大矩形角点就进行排序。(代码828行)
# 对四个顶点进行排序,从左到右,从上到下
sorted_box = sorted(box, key=lambda p: (p[1], p[0]))
(2)角度小于0时,以排为主的顺序排序。角度大于0时,以列为主的顺序排序(代码889行)
if self.angle < 0:
    # 计算每个小正方形的中心点坐标和编号
    for row, col in square_order:
        # 计算小正方形的中心点相对于大矩形中心点的坐标
        relative_center = np.array([(2 * col - 2) * self.width / 6, (2 * row - 2) * self.height / 6])

        # 使用旋转矩阵来旋转小正方形的中心点
        rotated_center = np.dot(rotation_matrix, relative_center)

        # 计算小正方形的中心点的绝对坐标
        absolute_center = self.center_big_square + rotated_center

        # 将中心坐标和编号添加到列表中
        self.squares_center.append((absolute_center, row * 3 + col + 1))
else:
    # 以列为主的顺序计算每个小正方形的中心点坐标和编号
    for col, row in square_order:
        # 计算小正方形的中心点相对于大矩形中心点的坐标
        relative_center = np.array([(2 * col - 2) * self.width / 6, (2 * row - 2) * self.height / 6])
        # 使用旋转矩阵来旋转小正方形的中心点
        rotated_center = np.dot(rotation_matrix, relative_center)
        # 计算小正方形的中心点的绝对坐标
        absolute_center = self.center_big_square + rotated_center
        # 将中心坐标和编号添加到列表中
        self.squares_center.append((absolute_center, row * 3 + col + 1))
        # 画出每个小正方形的内接圆
        cv2.circle(frame, (int(absolute_center[0]), int(absolute_center[1])), int(self.neijie_radius), (255, 0, 0), 2)
(3)角度大于0时,错误的方格信息修正(代码916行)
if(self.jiaodu > 0):
    # 修正不同的格子的所有信息。1号和3号互换,2号和6号互换,5号和7号互换,0,4,8不变
    self.squares_center[1], self.squares_center[3] = self.squares_center[3], self.squares_center[1]
    self.squares_center[2], self.squares_center[6] = self.squares_center[6], self.squares_center[2]
    self.squares_center[5], self.squares_center[7] = self.squares_center[7], self.squares_center[5]
8.使用旋转矩阵来旋转每个小正方形的中心点和绝对坐标(860行)
# 创建旋转矩阵
rotation_matrix = np.array([[np.cos(self.angle), -np.sin(self.angle)], [np.sin(self.angle), np.cos(self.angle)]])

# 初始化一个列表用于存储小正方形的中心点坐标和编号
self.squares_center = []
# 初始化一个列表用于存储小正方形的四个顶点坐标
self.square_points = []

# 计算大矩形的中心点
self.center_big_square = np.array([(self.top_left[0] + self.bottom_right[0]) / 2, (self.top_left[1] + self.bottom_right[1]) / 2])

# 确保 self.royal_rect_points 是一个 NumPy 数组

self.royal_rect_points = np.array([self.top_left, self.top_right, self.bottom_right, self.bottom_left], dtype=np.int32)
self.royal_rect_points = self.royal_rect_points.reshape((-1, 1, 2))

# 计算旋转矩阵的宽度和高度
self.width = max(self.distance(self.top_left, self.top_right), self.distance(self.bottom_left, self.bottom_right))
self.height = max(self.distance(self.top_left, self.bottom_left), self.distance(self.top_right, self.bottom_right))

#绘制出当前矩形
cv2.drawContours(frame, [box], 0, (0, 255, 0), 2)
# 定义顺序,最左上角开始编号
square_order = [
    (0, 0), (0, 1), (0, 2),
    (1, 0), (1, 1), (1, 2),
    (2, 0), (2, 1), (2, 2)
]
9.使用Hough圆变换来检测圆形(1033行)-
调节param2值,值越小,越容易识别
original_circles = cv2.HoughCircles(edges, cv2.HOUGH_GRADIENT, dp=1, minDist=20, param1=50, param2=20, minRadius=20, maxRadius=50)
加入限定面积大小的条件,再滤一些圆
for i in circles:
    center = (i[0] + left, i[1])  # 仅对x坐标添加偏移量
    radius = i[2]

    # 检查圆的面积是否在指定范围内
    if np.pi * (radius ** 2) < 5000:  # 可根据需要调整此值
    # 后面对圆做处理
10.根据获得的圆形,进行颜色判定,决定黑白棋子(1089行)
# 获取棋子中心点的颜色
color = frame[center[1], center[0]]
# 打印棋子的颜色值
#print(f"棋子中心 ({center[0]}, {center[1]}) 的颜色值: BGR({color[0]}, {color[1]}, {color[2]})")

# 掩模清空
self.white_mask = None

# 生成白色和黑色掩模
self.white_mask = cv2.inRange(frame, self.white_lower, self.white_upper)
self.black_mask = cv2.inRange(frame, self.black_lower, self.black_upper)


# 检查掩模中该位置的像素值
if self.white_mask[center[1], center[0]] > 0:
    white_count += 1

    circle_color = (0, 0, 0)  # 黑色
    center_color = (0, 0, 0)  # 黑色
elif self.black_mask[center[1], center[0]] > 0:
    black_count += 1

    circle_color = (255, 255, 255)  # 白色
    center_color = (255, 255, 255)  # 白色
else:

        continue  # 如果不匹配任何颜色范围,则跳过
滤除靠近矩阵内的杂圆,通过cv2.pointPolygonTest函数判断圆是否在大矩阵外面。(1120行)
pt = (float(center[0]), float(center[1]))  # 使用元组表示点的坐标
circle_in_square = True # 重置参数,用于后面画圆判别条件
yuan_point_position = cv2.pointPolygonTest(self.royal_rect_points, pt, False)

# 打印结果
if yuan_point_position > 0:
    # print(f"圆 {i} 在矩形内部")
    count_yuan_in += 1

elif yuan_point_position == 0:
    # print(f"圆 {i} 在矩形边界上")
    p = 0
    #不做处理
else:
    # print(f"圆 {i} 在矩形外部")
    count_yuan_out += 1
    if self.white_mask[center[1], center[0]] > 0:
        count_yuan_out_White += 1
    elif self.black_mask[center[1], center[0]] > 0:
        count_yuan_out_Black += 1
    circle_in_square = False
11.矩阵外的黑白棋子识别效果很好,但是矩阵内圆识别非常的乱-
1.同一个矩形可能同时判别到多个圆-
2.多个圆有时候颜色是不同的-
3.大矩形内的圆识别效果非常差,处理很多帧,往往只有一帧识别到(通过打印九宫格状态观察)-
视频中进行失败方案列举,此处不展示。
最终解决方案-
根据各方格内接圆的平均阈值判别黑白无棋三种状态。-
面对现场调试方案,平均阈值取值由一开始的界面按钮调试来决定,先摆放若干黑白棋子,点击9个按钮至对应状态,点击未存按钮至保存即可,self.test_jiugongge数组为一开始调试的九宫格子状态(0,1,2分别代表无,黑,白),self.jiugongge数组存储为判别得到的最终九宫格子状态
计算内接圆颜色平均值
# 计算每个内接圆的颜色平均值
mask = np.zeros((height, width), np.uint8)
center_int = tuple(center.astype(int))
radius_int = int(self.neijie_radius)
cv2.circle(mask, center_int, radius_int, 1, thickness=-1) #画出内接圆

average_color = cv2.mean(frame, mask=mask)[:3]
self.average_colors.append(average_color)
根据预设格子信息得到对应的颜色判别阈值
# 判断每个内接圆是否有棋子,以及棋子的颜色
# 通过self.test_jiugongge[]数组,调试无,黑,白的阈值部分
# # 筛选self.test_jiugongge[]数值中为1的格子
# selected_squares = [center for center, value in zip(self.squares_center, self.test_jiugongge) if value == 1]

# 得到这些格子的average_color[1]和average_color[2]数值
black_selected_colors = [(average_color[1], average_color[2]) for average_color, value in zip(self.average_colors, self.test_jiugongge) if value == 1]
if(self.save_yuzhi == 0):
    # 计算 average_color[1] 和 average_color[2] 的总和
    black_sum_1 = sum(black_color[0] for black_color in black_selected_colors)
    black_sum_2 = sum(black_color[1] for black_color in black_selected_colors)

    # 计算 average_color[1] 和 average_color[2] 的平均值
    black_average_value_1 = black_sum_1 / len(black_selected_colors) if black_selected_colors else 0
    black_average_value_2 = black_sum_2 / len(black_selected_colors) if black_selected_colors else 0

    # 计算 average_color[1] 和 average_color[2] 的最大值
    self.black_max_value_1 = max(black_color[0] for black_color in black_selected_colors) if black_selected_colors else 0
    self.black_max_value_2 = max(black_color[1] for black_color in black_selected_colors) if black_selected_colors else 0
根据阈值判定棋子颜色
for p, average_color in enumerate(self.average_colors):
    # 白棋赋值
    if average_color[0] > self.white_min_value_1 - 20 and average_color[1] > self.white_min_value_2 - 20:
        self.jiugongge[p] = 2
    # 黑棋赋值
    elif average_color[1] < self.black_max_value_1 + 20 and average_color[2] < self.black_max_value_2 + 20:
        self.jiugongge[p] = 1
    else:
        # if(self.jiaodu < 0):
        self.jiugongge[p] = 0
格子预设调试界面编写在界面初始化那一块,内容比较繁杂,这里不专门放了,代码64行开始。
棋子博弈算法部分(1398行)
def check_win(self, jiugongge):
    win_conditions = [
        (0, 1, 2), (3, 4, 5), (6, 7, 8),  # 行
        (0, 3, 6), (1, 4, 7), (2, 5, 8),  # 列
        (0, 4, 8), (2, 4, 6)  # 对角线
    ]
    for a, b, c in win_conditions:
        if jiugongge[a] == jiugongge[b] == jiugongge[c] != 0:
            return jiugongge[a]
    if 0 not in jiugongge:
        return 0
    return -1

def evaluate(self, jiugongge):
    winner = self.check_win(jiugongge)
    if winner == self.zhixing:
        return 10
    elif winner == 3 - self.zhixing:
        return -10

    score = 0
    for (a, b, c) in [(0, 1, 2), (3, 4, 5), (6, 7, 8), (0, 3, 6), (1, 4, 7), (2, 5, 8), (0, 4, 8), (2, 4, 6)]:
        line = [jiugongge[a], jiugongge[b], jiugongge[c]]
        if line.count(self.zhixing) == 2 and line.count(0) == 1:
            score += 5
        if line.count(3 - self.zhixing) == 2 and line.count(0) == 1:
            score -= 4

    return score

def minimax(self, jiugongge, depth, alpha, beta, is_maximizing):
    score = self.evaluate(jiugongge)
    if score == 10 or score == -10:
        return score
    if 0 not in jiugongge:
        return 0

    if is_maximizing:
        best = -float('inf')
        for i in range(9):
            if jiugongge[i] == 0:
                jiugongge[i] = self.zhixing
                best = max(best, self.minimax(jiugongge, depth + 1, alpha, beta, False))
                jiugongge[i] = 0
                alpha = max(alpha, best)
                if beta <= alpha:
                    break
        return best
    else:
        best = float('inf')
        for i in range(9):
            if jiugongge[i] == 0:
                jiugongge[i] = 3 - self.zhixing
                best = min(best, self.minimax(jiugongge, depth + 1, alpha, beta, True))
                jiugongge[i] = 0
                beta = min(beta, best)
                if beta <= alpha:
                    break
        return best

def find_best_move(self, jiugongge):
    best_val = -float('inf')
    self.move = -1

    for i in range(9):
        if jiugongge[i] == 0:
            jiugongge[i] = self.zhixing
            move_val = self.minimax(jiugongge, 0, -float('inf'), float('inf'), False)
            jiugongge[i] = 0

            if move_val > best_val or (move_val == best_val and i == 4):
                self.move = i
                best_val = move_val

    return self.move
其他过程以及UI界面设计不进行详细说明,自行查阅吧。此代码工程只是本人的新手学习记录过程,并不是很专业的项目,有错勿喷。开源代码已经上传到附件中,可自行下载阅览,若有细节疑问,可看讲解视频或评论区留言。-
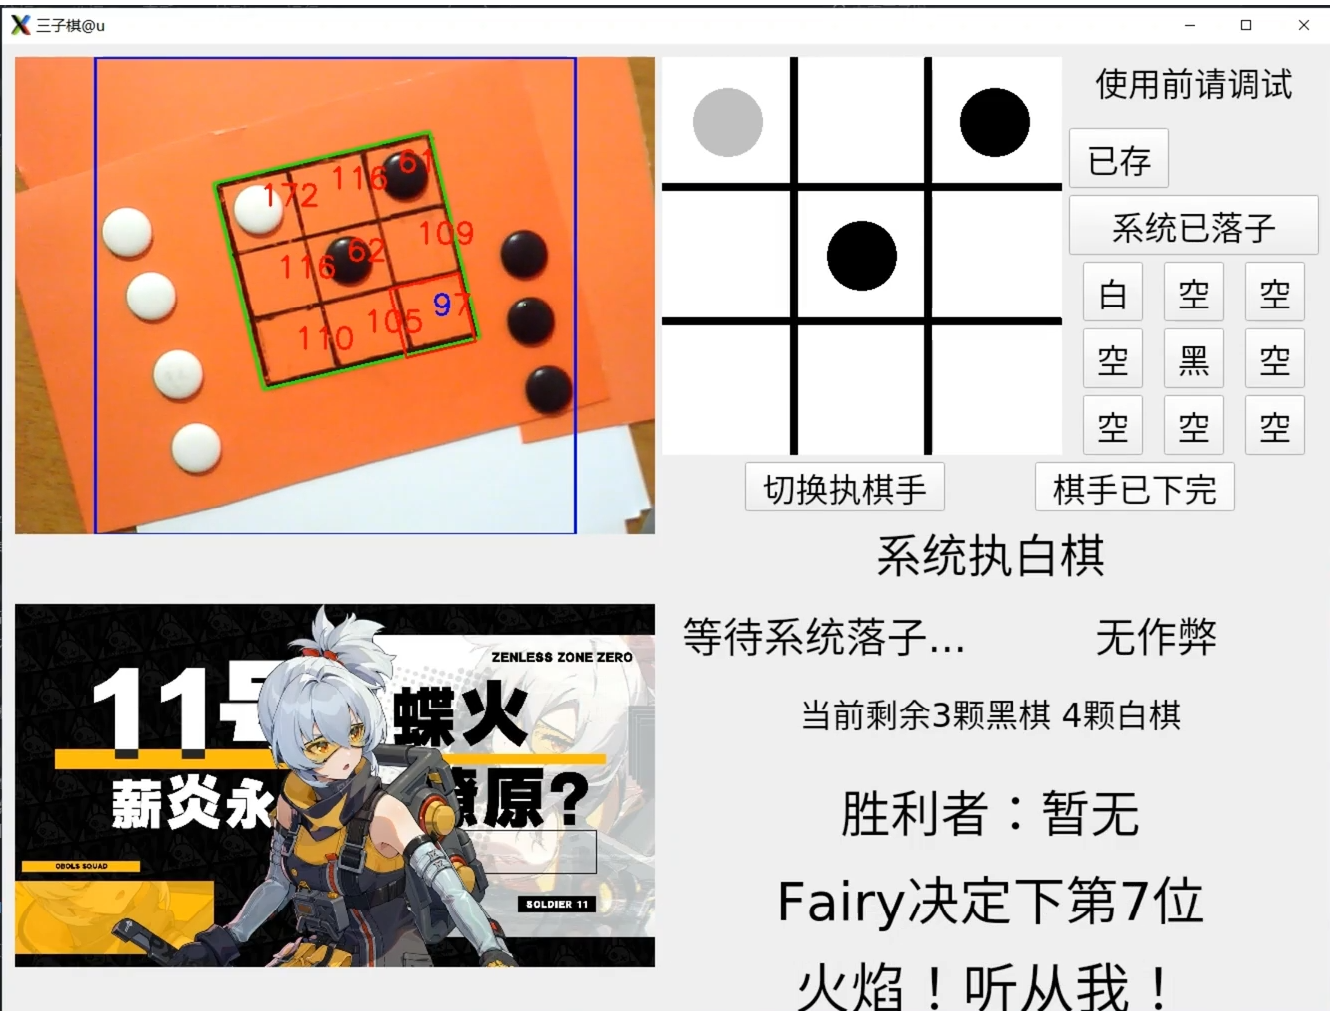
实际效果,视频中更详细。-