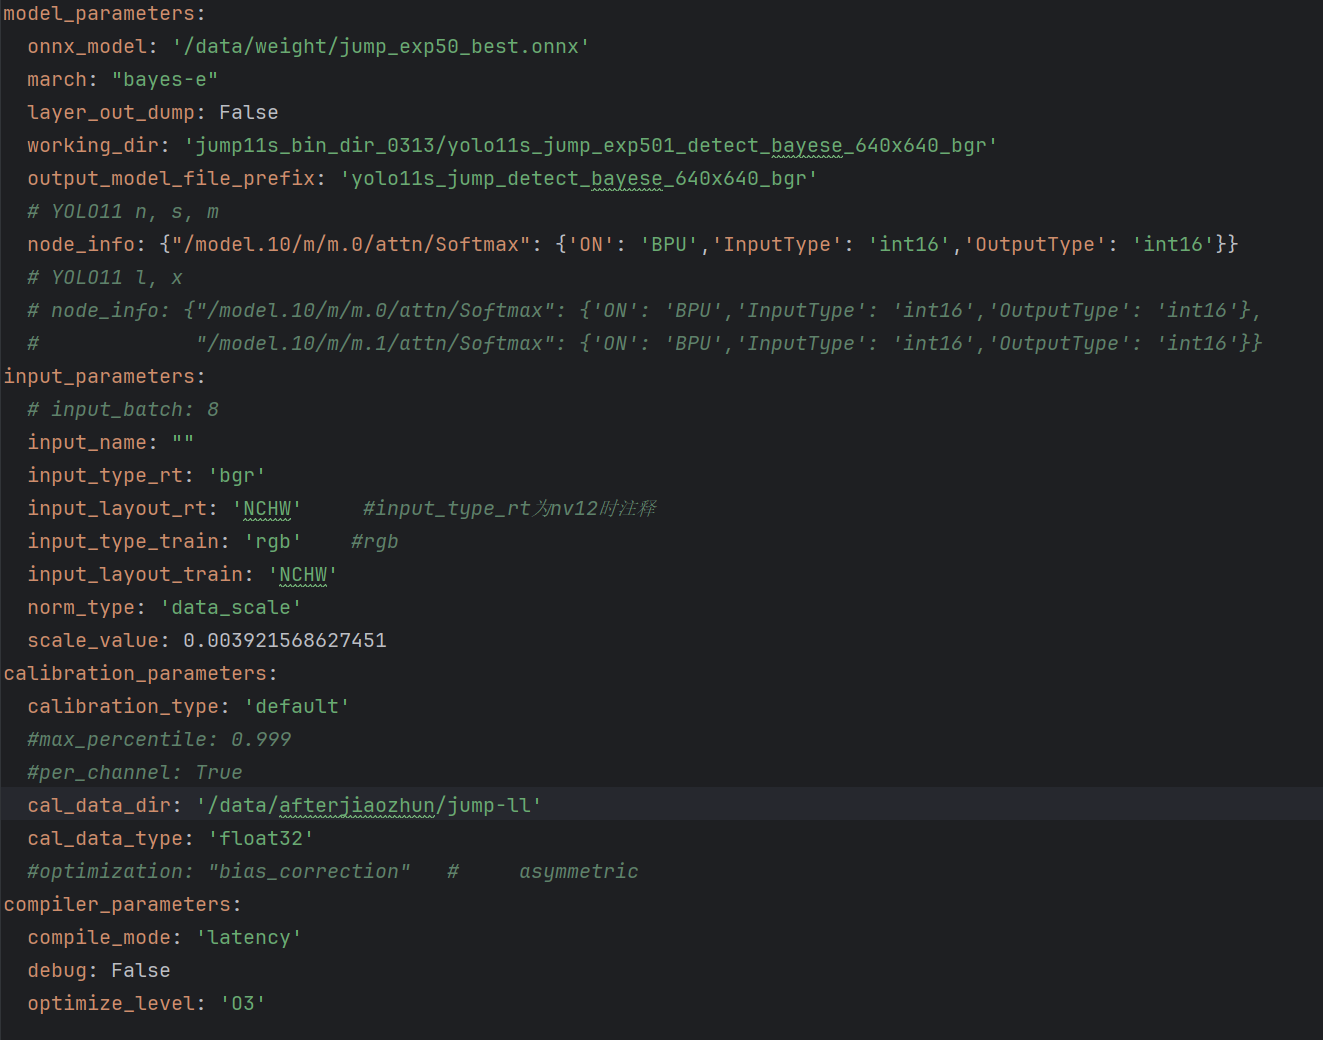
自己训练的yolo11模型,使用以下配置参数进行量化,量化后的quantized_model.onnx和原模型基本对齐,但是bin文件无法对齐,表现为推理同一个视频,bin几乎检测不到目标
以下为bin文件推理视频的代码,请问是哪里有错误。
#!/user/bin/env python
Copyright (c) 2024,WuChao D-Robotics.
Licensed under the Apache License, Version 2.0 (the “License”);
you may not use this file except in compliance with the License.
You may obtain a copy of the License at
http://www.apache.org/licenses/LICENSE-2.0
Unless required by applicable law or agreed to in writing, software
distributed under the License is distributed on an “AS IS” BASIS,
WITHOUT WARRANTIES OR CONDITIONS OF ANY KIND, either express or implied.
See the License for the specific language governing permissions and
limitations under the License.
注意: 此程序在RDK板端端运行
Attention: This program runs on RDK board.
import os
import cv2
import numpy as np
scipy
try:
from scipy.special import softmax
except:
print(“scipy is not installed, installing.”)
os.system(“pip install scipy”)
from scipy.special import softmax
hobot_dnn
try:
try:
from hobot_dnn import pyeasy_dnn as dnn # BSP Python API
except:
from hobot_dnn_rdkx5 import pyeasy_dnn as dnn # BSP Python API from PyPI
except:
print(“pip install hobot-dnn-rdkx5”)
from hobot_dnn_rdkx5 import pyeasy_dnn as dnn
from time import time
import argparse
import logging
日志模块配置
logging configs
logging.basicConfig(
level = logging.DEBUG,
format = ‘[%(name)s] [%(asctime)s.%(msecs)03d] [%(levelname)s] %(message)s’,
datefmt=‘%H:%M:%S’)
logger = logging.getLogger(“RDK_YOLO”)
def main():
parser = argparse.ArgumentParser()
parser.add_argument(‘–model-path’, type=str, default=‘ktx/jump/yolo11s_jump_exp39_detect_bayese_640x640_bgr.bin’,
help=“”“Path to BPU Quantized *.bin Model.
RDK X3(Module): Bernoulli2.
RDK Ultra: Bayes.
RDK X5(Module): Bayes-e.
RDK S100: Nash-e.
RDK S100P: Nash-m.”“”)
parser.add_argument(‘–test-img’, type=str, default=‘test/bk.jpg’, help=‘Path to Load Test Image.’)
parser.add_argument(‘–test-video’, type=str, default=‘test/2s.mp4’, help=‘Path to Load Test Video (if empty, process image).’)
parser.add_argument(‘–img-save-path’, type=str, default=‘res/bk.jpg’, help=‘Path to Save Result Image.’)
parser.add_argument(‘–video-save-path’, type=str, default=‘res/2s.mp4’, help=‘Path to Save Result Video.’)
parser.add_argument(‘–classes-num’, type=int, default=2, help=‘Classes Num to Detect.’)
parser.add_argument(‘–nms-thres’, type=float, default=0.5, help=‘IoU threshold.’)
parser.add_argument(‘–score-thres’, type=float, default=0.2, help=‘confidence threshold.’)
parser.add_argument(‘–reg’, type=int, default=16, help=‘DFL reg layer.’)
parser.add_argument(‘–strides’, type=lambda s: list(map(int, s.split(‘,’))),
default=[8, 16 ,32],
help=‘–strides 8, 16, 32’)
opt = parser.parse_args()
logger.info(opt)
# quick demo (注释掉NV12模型的自动下载,避免干扰BGR模型)
# if not os.path.exists(opt.model_path):
#     print(f"file {opt.model_path} does not exist. downloading ...")
#     os.system("wget -c https://archive.d-robotics.cc/downloads/rdk_model_zoo/rdk_x5/ultralytics_YOLO/yolov13n_detect_bayese_640x640_nv12.bin")
#     opt.model_path = 'yolov13n_detect_bayese_640x640_nv12.bin'

# 实例化
model = Ultralytics_YOLO_Detect_Bayese_BGR(
    model_path=opt.model_path,
    classes_num=opt.classes_num,   # default: 80
    nms_thres=opt.nms_thres,       # default: 0.7
    score_thres=opt.score_thres,   # default: 0.25
    reg=opt.reg,                   # default: 16
    strides=opt.strides            # default: [8, 16, 32]
    )

# 判断处理视频还是图片
if opt.test_video and os.path.exists(opt.test_video):
    # 处理视频
    process_video(model, opt)
else:
    # 处理图片(原有逻辑)
    # 读图
    img = cv2.imread(opt.test_img)
    if img is None:
        raise ValueError(f"Load image failed: {opt.test_img}")
        exit()
    # 准备输入数据
    input_tensor = model.preprocess_bgr(img)
    # 推理
    outputs = model.c2numpy(model.forward(input_tensor))
    # 后处理
    results = model.postProcess(outputs)
    # 渲染
    logger.info("\033[1;32m" + "Draw Results: " + "\033[0m")
    for class_id, score, x1, y1, x2, y2 in results:
        logger.info("(%d, %d, %d, %d) -> %s: %.2f"%(x1,y1,x2,y2, coco_names[class_id], score))
        draw_detection(img, (x1, y1, x2, y2), score, class_id)
    # 保存结果
    cv2.imwrite(opt.img_save_path, img)
    logger.info("\033[1;31m" + f"saved in path: \"./{opt.img_save_path}\"" + "\033[0m")
def process_video(model, opt):
“”"
处理视频推理的函数
“”"
打开视频文件
cap = cv2.VideoCapture(opt.test_video)
if not cap.isOpened():
raise ValueError(f"Load video failed: {opt.test_video}")
# 获取视频基本信息
fps = int(cap.get(cv2.CAP_PROP_FPS))
width = int(cap.get(cv2.CAP_PROP_FRAME_WIDTH))
height = int(cap.get(cv2.CAP_PROP_FRAME_HEIGHT))
total_frames = int(cap.get(cv2.CAP_PROP_FRAME_COUNT))

logger.info(f"Video info - FPS: {fps}, Width: {width}, Height: {height}, Total frames: {total_frames}")

# 创建视频写入器
fourcc = cv2.VideoWriter_fourcc(*'mp4v')
os.makedirs(os.path.dirname(opt.video_save_path), exist_ok=True)
out = cv2.VideoWriter(opt.video_save_path, fourcc, fps, (width, height))

frame_count = 0
total_infer_time = 0

# 逐帧处理
while cap.isOpened():
    ret, frame = cap.read()
    if not ret:
        break

    frame_count += 1
    logger.info(f"\033[1;34mProcessing frame {frame_count}/{total_frames}\033[0m")

    # 推理计时开始
    infer_start = time()

    # 预处理(BGR格式)
    input_tensor = model.preprocess_bgr(frame)
    # 推理
    outputs = model.c2numpy(model.forward(input_tensor))
    # 后处理
    results = model.postProcess(outputs)

    # 推理计时结束
    infer_time = time() - infer_start
    total_infer_time += infer_time
    logger.info(f"Frame {frame_count} inference time: {infer_time*1000:.2f} ms")

    # 绘制检测结果
    for class_id, score, x1, y1, x2, y2 in results:
        logger.info("(%d, %d, %d, %d) -> %s: %.2f"%(x1,y1,x2,y2, coco_names[class_id], score))
        draw_detection(frame, (x1, y1, x2, y2), score, class_id)

    # 写入结果帧
    out.write(frame)

# 释放资源
cap.release()
out.release()

# 计算平均推理时间
avg_infer_time = total_infer_time / frame_count if frame_count > 0 else 0
logger.info("\033[1;32m" + "="*50 + "\033[0m")
logger.info(f"Video processing completed! Total frames: {frame_count}")
logger.info(f"Average inference time per frame: {avg_infer_time*1000:.2f} ms")
logger.info(f"Average FPS: {1/avg_infer_time:.2f}" if avg_infer_time > 0 else "Average FPS: N/A")
logger.info(f"Result video saved to: {opt.video_save_path}")
logger.info("\033[1;32m" + "="*50 + "\033[0m")
class Ultralytics_YOLO_Detect_Bayese_BGR():
def init(self, model_path, classes_num, nms_thres, score_thres, reg, strides):
加载BPU的bin模型, 打印相关参数
Load the quantized *.bin model and print its parameters
try:
begin_time = time()
self.quantize_model = dnn.load(model_path)
input_info = self.quantize_model[0].inputs[0]
logger.info(f"模型输入 dtype: {input_info.properties.dtype}") # 查看是uint8/float32
logger.info(f"模型输入 shape: {input_info.properties.shape}") # 查看是否为NCHW
logger.debug("\033[1;31m" + "Load D-Robotics Quantize model time = %.2f ms"%(1000*(time() - begin_time)) + "\033[0m")
except Exception as e:
logger.error("❌ Failed to load model file: %s"%(model_path))
logger.error("You can download the model file from the following docs: ./models/download.md")
logger.error(e)
exit(1)
logger.info("\033[1;32m" + "-> input tensors" + "\033[0m")
for i, quantize_input in enumerate(self.quantize_model[0].inputs):
logger.info(f"intput[{i}], name={quantize_input.name}, type={quantize_input.properties.dtype}, shape={quantize_input.properties.shape}")
logger.info("\033[1;32m" + "-> output tensors" + "\033[0m")
for i, quantize_input in enumerate(self.quantize_model[0].outputs):
logger.info(f"output[{i}], name={quantize_input.name}, type={quantize_input.properties.dtype}, shape={quantize_input.properties.shape}")
# init
self.REG = reg
self.CLASSES_NUM = classes_num
self.SCORE_THRESHOLD = score_thres
self.NMS_THRESHOLD = nms_thres
self.CONF_THRES_RAW = -np.log(1/self.SCORE_THRESHOLD - 1)
self.input_H, self.input_W = self.quantize_model[0].inputs[0].properties.shape[2:4]
self.strides = strides
logger.info(f"{self.REG = }, {self.CLASSES_NUM = }")
logger.info("SCORE_THRESHOLD = %.2f, NMS_THRESHOLD = %.2f"%(self.SCORE_THRESHOLD, self.NMS_THRESHOLD))
logger.info("CONF_THRES_RAW = %.2f"%self.CONF_THRES_RAW)
logger.info(f"{self.input_H = }, {self.input_W = }")
logger.info(f"{self.strides = }")
# DFL求期望的系数, 只需要生成一次
# DFL calculates the expected coefficients, which only needs to be generated once.
self.weights_static = np.array([i for i in range(reg)]).astype(np.float32)[np.newaxis, np.newaxis, :]
logger.info(f"{self.weights_static.shape = }")
# anchors, 只需要生成一次
self.grids = []
for stride in self.strides:
assert self.input_H % stride == 0, f"{stride=}, {self.input_H=}: input_H % stride != 0"
assert self.input_W % stride == 0, f"{stride=}, {self.input_W=}: input_W % stride != 0"
grid_H, grid_W = self.input_H // stride, self.input_W // stride
self.grids.append(np.stack([np.tile(np.linspace(0.5, grid_H-0.5, grid_H), reps=grid_H),
np.repeat(np.arange(0.5, grid_W+0.5, 1), grid_W)], axis=0).transpose(1,0))
logger.info(f"{self.grids[-1].shape = }")
def preprocess_bgr(self, img):
"""
BGR格式模型的预处理函数(替换原NV12预处理)
适配量化配置:
input_type_rt: 'bgr'
input_layout_rt: 'NCHW'
norm_type: 'data_scale'
scale_value: 0.003921568627451 (1/255)
"""
RESIZE_TYPE = 0
LETTERBOX_TYPE = 1
PREPROCESS_TYPE = LETTERBOX_TYPE
logger.info(f"PREPROCESS_TYPE = {PREPROCESS_TYPE}")
begin_time = time()
self.img_h, self.img_w = img.shape[0:2]
if PREPROCESS_TYPE == RESIZE_TYPE:
# 直接resize为模型输入尺寸(BGR格式)
input_tensor = cv2.resize(img, (self.input_W, self.input_H), interpolation=cv2.INTER_NEAREST)
self.y_scale = 1.0 * self.input_H / self.img_h
self.x_scale = 1.0 * self.input_W / self.img_w
self.y_shift = 0
self.x_shift = 0
logger.info("\033[1;31m" + f"pre process(resize) time = {1000*(time() - begin_time):.2f} ms" + "\033[0m")
elif PREPROCESS_TYPE == LETTERBOX_TYPE:
# letterbox缩放(保持BGR格式)
self.x_scale = min(1.0 * self.input_H / self.img_h, 1.0 * self.input_W / self.img_w)
self.y_scale = self.x_scale
if self.x_scale <= 0 or self.y_scale <= 0:
raise ValueError("Invalid scale factor.")
new_w = int(self.img_w * self.x_scale)
self.x_shift = (self.input_W - new_w) // 2
x_other = self.input_W - new_w - self.x_shift
new_h = int(self.img_h * self.y_scale)
self.y_shift = (self.input_H - new_h) // 2
y_other = self.input_H - new_h - self.y_shift
input_tensor = cv2.resize(img, (new_w, new_h))
#print('aaaaaaaaaaaaaa', input_tensor)
input_tensor = cv2.copyMakeBorder(input_tensor, self.y_shift, y_other, self.x_shift, x_other, cv2.BORDER_CONSTANT, value=[127, 127, 127])
#print('bbbbbbbbbbbbbb', input_tensor)
logger.info("\033[1;31m" + f"pre process(letter box) time = {1000*(time() - begin_time):.2f} ms" + "\033[0m")
else:
logger.error(f"illegal PREPROCESS_TYPE = {PREPROCESS_TYPE}")
exit(-1)
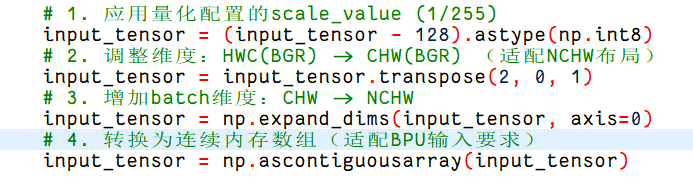
# 1. 应用量化配置的scale_value (1/255)
#input_tensor = input_tensor.astype(np.float32) * 0.003921568627451
input_tensor = input_tensor.astype(np.uint8)
input_tensor = cv2.cvtColor(input_tensor, cv2.COLOR_BGR2RGB)
# 2. 调整维度:HWC(BGR) -> CHW(BGR) (适配NCHW布局)
input_tensor = input_tensor.transpose(2, 0, 1)
#print('1111111111111', input_tensor)
# 3. 增加batch维度:CHW -> NCHW
input_tensor = np.expand_dims(input_tensor, axis=0)
#print('2222222222222', input_tensor)
# 4. 转换为连续内存数组(适配BPU输入要求)
input_tensor = np.ascontiguousarray(input_tensor)
logger.info(f"预处理后 - 形状: {input_tensor.shape}, 类型: {input_tensor.dtype}, 均值: {np.mean(input_tensor):.4f}, 最大: {np.max(input_tensor):.4f}, 最小: {np.min(input_tensor):.4f}")
logger.debug("\033[1;31m" + f"pre process total time = {1000*(time() - begin_time):.2f} ms" + "\033[0m")
logger.info(f"y_scale = {self.y_scale:.2f}, x_scale = {self.x_scale:.2f}")
logger.info(f"y_shift = {self.y_shift:.2f}, x_shift = {self.x_shift:.2f}")
return input_tensor
def forward(self, input_tensor):
begin_time = time()
quantize_outputs = self.quantize_model[0].forward(input_tensor)
logger.debug("\033[1;31m" + f"forward time = {1000*(time() - begin_time):.2f} ms" + "\033[0m")
return quantize_outputs
def c2numpy(self, outputs):
begin_time = time()
outputs = [dnnTensor.buffer for dnnTensor in outputs]
logger.debug("\033[1;31m" + f"c to numpy time = {1000*(time() - begin_time):.2f} ms" + "\033[0m")
return outputs
def postProcess(self, outputs):
begin_time = time()
# reshape
clses = [outputs[0].reshape(-1, self.CLASSES_NUM), outputs[2].reshape(-1, self.CLASSES_NUM), outputs[4].reshape(-1, self.CLASSES_NUM)]
bboxes = [outputs[1].reshape(-1, self.REG * 4), outputs[3].reshape(-1, self.REG * 4), outputs[5].reshape(-1, self.REG * 4)]
dbboxes, ids, scores = [], [], []
for cls, bbox, stride, grid in zip(clses, bboxes, self.strides, self.grids):
# score 筛选
max_scores = np.max(cls, axis=1)
bbox_selected = np.flatnonzero(max_scores >= self.CONF_THRES_RAW)
ids.append(np.argmax(cls[bbox_selected, : ], axis=1))
# 3个Classify分类分支:Sigmoid计算
scores.append(1 / (1 + np.exp(-max_scores[bbox_selected])))
# dist2bbox (ltrb2xyxy)
ltrb_selected = np.sum(softmax(bbox[bbox_selected,:].reshape(-1, 4, self.REG), axis=2) * self.weights_static, axis=2)
grid_selected = grid[bbox_selected, :]
x1y1 = grid_selected - ltrb_selected[:, 0:2]
x2y2 = grid_selected + ltrb_selected[:, 2:4]
dbboxes.append(np.hstack([x1y1, x2y2]) * stride)
dbboxes = np.concatenate((dbboxes), axis=0)
scores = np.concatenate((scores), axis=0)
ids = np.concatenate((ids), axis=0)
hw = (dbboxes[:,2:4] - dbboxes[:,0:2])
xyhw2 = np.hstack([dbboxes[:,0:2], hw])
# 分类别nms
results = []
for i in range(self.CLASSES_NUM):
id_indices = ids==i
indices = cv2.dnn.NMSBoxes(xyhw2[id_indices,:], scores[id_indices], self.SCORE_THRESHOLD, self.NMS_THRESHOLD)
if len(indices) == 0:
continue
for indic in indices:
x1, y1, x2, y2 = dbboxes[id_indices,:][indic]
x1 = int((x1 - self.x_shift) / self.x_scale)
y1 = int((y1 - self.y_shift) / self.y_scale)
x2 = int((x2 - self.x_shift) / self.x_scale)
y2 = int((y2 - self.y_shift) / self.y_scale)
x1 = x1 if x1 > 0 else 0
x2 = x2 if x2 > 0 else 0
y1 = y1 if y1 > 0 else 0
y2 = y2 if y2 > 0 else 0
x1 = x1 if x1 < self.img_w else self.img_w
x2 = x2 if x2 < self.img_w else self.img_w
y1 = y1 if y1 < self.img_h else self.img_h
y2 = y2 if y2 < self.img_h else self.img_h
results.append((i, scores[id_indices][indic], x1, y1, x2, y2))
logger.debug("\033[1;31m" + f"Post Process time = {1000*(time() - begin_time):.2f} ms" + "\033[0m")
return results
coco_names = [
“person”, “head”
]
rdk_colors = [
(56, 56, 255), (151, 157, 255), (31, 112, 255), (29, 178, 255),(49, 210, 207), (10, 249, 72), (23, 204, 146), (134, 219, 61),
(52, 147, 26), (187, 212, 0), (168, 153, 44), (255, 194, 0),(147, 69, 52), (255, 115, 100), (236, 24, 0), (255, 56, 132),
(133, 0, 82), (255, 56, 203), (200, 149, 255), (199, 55, 255)]
def draw_detection(img, bbox, score, class_id) → None:
“”"
Draws a detection bounding box and label on the image.
Parameters:
    img (np.array): The input image.
    bbox (tuple[int, int, int, int]): A tuple containing the bounding box coordinates (x1, y1, x2, y2).
    score (float): The detection score of the object.
    class_id (int): The class ID of the detected object.
"""
x1, y1, x2, y2 = bbox
color = rdk_colors[class_id%20]
cv2.rectangle(img, (x1, y1), (x2, y2), color, 2)
label = f"{coco_names[class_id]}: {score:.2f}"
(label_width, label_height), _ = cv2.getTextSize(label, cv2.FONT_HERSHEY_SIMPLEX, 0.5, 1)
label_x, label_y = x1, y1 - 10 if y1 - 10 > label_height else y1 + 10
cv2.rectangle(
    img, (label_x, label_y - label_height), (label_x + label_width, label_y + label_height), color, cv2.FILLED
)
cv2.putText(img, label, (label_x, label_y), cv2.FONT_HERSHEY_SIMPLEX, 0.5, (0, 0, 0), 1, cv2.LINE_AA)
if name == “main”:
main()