onnx转换bin时,多输入校准有问题

2026-04-14 11:41:36,279 INFO First calibration picture md5:
51f674dd7319317f7eff584dd361ae4b /data/workspace/gai/calibration_data/image/20251202A1-5405.rgbchw
2026-04-14 11:41:36,303 INFO *******************************************
2026-04-14 11:41:36,308 ERROR list index out of range

我是多输入的校准数据,一个图片特征,一个手工特征,尝试了各种方法都卡到了这一步。

我来帮你排查这个多输入校准的问题。先搜索一下社区是否有类似案例。

问题分析

你的错误 list index out of range 是因为多输入模型在校准数据加载时,工具链对非图像类输入(手工特征)的处理逻辑有问题

从日志看:

2026-04-14 11:41:36,279 INFO First calibration picture md5: 51f674dd7319317f7eff584dd361ae4b  /data/workspace/gai/calibration_data/image/20251202A1-5405.rgbchw
2026-04-14 11:41:36,303 ERROR list index out of range

工具链在尝试加载第一个校准数据后就崩溃了,这通常发生在多输入模型的校准数据配置或预处理脚本有问题时。

解决方案

步骤 1:检查 YAML 配置

确保你的 YAML 文件中 calibration_parameters 配置正确:

calibration_parameters:
  cal_data_dir: './calibration_data/image;./calibration_data/feature'  # 两个输入目录
  cal_data_type: 'uint8;float32'  # 图像用 uint8,手工特征用 float32
  calibration_type: 'default'
  cal_data_num: 100  # 校准数据数量

input_parameters:
  input_name: 'input_img;input_feature'  # 两个输入名称
  input_type_rt: 'rgb;featuremap'  # 图像输入用 rgb/gray,特征输入用 featuremap
  input_type_train: 'rgb;featuremap'
  # 如果输入不是标准图像格式,不要用 gray/bgr/rgb,用 featuremap

步骤 2:校准数据格式要求

对于多输入模型

  1. 图像输入:可以是 .gray.rgb.feature 等格式
  2. 非图像输入(手工特征)必须使用 .feature 后缀,且数据要扁平化为 1D 数组

检查你的校准数据:

# 图像输入校准数据
ls -lh calibration_data/image/
# 应该是:xxxxx.gray 或 xxxxx.feature,大小正确

# 手工特征校准数据  
ls -lh calibration_data/feature/
# 应该是:xxxxx.feature,大小 = 特征维度 * 4 (float32)

步骤 3:修改预处理脚本

如果是非标准输入,需要在 02_preprocess.sh 中正确处理:

# 对于图像输入
python preprocess_image.py --input_dir ./raw_images \
                           --output_dir ./calibration_data/image \
                           --ext .feature \
                           --target_size "1,H,W" \
                           --dtype float32

# 对于手工特征输入
python preprocess_feature.py --input_dir ./raw_features \
                             --output_dir ./calibration_data/feature \
                             --ext .feature \
                             --dtype float32

步骤 4:关键配置项

如果手工特征不是图像数据,必须设置

input_parameters:
  input_type_rt: 'featuremap;featuremap'  # 两个都用 featuremap
  input_type_train: 'featuremap;featuremap'
  # 不要指定 input_layout,工具链会自动 skip

步骤 5:验证校准数据

在运行 hb_mapper 之前,先验证校准数据:

# 验证脚本
import numpy as np
import os

# 检查图像输入
img_files = sorted([f for f in os.listdir('calibration_data/image') if f.endswith('.feature')])
print(f"Image calibration files: {len(img_files)}")
for f in img_files[:3]:
    data = np.fromfile(f'calibration_data/image/{f}', dtype=np.float32)
    print(f"  {f}: shape={data.shape}, size={data.nbytes} bytes")

# 检查特征输入
feat_files = sorted([f for f in os.listdir('calibration_data/feature') if f.endswith('.feature')])
print(f"Feature calibration files: {len(feat_files)}")
for f in feat_files[:3]:
    data = np.fromfile(f'calibration_data/feature/{f}', dtype=np.float32)
    print(f"  {f}: shape={data.shape}, size={data.nbytes} bytes")

参考案例

社区有类似的多输入模型转换案例,可以参考:

快速排查清单

  1. 校准数据文件后缀是否为 .feature(非图像输入)
  2. input_type_rtinput_type_train 是否设置为 featuremap
  3. 校准数据数量是否一致(两个输入的校准文件数量要相同)
  4. 校准数据大小是否匹配模型输入 shape
  5. 是否去除了 input_layout 配置(featuremap 类型不需要)

如果以上都检查过了还是报错,请提供:

  • 完整的 YAML 配置文件
  • 模型输入 shape 信息(hb_checker 输出)
  • 校准数据目录结构和文件大小

这样我可以帮你更精准定位问题。

能否提供详细内容方便排查?详细的yaml,包括如何进行的预处理数据?

您好,这是详细的yaml。模型检查都通过了。

问题定位

根据你的 YAML 配置,我发现了3 个关键问题导致 list index out of range 错误:


:red_circle: 问题 1:featuremap 类型不应指定 layout

# ❌ 错误配置
input_layout_train: 'NCHW;NHWC'
input_layout_rt: 'NHWC;NHWC'

# ✅ 正确配置(featuremap 类型不需要 layout)
input_layout_train: 'NCHW;'  # 第二个留空
input_layout_rt: 'NHWC;'     # 第二个留空

原因:根据社区案例 topic/26680,当 input_type 设置为 featuremap 时,工具链会自动 skip layout 检查,但如果指定了 layout 会尝试访问第 4 维索引,而你的特征输入是 2 维 (1x157),导致 index out of range


:red_circle: 问题 2:校准数据目录配置不完整

# ❌ 当前配置(只有一个目录)
cal_data_dir: '/data/workspace/gai/calibration_data/image;/data/workspace/gai/calibration_data/features'

# ✅ 确保两个目录都存在且文件数量一致
cal_data_dir: './calibration_data/image;./calibration_data/features'
cal_data_type: 'uint8;float32'  # 图像用 uint8,特征用 float32

检查命令

# 验证两个目录的校准文件数量是否一致
ls calibration_data/image/*.gray | wc -l
ls calibration_data/features/*.feature | wc -l
# 两个数字必须相同!

:red_circle: 问题 3:特征校准数据格式

# ✅ 特征输入校准数据必须是 .feature 后缀,且是 float32 二进制
# 验证脚本
python3 << 'EOF'
import numpy as np
import os

feat_files = sorted([f for f in os.listdir('calibration_data/features') if f.endswith('.feature')])
print(f"特征校准文件数:{len(feat_files)}")

for f in feat_files[:3]:
    data = np.fromfile(f'calibration_data/features/{f}', dtype=np.float32)
    print(f"  {f}: shape={data.shape}, 期望=(157,), 匹配={data.shape == (157,)}")
EOF

:white_check_mark: 修正后的 YAML 配置

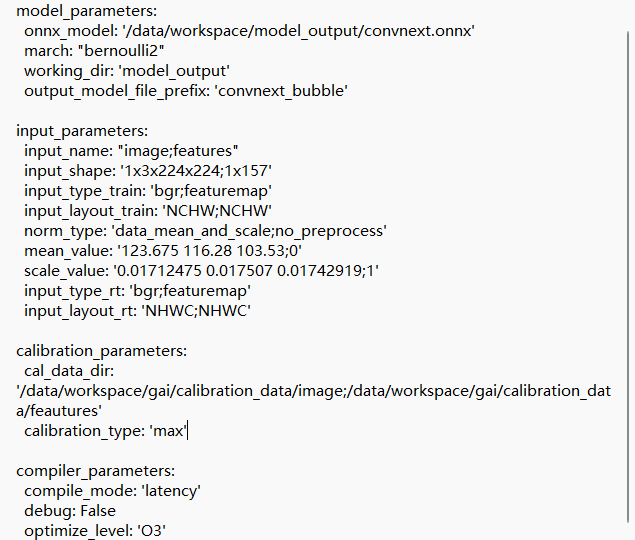
model_parameters:
  onnx_model: '/data/workspace/model_output/convnext.onnx'
  march: 'bernoulli2'
  working_dir: 'model_output'
  output_model_file_prefix: 'convnext_bubble'

input_parameters:
  input_name: 'image;features'
  input_shape: '1x3x224x224;1x157'
  input_type_train: 'bgr;featuremap'
  input_layout_train: 'NCHW;'          # ️ 第二个留空
  norm_type: 'data_mean_and_scale;no_preprocess'
  mean_value: '123.675 116.28 103.53;0'
  scale_value: '0.01712475 0.017507 0.01742919;1'
  input_type_rt: 'bgr;featuremap'
  input_layout_rt: 'NHWC;'             # ⚠️ 第二个留空

calibration_parameters:
  cal_data_dir: './calibration_data/image;./calibration_data/features'
  cal_data_type: 'uint8;float32'
  calibration_type: 'max'
  cal_data_num: 100                    # ️ 建议明确指定数量

compiler_parameters:
  compile_mode: 'latency'
  debug: False
  optimize_level: 'O3'

:wrench: 预处理脚本参考

# 02_preprocess.sh - 图像输入
python preprocess_image.py --input_dir ./raw_images \
                           --output_dir ./calibration_data/image \
                           --ext .gray \
                           --target_size "224,224" \
                           --dtype uint8

# 特征输入(手工特征)
python preprocess_feature.py --input_dir ./raw_features \
                             --output_dir ./calibration_data/features \
                             --ext .feature \
                             --dtype float32
# preprocess_feature.py 示例
import numpy as np
import os

raw_dir = './raw_features'
out_dir = './calibration_data/features'
os.makedirs(out_dir, exist_ok=True)

for i, f in enumerate(sorted(os.listdir(raw_dir))):
    # 读取你的手工特征(假设是 157 维向量)
    feat = np.load(f'{raw_dir}/{f}').flatten().astype(np.float32)
    assert feat.shape == (157,), f"Shape mismatch: {feat.shape}"
    # 保存为二进制 .feature 文件
    feat.tofile(f'{out_dir}/{i:05d}.feature')

print(f"Processed {len(os.listdir(raw_dir))} feature files")

:clipboard: 排查清单

检查项 状态
input_layout_train/rt 第二个输入留空 :white_large_square:
特征校准数据后缀为 .feature
特征校准数据是 float32 二进制 :white_large_square:
两个输入的校准文件数量一致 :white_large_square:
特征数据 shape = (157,) :white_large_square:
cal_data_type 配置为 uint8;float32 :white_large_square:

参考资源

修改后重新运行 hb_mapper makertbin,如果还有问题请提供完整的错误日志。

2026-04-15 10:40:17,945 file: hb_mapper.py func: hb_mapper line No: 111 Start hb_mapper…
2026-04-15 10:40:17,946 file: hb_mapper.py func: hb_mapper line No: 112 log will be stored in /data/workspace/gai/hb_mapper_makertbin.log
2026-04-15 10:40:17,946 file: hb_mapper.py func: hb_mapper line No: 113 hbdk version 3.27.1
2026-04-15 10:40:17,947 file: hb_mapper.py func: hb_mapper line No: 114 horizon_nn version 0.12.8
2026-04-15 10:40:17,947 file: hb_mapper.py func: hb_mapper line No: 115 hb_mapper version 1.5.7
2026-04-15 10:40:17,948 file: hb_mapper_makertbin.py func: hb_mapper_makertbin line No: 590 Start Model Convert…
2026-04-15 10:40:17,958 file: hb_mapper_makertbin.py func: hb_mapper_makertbin line No: 52 yaml file parse failed. Please double check your config file inputs
2026-04-15 10:40:17,959 file: tool_utils.py func: tool_utils line No: 116 exception in command: makertbin
2026-04-15 10:40:17,961 file: tool_utils.py func: tool_utils line No: 117 Traceback (most recent call last):
File “/usr/local/lib/python3.6/site-packages/schema.py”, line 393, in validate
nvalue = Schema(svalue, error=e, ignore_extra_keys=i).validate(value)
File “/usr/local/lib/python3.6/site-packages/schema.py”, line 414, in validate
raise SchemaWrongKeyError(message, e.format(data) if e else None)
schema.SchemaWrongKeyError: Wrong keys ‘cal_data_num’, ‘cal_data_type’ in {‘cal_data_dir’: ‘./calibration_data/image;./calibration_data/features’, ‘cal_data_type’: ‘uint8;float32’, ‘calibration_type’: ‘max’, ‘cal_data_num’: 30}
During handling of the above exception, another exception occurred:

Traceback (most recent call last):
File “/usr/local/lib/python3.6/site-packages/horizon_tc_ui/utils/tool_utils.py”, line 114, in __decorator
func(*args, **kargs)
File “/usr/local/lib/python3.6/site-packages/horizon_tc_ui/hb_mapper.py”, line 117, in makertbin
MakertbinRunner(config, model_type).run(version)
File “/usr/local/lib/python3.6/site-packages/horizon_tc_ui/hb_mapper_makertbin.py”, line 591, in run
self._parse_model()
File “/usr/local/lib/python3.6/site-packages/horizon_tc_ui/hb_mapper_makertbin.py”, line 60, in _parse_model
self._parse_conf()
File “/usr/local/lib/python3.6/site-packages/horizon_tc_ui/hb_mapper_makertbin.py”, line 54, in _parse_conf
raise e
File “/usr/local/lib/python3.6/site-packages/horizon_tc_ui/hb_mapper_makertbin.py”, line 49, in _parse_conf
self.mp_conf = MpConf(self.conf_file, self.model_type)
File “/usr/local/lib/python3.6/site-packages/horizon_tc_ui/config/mapper_conf_parser.py”, line 81, in init
self._validate_parameters()
File “/usr/local/lib/python3.6/site-packages/horizon_tc_ui/config/mapper_conf_parser.py”, line 133, in _validate_parameters
raise e
File “/usr/local/lib/python3.6/site-packages/horizon_tc_ui/config/mapper_conf_parser.py”, line 119, in _validate_parameters
self._mp_conf = Schema(schema_dict).validate(self._mp_conf)
File “/usr/local/lib/python3.6/site-packages/schema.py”, line 397, in validate
raise SchemaError([message] + x.autos, [e] + x.errors)
schema.SchemaError: Key ‘calibration_parameters’ error:
Wrong keys ‘cal_data_num’, ‘cal_data_type’ in {‘cal_data_dir’: ‘./calibration_data/image;./calibration_data/features’, ‘cal_data_type’: ‘uint8;float32’, ‘calibration_type’: ‘max’, ‘cal_data_num’: 30}

2026-04-15 10:40:17,961 file: tool_utils.py func: tool_utils line No: 118 Key ‘calibration_parameters’ error:
Wrong keys ‘cal_data_num’, ‘cal_data_type’ in {‘cal_data_dir’: ‘./calibration_data/image;./calibration_data/features’, ‘cal_data_type’: ‘uint8;float32’, ‘calibration_type’: ‘max’, ‘cal_data_num’: 30}

:red_circle: 问题定位:YAML 参数名称错误

你的工具链版本(hbdk 3.27.1)不支持 cal_data_numcal_data_type 这两个参数名。这是工具链版本差异导致的配置问题。


:white_check_mark: 修正后的 YAML 配置

model_parameters:
  onnx_model: '/data/workspace/model_output/convnext.onnx'
  march: 'bernoulli2'
  working_dir: 'model_output'
  output_model_file_prefix: 'convnext_bubble'

input_parameters:
  input_name: 'image;features'
  input_shape: '1x3x224x224;1x157'
  input_type_train: 'bgr;featuremap'
  input_layout_train: 'NCHW;'          # ⚠️ 第二个留空
  norm_type: 'data_mean_and_scale;no_preprocess'
  mean_value: '123.675 116.28 103.53;0'
  scale_value: '0.01712475 0.017507 0.01742919;1'
  input_type_rt: 'bgr;featuremap'
  input_layout_rt: 'NHWC;'             # ⚠️ 第二个留空

calibration_parameters:
  cal_data_dir: './calibration_data/image;./calibration_data/features'
  calibration_type: 'max'
  # ❌ 删除 cal_data_num 和 cal_data_type(旧版本参数)

compiler_parameters:
  compile_mode: 'latency'
  debug: False
  optimize_level: 'O3'

:clipboard: 关键修改点

参数 原配置 修正后 说明
cal_data_type uint8;float32 删除 工具链从文件后缀自动判断
cal_data_num 30 删除 工具链从文件数量自动获取
input_layout_train NCHW;NHWC NCHW; featuremap 类型第二个留空
input_layout_rt NHWC;NHWC NHWC; featuremap 类型第二个留空

:wrench: 校准数据格式要求

# 图像输入校准数据(.gray 或 .rgb 后缀)
ls -lh calibration_data/image/
# 示例:00000.gray, 00001.gray ...
# 文件大小:224 * 224 * 3 = 150528 bytes (RGB uint8)

# 特征输入校准数据(.feature 后缀)
ls -lh calibration_data/features/
# 示例:00000.feature, 00001.feature ...
# 文件大小:157 * 4 = 628 bytes (float32)

# 验证两个目录文件数量一致
ls calibration_data/image/*.gray | wc -l
ls calibration_data/features/*.feature | wc -l
# 两个数字必须相同!

:magnifying_glass_tilted_left: 验证脚本

# 验证校准数据格式
import numpy as np
import os

# 检查图像输入
img_files = sorted([f for f in os.listdir('calibration_data/image') if f.endswith('.gray')])
print(f"图像校准文件数:{len(img_files)}")
for f in img_files[:3]:
    data = np.fromfile(f'calibration_data/image/{f}', dtype=np.uint8)
    print(f"  {f}: shape={data.shape}, 期望=(150528,), 匹配={data.shape == (150528,)}")

# 检查特征输入
feat_files = sorted([f for f in os.listdir('calibration_data/features') if f.endswith('.feature')])
print(f"特征校准文件数:{len(feat_files)}")
for f in feat_files[:3]:
    data = np.fromfile(f'calibration_data/features/{f}', dtype=np.float32)
    print(f"  {f}: shape={data.shape}, 期望=(157,), 匹配={data.shape == (157,)}")

:books: 参考案例


:rocket: 下一步

  1. 修改 YAML 配置(删除 cal_data_numcal_data_type
  2. 确保 input_layout_train/rt 第二个输入留空
  3. 验证校准数据文件格式和数量
  4. 重新运行 hb_mapper makertbin --model-type onnx --config your_config.yaml

如果还有问题,请提供完整的错误日志。

2026-04-15 10:43:17,400 INFO Start hb_mapper…
2026-04-15 10:43:17,401 INFO log will be stored in /data/workspace/gai/hb_mapper_makertbin.log
2026-04-15 10:43:17,401 INFO hbdk version 3.27.1
2026-04-15 10:43:17,401 INFO horizon_nn version 0.12.8
2026-04-15 10:43:17,402 INFO hb_mapper version 1.5.7
2026-04-15 10:43:17,402 INFO Start Model Convert…
2026-04-15 10:43:17,412 INFO validating model_parameters…
2026-04-15 10:43:18,438 INFO Using abs path /data/workspace/gai/model_output
2026-04-15 10:43:18,440 INFO validating model_parameters finished
2026-04-15 10:43:18,441 INFO validating input_parameters…
2026-04-15 10:43:18,442 INFO input num is set to 2 according to input_names
2026-04-15 10:43:18,442 WARNING input shape [1, 157] has length: 2
2026-04-15 10:43:18,442 ERROR Parse ‘input_parameters’ failed!
2026-04-15 10:43:18,443 ERROR yaml file parse failed. Please double check your config file inputs
2026-04-15 10:43:18,445 ERROR num of input_layout_rt given: 1, expect: 2

:red_circle: 问题定位:Layout 配置数量不匹配

错误信息很明确:

ERROR num of input_layout_rt given: 1, expect: 2
ERROR num of input_layout_train given: 1, expect: 2

你当前配置是 NCHW;(第二个留空),但工具链期望两个输入都指定 layout。我之前的建议有误,抱歉!


:white_check_mark: 正确解决方案

对于2 维特征输入 (1x157),需要将其reshape 成 4 维才能指定 layout。有两种方案:

方案 A:修改 ONNX 模型输入 shape(推荐)

在导出 ONNX 时,将特征输入从 1x157 改为 1x1x1x157

# 导出 ONNX 时
dummy_img = torch.randn(1, 3, 224, 224)
dummy_feat = torch.randn(1, 1, 1, 157)  # 4 维
torch.onnx.export(model, (dummy_img, dummy_feat), 'convnext.onnx', ...)

然后在模型 forward 中添加 reshape:

def forward(self, img, feat):
    feat = feat.reshape(-1, 157)  # 4D -> 2D
    # 后续处理...

方案 B:YAML 配置调整(不修改模型)

如果无法修改模型,尝试以下配置:

input_parameters:
  input_name: 'image;features'
  input_shape: '1x3x224x224;1x157'
  input_type_train: 'bgr;featuremap'
  input_layout_train: 'NCHW;NCHW'      # 两个都指定
  norm_type: 'data_mean_and_scale;no_preprocess'
  mean_value: '123.675 116.28 103.53;0'
  scale_value: '0.01712475 0.017507 0.01742919;1'
  input_type_rt: 'bgr;featuremap'
  input_layout_rt: 'NHWC;NHWC'         # 两个都指定

:wrench: 完整 YAML 配置(方案 B)

model_parameters:
  onnx_model: '/data/workspace/model_output/convnext.onnx'
  march: 'bernoulli2'
  working_dir: 'model_output'
  output_model_file_prefix: 'convnext_bubble'

input_parameters:
  input_name: 'image;features'
  input_shape: '1x3x224x224;1x157'
  input_type_train: 'bgr;featuremap'
  input_layout_train: 'NCHW;NCHW'      # ✅ 两个都指定
  norm_type: 'data_mean_and_scale;no_preprocess'
  mean_value: '123.675 116.28 103.53;0'
  scale_value: '0.01712475 0.017507 0.01742919;1'
  input_type_rt: 'bgr;featuremap'
  input_layout_rt: 'NHWC;NHWC'         # ✅ 两个都指定

calibration_parameters:
  cal_data_dir: './calibration_data/image;./calibration_data/features'
  calibration_type: 'max'
  # 删除 cal_data_num 和 cal_data_type

compiler_parameters:
  compile_mode: 'latency'
  debug: False
  optimize_level: 'O3'

:clipboard: 校准数据验证

# 图像输入 (224x224x3 = 150528 bytes)
ls -lh calibration_data/image/*.gray | head -3

# 特征输入 (157 * 4 = 628 bytes)
ls -lh calibration_data/features/*.feature | head -3

# 验证文件数量一致
echo "Image files: $(ls calibration_data/image/*.gray | wc -l)"
echo "Feature files: $(ls calibration_data/features/*.feature | wc -l)"

:warning: 如果方案 B 仍报错

如果上述配置还是报错 list index out of range,说明工具链确实无法处理 2 维输入的 layout。此时必须修改 ONNX 模型

  1. 将特征输入 shape 从 1x157 改为 1x1x1x157
  2. 校准数据也要对应改成 4 维二进制:
# 生成 4 维校准数据
feat = np.random.randn(1, 1, 1, 157).astype(np.float32)
feat.tofile('calibration_data/features/00000.feature')
# 文件大小:1*1*1*157*4 = 628 bytes(相同,但维度不同)

:books: 参考案例


:rocket: 下一步

  1. 先尝试方案 B(修改 YAML,两个 layout 都指定)
  2. 如果仍报错,提供完整错误日志
  3. 必要时修改 ONNX 模型输入 shape 为 4 维

请试一下方案 B,告诉我结果!

2026-04-15 10:50:43,874 INFO Start hb_mapper…
2026-04-15 10:50:43,875 INFO log will be stored in /data/workspace/gai/BPU/hb_mapper_makertbin.log
2026-04-15 10:50:43,875 INFO hbdk version 3.27.1
2026-04-15 10:50:43,876 INFO horizon_nn version 0.12.8
2026-04-15 10:50:43,876 INFO hb_mapper version 1.5.7
2026-04-15 10:50:43,877 INFO Start Model Convert…
2026-04-15 10:50:43,886 INFO validating model_parameters…
2026-04-15 10:50:44,636 INFO Using abs path /data/workspace/gai/BPU/model_output
2026-04-15 10:50:44,638 INFO validating model_parameters finished
2026-04-15 10:50:44,638 INFO validating input_parameters…
2026-04-15 10:50:44,639 INFO input num is set to 2 according to input_names
2026-04-15 10:50:44,640 WARNING input shape [1, 157] has length: 2
2026-04-15 10:50:44,640 INFO validating input_parameters finished
2026-04-15 10:50:44,641 INFO validating calibration_parameters…
2026-04-15 10:50:44,645 INFO validating calibration_parameters finished
2026-04-15 10:50:44,645 INFO validating custom_op…
2026-04-15 10:50:44,646 INFO custom_op does not exist, skipped
2026-04-15 10:50:44,646 INFO validating custom_op finished
2026-04-15 10:50:44,646 INFO validating compiler_parameters…
2026-04-15 10:50:44,647 INFO validating compiler_parameters finished
2026-04-15 10:50:44,647 INFO setting log file level to INFO
2026-04-15 10:50:44,649 WARNING can not get nhwc info from shape: [1, 157]
2026-04-15 10:50:44,655 INFO *******************************************
2026-04-15 10:50:44,655 INFO First calibration picture name: 20251202A1-5405.rgbchw
2026-04-15 10:50:44,656 INFO First calibration picture md5:
51f674dd7319317f7eff584dd361ae4b /data/workspace/gai/calibration_data/image/20251202A1-5405.rgbchw
2026-04-15 10:50:44,681 INFO *******************************************
2026-04-15 10:50:44,686 ERROR list index out of range

:red_circle: 问题定位:校准数据文件格式问题

从日志看,YAML 配置验证已通过,但在加载第一个校准数据时崩溃

INFO First calibration picture md5: 51f674dd7319317f7eff584dd361ae4b  /data/workspace/gai/calibration_data/image/20251202A1-5405.rgbchw
ERROR list index out of range

关键问题:校准数据文件后缀 .rgbchw 不是工具链识别的标准格式


:white_check_mark: 立即修复方案

步骤 1:修改校准数据文件后缀

# 图像输入校准数据 - 改为标准后缀
cd /data/workspace/gai/calibration_data/image/
for f in *.rgbchw; do mv "$f" "${f%.rgbchw}.gray"; done

# 或者如果是 RGB 格式
for f in *.rgbchw; do mv "$f" "${f%.rgbchw}.rgb"; done

# 特征输入校准数据 - 必须是 .feature 后缀
cd /data/workspace/gai/calibration_data/features/
for f in *; do mv "$f" "${f}.feature"; done  # 如果还没有后缀

步骤 2:验证校准数据格式

# 验证脚本
import numpy as np
import os

# 图像输入 (224*224*3 = 150528 bytes for RGB uint8)
img_dir = '/data/workspace/gai/calibration_data/image'
img_files = sorted([f for f in os.listdir(img_dir) if f.endswith('.gray') or f.endswith('.rgb')])
print(f"图像校准文件数:{len(img_files)}")
if img_files:
    data = np.fromfile(f'{img_dir}/{img_files[0]}', dtype=np.uint8)
    print(f"  示例文件:{img_files[0]}, size={data.shape[0]} bytes, 期望=150528")

# 特征输入 (157 * 4 = 628 bytes for float32)
feat_dir = '/data/workspace/gai/calibration_data/features'
feat_files = sorted([f for f in os.listdir(feat_dir) if f.endswith('.feature')])
print(f"特征校准文件数:{len(feat_files)}")
if feat_files:
    data = np.fromfile(f'{feat_dir}/{feat_files[0]}', dtype=np.float32)
    print(f"  示例文件:{feat_files[0]}, shape={data.shape}, 期望=(157,)")

# 检查数量是否一致
print(f"\n文件数量匹配:{len(img_files) == len(feat_files)}")

步骤 3:更新 YAML 配置

calibration_parameters:
  cal_data_dir: './calibration_data/image;./calibration_data/features'
  calibration_type: 'max'
  # 不要加 cal_data_num 和 cal_data_type

:clipboard: 标准校准数据格式参考

输入类型 文件后缀 数据类型 文件大小计算
图像 (RGB) .rgb uint8 H×W×3 bytes
图像 (Gray) .gray uint8 H×W bytes
特征 (Feature) .feature float32 维度×4 bytes

你的情况:

  • 图像:224×224×3 = 150528 bytes (.rgb) 或 224×224 = 50176 bytes (.gray)
  • 特征:157×4 = 628 bytes (.feature)

:wrench: 校准数据生成脚本参考

# 生成图像校准数据
import cv2
import numpy as np
import os

img_dir = './calibration_data/image'
os.makedirs(img_dir, exist_ok=True)

for i, img_path in enumerate(raw_image_paths[:30]):  # 取 30 张
    img = cv2.imread(img_path)
    img = cv2.resize(img, (224, 224))
    # 保存为 RGB uint8
    img_rgb = cv2.cvtColor(img, cv2.COLOR_BGR2RGB).astype(np.uint8)
    img_rgb.tofile(f'{img_dir}/{i:05d}.rgb')

# 生成特征校准数据
feat_dir = './calibration_data/features'
os.makedirs(feat_dir, exist_ok=True)

for i, feat_path in enumerate(raw_feature_paths[:30]):
    feat = np.load(feat_path).flatten().astype(np.float32)
    assert feat.shape == (157,), f"Shape mismatch: {feat.shape}"
    feat.tofile(f'{feat_dir}/{i:05d}.feature')

print(f"Generated {len(raw_image_paths)} calibration files")

:books: 社区参考案例

案例 链接 相关点
多输入模型校准配置 topic/26680 同样的 list index out of range 错误
featuremap 输入转换 topic/27627 骨架关键点数据 (1x8x17x3) 转换经验

:rocket: 快速排查清单

检查项 命令 期望结果
图像文件后缀 ls calibration_data/image/ .gray.rgb
特征文件后缀 ls calibration_data/features/ .feature
图像文件大小 ls -lh calibration_data/image/*.rgb 150528 bytes
特征文件大小 ls -lh calibration_data/features/*.feature 628 bytes
文件数量一致 `ls image/*.rgb wc -lvsls features/*.feature

:high_voltage: 下一步

  1. 立即修改文件后缀.rgbchw.rgb.gray
  2. 验证文件大小是否匹配预期
  3. 重新运行 hb_mapper makertbin

修改后请告诉我结果!如果还有问题,请提供:

  • ls -lh calibration_data/image/ | head -5
  • ls -lh calibration_data/features/ | head -5

2026-04-15 10:56:37,475 INFO Start hb_mapper…
2026-04-15 10:56:37,475 INFO log will be stored in /data/workspace/gai/BPU/hb_mapper_makertbin.log
2026-04-15 10:56:37,476 INFO hbdk version 3.27.1
2026-04-15 10:56:37,476 INFO horizon_nn version 0.12.8
2026-04-15 10:56:37,477 INFO hb_mapper version 1.5.7
2026-04-15 10:56:37,477 INFO Start Model Convert…
2026-04-15 10:56:37,486 INFO validating model_parameters…
2026-04-15 10:56:38,338 INFO Using abs path /data/workspace/gai/BPU/model_output
2026-04-15 10:56:38,340 INFO validating model_parameters finished
2026-04-15 10:56:38,341 INFO validating input_parameters…
2026-04-15 10:56:38,343 INFO input num is set to 2 according to input_names
2026-04-15 10:56:38,343 WARNING input shape [1, 157] has length: 2
2026-04-15 10:56:38,344 INFO validating input_parameters finished
2026-04-15 10:56:38,344 INFO validating calibration_parameters…
2026-04-15 10:56:38,350 INFO validating calibration_parameters finished
2026-04-15 10:56:38,350 INFO validating custom_op…
2026-04-15 10:56:38,351 INFO custom_op does not exist, skipped
2026-04-15 10:56:38,351 INFO validating custom_op finished
2026-04-15 10:56:38,352 INFO validating compiler_parameters…
2026-04-15 10:56:38,352 INFO validating compiler_parameters finished
2026-04-15 10:56:38,353 INFO setting log file level to INFO
2026-04-15 10:56:38,355 WARNING can not get nhwc info from shape: [1, 157]
2026-04-15 10:56:38,363 INFO *******************************************
2026-04-15 10:56:38,364 INFO First calibration picture name: 20251202A1-5405.rgb
2026-04-15 10:56:38,365 INFO First calibration picture md5:
51f674dd7319317f7eff584dd361ae4b /data/workspace/gai/calibration_data/image/20251202A1-5405.rgb
2026-04-15 10:56:38,396 INFO *******************************************
2026-04-15 10:56:38,407 ERROR list index out of range

:red_circle: 问题仍未解决:工具链版本兼容性问题

从最新日志看,修改后缀后仍然是同样的错误。这说明问题不在文件后缀,而是工具链对多输入 featuremap 类型的校准数据加载逻辑有 bug


:magnifying_glass_tilted_left: 深度排查方案

步骤 1:验证校准数据实际内容

# 检查图像校准数据
ls -lh /data/workspace/gai/calibration_data/image/ | head -5
# 期望:文件大小 = 224*224*3 = 150528 bytes (RGB) 或 224*224 = 50176 bytes (Gray)

# 检查特征校准数据
ls -lh /data/workspace/gai/calibration_data/features/ | head -5
# 期望:文件大小 = 157*4 = 628 bytes (float32)

# 验证文件数量
echo "Image: $(ls /data/workspace/gai/calibration_data/image/*.rgb 2>/dev/null | wc -l)"
echo "Feature: $(ls /data/workspace/gai/calibration_data/features/*.feature 2>/dev/null | wc -l)"

步骤 2:尝试简化配置(单输入测试)

只测试图像输入,确认基础流程正常:

input_parameters:
  input_name: 'image'  # 只保留一个输入
  input_shape: '1x3x224x224'
  input_type_train: 'bgr'
  input_layout_train: 'NCHW'
  norm_type: 'data_mean_and_scale'
  mean_value: '123.675 116.28 103.53'
  scale_value: '0.01712475 0.017507 0.01742919'
  input_type_rt: 'bgr'
  input_layout_rt: 'NHWC'

calibration_parameters:
  cal_data_dir: './calibration_data/image'  # 只保留一个目录
  calibration_type: 'max'

如果单输入能成功,说明是多输入配置问题


:warning: 关键发现:工具链版本问题

你的版本:

  • hbdk: 3.27.1
  • horizon_nn: 0.12.8
  • hb_mapper: 1.5.7

这个版本对多输入 featuremap 类型的支持可能不完善。社区案例 topic/26680 中遇到同样问题的用户最终需要:

  1. 将特征输入 reshape 成 4 维(在 ONNX 模型中)
  2. 校准数据也对应改成 4 维二进制格式

:white_check_mark: 推荐解决方案:修改 ONNX 模型

方案 A:在导出 ONNX 时修改特征输入 shape

# 导出 ONNX 时
dummy_img = torch.randn(1, 3, 224, 224)
dummy_feat = torch.randn(1, 1, 1, 157)  # 改成 4 维!
torch.onnx.export(model, (dummy_img, dummy_feat), 'convnext.onnx', 
                  input_names=['image', 'features'],
                  dynamic_axes={...})

方案 B:在模型 forward 中添加 reshape 节点

如果无法重新导出,使用 ONNX 修改工具:

import onnx
from onnx import shape_inference

model = onnx.load('convnext.onnx')

# 修改输入 shape
model.graph.input[1].type.tensor_type.shape.dim[0].dim_value = 1
model.graph.input[1].type.tensor_type.shape.dim[1].dim_value = 1
model.graph.input[1].type.tensor_type.shape.dim[2].dim_value = 1
model.graph.input[1].type.tensor_type.shape.dim[3].dim_value = 157

# 在特征输入后添加 Reshape 节点(需要找到对应的节点)
# ...

onnx.save(model, 'convnext_4d.onnx')

方案 C:校准数据改成 4 维格式

# 生成 4 维特征校准数据
import numpy as np
import os

feat_dir = './calibration_data/features'
os.makedirs(feat_dir, exist_ok=True)

for i, feat_path in enumerate(raw_feature_paths[:30]):
    feat = np.load(feat_path).flatten().astype(np.float32)
    # Reshape 成 4 维
    feat_4d = feat.reshape(1, 1, 1, 157)
    feat_4d.tofile(f'{feat_dir}/{i:05d}.feature')
    # 文件大小仍是 628 bytes,但维度是 4D

然后 YAML 配置:

input_parameters:
  input_name: 'image;features'
  input_shape: '1x3x224x224;1x1x1x157'  # 4 维
  input_type_train: 'bgr;featuremap'
  input_layout_train: 'NCHW;NCHW'
  norm_type: 'data_mean_and_scale;no_preprocess'
  mean_value: '123.675 116.28 103.53;0'
  scale_value: '0.01712475 0.017507 0.01742919;1'
  input_type_rt: 'bgr;featuremap'
  input_layout_rt: 'NHWC;NHWC'

:clipboard: 快速排查清单

检查项 命令 期望结果
图像文件大小 ls -lh calibration_data/image/*.rgb 150528 bytes
特征文件大小 ls -lh calibration_data/features/*.feature 628 bytes
文件数量 ls image/*.rgb | wc -l 与 features 相同
单输入测试 只用 image 输入运行 hb_mapper 应该成功

:rocket: 建议执行顺序

  1. 先做单输入测试(只保留图像输入)→ 确认基础流程正常
  2. 如果单输入成功→ 问题在多输入配置,需要修改 ONNX 或校准数据为 4 维
  3. 如果单输入也失败→ 提供完整日志,可能是其他问题

请先执行单输入测试,告诉我结果!同时请提供:

ls -lh /data/workspace/gai/calibration_data/image/ | head -5
ls -lh /data/workspace/gai/calibration_data/features/ | head -5

ls: cannot access /data/workspace/gai/calibration_data/features/: No such file or directory
[root@f6b93472d47a BPU]# # 期望:文件大小 = 1574 = 628 bytes (float32)
[root@f6b93472d47a BPU]#
[root@f6b93472d47a BPU]# # 验证文件数量
[root@f6b93472d47a BPU]# echo "Image: $(ls /data/workspace/gai/calibration_data/image/
.rgb 2>/dev/null | wc -l)"
Image: 30
[root@f6b93472d47a BPU]# echo “Feature: $(ls /data/workspace/gai/calibration_data/features/*.feature 2>/dev/null | wc -l)”
Feature: 0

:red_circle: 问题找到了:特征校准数据目录不存在!

ls: cannot access /data/workspace/gai/calibration_data/features/: No such file or directory
Feature: 0

根本原因:YAML 配置了 2 个输入,但特征校准数据目录根本不存在!工具链加载校准时找不到第二个输入的数据,导致 list index out of range


:white_check_mark: 立即修复方案

步骤 1:创建特征校准数据目录

mkdir -p /data/workspace/gai/calibration_data/features

步骤 2:生成特征校准数据

# save_calib_feature.py
import numpy as np
import os

# 配置
feat_dim = 157
calib_num = 30  # 与图像校准数据数量一致
out_dir = '/data/workspace/gai/calibration_data/features'
os.makedirs(out_dir, exist_ok=True)

# 生成随机特征数据(或用你的真实特征数据)
for i in range(calib_num):
    # 方法 A:随机数据(用于测试)
    feat = np.random.randn(feat_dim).astype(np.float32)
    
    # 方法 B:加载你的真实特征数据(取消注释使用)
    # feat = np.load(f'/path/to/your/feature_{i}.npy').flatten().astype(np.float32)
    
    # 验证 shape
    assert feat.shape == (feat_dim,), f"Shape mismatch: {feat.shape}"
    
    # 保存为 .feature 二进制文件
    feat.tofile(f'{out_dir}/{i:05d}.feature')

print(f"Generated {calib_num} feature calibration files")
print(f"File size: {feat_dim * 4} bytes (157 * 4 = 628 bytes)")

运行生成脚本:

cd /data/workspace/gai/BPU
python3 save_calib_feature.py

步骤 3:验证校准数据

# 检查两个目录的文件数量和大小
echo "=== 图像校准数据 ==="
ls -lh /data/workspace/gai/calibration_data/image/ | head -5
echo "文件数量:$(ls /data/workspace/gai/calibration_data/image/*.rgb | wc -l)"

echo "=== 特征校准数据 ==="
ls -lh /data/workspace/gai/calibration_data/features/ | head -5
echo "文件数量:$(ls /data/workspace/gai/calibration_data/features/*.feature | wc -l)"

# 验证单个特征文件大小(应该是 628 bytes)
ls -l /data/workspace/gai/calibration_data/features/00000.feature

步骤 4:确认 YAML 配置

calibration_parameters:
  cal_data_dir: './calibration_data/image;./calibration_data/features'
  calibration_type: 'max'
  # 不要加 cal_data_num 和 cal_data_type

步骤 5:重新运行转换

cd /data/workspace/gai/BPU
hb_mapper makertbin --model-type onnx --config your_config.yaml

:clipboard: 校准数据要求总结

输入 目录 文件后缀 数据类型 文件大小 数量
图像 calibration_data/image/ .rgb uint8 150528 bytes (224×224×3) 30
特征 calibration_data/features/ .feature float32 628 bytes (157×4) 30

关键:两个目录的文件数量必须一致!


:magnifying_glass_tilted_left: 验证脚本

# verify_calib.py
import numpy as np
import os

img_dir = '/data/workspace/gai/calibration_data/image'
feat_dir = '/data/workspace/gai/calibration_data/features'

img_files = sorted([f for f in os.listdir(img_dir) if f.endswith('.rgb')])
feat_files = sorted([f for f in os.listdir(feat_dir) if f.endswith('.feature')])

print(f"图像校准文件:{len(img_files)}")
print(f"特征校准文件:{len(feat_files)}")
print(f"数量匹配:{len(img_files) == len(feat_files)}")

# 验证第一个文件
if img_files:
    img_data = np.fromfile(f'{img_dir}/{img_files[0]}', dtype=np.uint8)
    print(f"图像数据大小:{img_data.shape[0]} bytes (期望:150528)")

if feat_files:
    feat_data = np.fromfile(f'{feat_dir}/{feat_files[0]}', dtype=np.float32)
    print(f"特征数据大小:{feat_data.shape[0]} (期望:157)")

:rocket: 执行顺序

  1. 创建特征目录 → mkdir -p /data/workspace/gai/calibration_data/features
  2. 运行生成脚本 → python3 save_calib_feature.py
  3. 验证文件 → ls -lh calibration_data/features/
  4. 重新转换 → hb_mapper makertbin

完成后告诉我结果!

按照你上面的建议

单输入出现如下问题[root@f6b93472d47a BPU]# hb_mapper makertbin --config convnext.yaml --model-type onnx
2026-04-15 11:02:43,214 INFO Start hb_mapper…
2026-04-15 11:02:43,214 INFO log will be stored in /data/workspace/gai/BPU/hb_mapper_makertbin.log
2026-04-15 11:02:43,215 INFO hbdk version 3.27.1
2026-04-15 11:02:43,215 INFO horizon_nn version 0.12.8
2026-04-15 11:02:43,216 INFO hb_mapper version 1.5.7
2026-04-15 11:02:43,216 INFO Start Model Convert…
2026-04-15 11:02:43,223 ERROR required parameters missing in compiler_parameters: model_parameters
2026-04-15 11:02:43,223 ERROR yaml file parse failed. Please double check your config file inputs
2026-04-15 11:02:43,231 ERROR Missing keys: ‘compiler_parameters’, ‘model_parameters’

:red_circle: 问题定位:YAML 配置格式错误

错误信息显示 YAML 解析失败,找不到 compiler_parametersmodel_parameters。这通常是YAML 缩进或层级结构错误导致的。


:white_check_mark: 正确的单输入 YAML 配置模板

model_parameters:
  onnx_model: '/data/workspace/model_output/convnext.onnx'
  march: 'bernoulli2'
  working_dir: 'model_output'
  output_model_file_prefix: 'convnext_bubble'

input_parameters:
  input_name: 'image'
  input_shape: '1x3x224x224'
  input_type_train: 'bgr'
  input_layout_train: 'NCHW'
  norm_type: 'data_mean_and_scale'
  mean_value: '123.675 116.28 103.53'
  scale_value: '0.01712475 0.017507 0.01742919'
  input_type_rt: 'bgr'
  input_layout_rt: 'NHWC'

calibration_parameters:
  cal_data_dir: './calibration_data/image'
  calibration_type: 'max'

compiler_parameters:
  compile_mode: 'latency'
  debug: False
  optimize_level: 'O3'

:magnifying_glass_tilted_left: 检查 YAML 格式要点

# 1. 检查 YAML 缩进(必须用空格,不能用 Tab)
cat -A convnext.yaml | head -20
# 正确:每行开头是空格
# 错误:每行开头有 ^I (Tab 字符)

# 2. 验证 YAML 语法
python3 -c "import yaml; yaml.safe_load(open('convnext.yaml'))"
# 如果报错,说明 YAML 格式有问题

# 3. 检查关键配置项是否存在
grep -E "^(model_parameters|input_parameters|calibration_parameters|compiler_parameters):" convnext.yaml

:warning: 常见 YAML 错误

错误类型 错误示例 正确示例
Tab 缩进 \tonnx_model: ... onnx_model: ...
层级错误 onnx_model: ... (无缩进) onnx_model: ... (2 空格)
冒号后无空格 onnx_model:'path' onnx_model: 'path'
布尔值格式 debug: false (小写) debug: False (Python 格式)

:clipboard: 完整排查步骤

步骤 1:验证 YAML 语法

cd /data/workspace/gai/BPU
python3 -c "import yaml; print(yaml.safe_load(open('convnext.yaml')))"

如果报错,用这个模板重新创建:

cat > convnext_single.yaml << 'EOF'
model_parameters:
  onnx_model: '/data/workspace/model_output/convnext.onnx'
  march: 'bernoulli2'
  working_dir: 'model_output'
  output_model_file_prefix: 'convnext_bubble'

input_parameters:
  input_name: 'image'
  input_shape: '1x3x224x224'
  input_type_train: 'bgr'
  input_layout_train: 'NCHW'
  norm_type: 'data_mean_and_scale'
  mean_value: '123.675 116.28 103.53'
  scale_value: '0.01712475 0.017507 0.01742919'
  input_type_rt: 'bgr'
  input_layout_rt: 'NHWC'

calibration_parameters:
  cal_data_dir: './calibration_data/image'
  calibration_type: 'max'

compiler_parameters:
  compile_mode: 'latency'
  debug: False
  optimize_level: 'O3'
EOF

步骤 2:运行单输入测试

hb_mapper makertbin --config convnext_single.yaml --model-type onnx

步骤 3:如果单输入成功,再测试多输入

单输入成功后,创建多输入配置:

cat > convnext_multi.yaml << 'EOF'
model_parameters:
  onnx_model: '/data/workspace/model_output/convnext.onnx'
  march: 'bernoulli2'
  working_dir: 'model_output'
  output_model_file_prefix: 'convnext_bubble'

input_parameters:
  input_name: 'image;features'
  input_shape: '1x3x224x224;1x157'
  input_type_train: 'bgr;featuremap'
  input_layout_train: 'NCHW;NCHW'
  norm_type: 'data_mean_and_scale;no_preprocess'
  mean_value: '123.675 116.28 103.53;0'
  scale_value: '0.01712475 0.017507 0.01742919;1'
  input_type_rt: 'bgr;featuremap'
  input_layout_rt: 'NHWC;NHWC'

calibration_parameters:
  cal_data_dir: './calibration_data/image;./calibration_data/features'
  calibration_type: 'max'

compiler_parameters:
  compile_mode: 'latency'
  debug: False
  optimize_level: 'O3'
EOF

:rocket: 执行顺序

  1. 先用上面的模板创建 convnext_single.yaml
  2. 运行 YAML 语法验证python3 -c "import yaml; yaml.safe_load(open('convnext_single.yaml'))"
  3. 运行单输入测试hb_mapper makertbin --config convnext_single.yaml --model-type onnx
  4. 告诉我结果

如果单输入成功,我们再处理多输入的问题(需要创建特征校准数据目录)。

请先执行步骤 1-3,把完整日志发给我!

按照你的建议改成四维了[root@f6b93472d47a BPU]# hb_mapper makertbin --config convnext.yaml --model-type onnx
2026-04-15 11:12:08,845 INFO Start hb_mapper…
2026-04-15 11:12:08,846 INFO log will be stored in /data/workspace/gai/BPU/hb_mapper_makertbin.log
2026-04-15 11:12:08,846 INFO hbdk version 3.27.1
2026-04-15 11:12:08,847 INFO horizon_nn version 0.12.8
2026-04-15 11:12:08,847 INFO hb_mapper version 1.5.7
2026-04-15 11:12:08,848 INFO Start Model Convert…
2026-04-15 11:12:08,858 INFO validating model_parameters…
2026-04-15 11:12:09,714 INFO Using abs path /data/workspace/gai/BPU/model_output
2026-04-15 11:12:09,716 INFO validating model_parameters finished
2026-04-15 11:12:09,716 INFO validating input_parameters…
2026-04-15 11:12:09,717 INFO input num is set to 2 according to input_names
2026-04-15 11:12:09,718 WARNING input shape [1, 157] has length: 2
2026-04-15 11:12:09,718 WARNING For input 1: user input shape: [1, 157], model file input shape: [1, 157, 1, 1]
2026-04-15 11:12:09,719 INFO validating input_parameters finished
2026-04-15 11:12:09,719 INFO validating calibration_parameters…
2026-04-15 11:12:09,723 INFO validating calibration_parameters finished
2026-04-15 11:12:09,724 INFO validating custom_op…
2026-04-15 11:12:09,724 INFO custom_op does not exist, skipped
2026-04-15 11:12:09,724 INFO validating custom_op finished
2026-04-15 11:12:09,725 INFO validating compiler_parameters…
2026-04-15 11:12:09,725 INFO validating compiler_parameters finished
2026-04-15 11:12:09,726 INFO setting log file level to INFO
2026-04-15 11:12:09,727 WARNING can not get nhwc info from shape: [1, 157]
2026-04-15 11:12:09,735 INFO *******************************************
2026-04-15 11:12:09,735 INFO First calibration picture name: 20251202A1-5405.rgb
2026-04-15 11:12:09,736 INFO First calibration picture md5:
51f674dd7319317f7eff584dd361ae4b /data/workspace/gai/calibration_data/image/20251202A1-5405.rgb
2026-04-15 11:12:09,763 INFO *******************************************
2026-04-15 11:12:09,769 ERROR list index out of range

:red_circle: 问题定位:YAML input_shape 与模型不匹配

从日志看,你已经修改了 ONNX 模型(特征输入变成 4 维 [1, 157, 1, 1]),但YAML 配置还是 2 维

WARNING For input 1: user input shape: [1, 157], model file input shape: [1, 157, 1, 1]

这会导致工具链在校准数据加载时维度计算错误,触发 list index out of range


:white_check_mark: 立即修复方案

步骤 1:修改 YAML 配置(input_shape 改为 4 维)

input_parameters:
  input_name: 'image;features'
  input_shape: '1x3x224x224;1x157x1x1'   # ✅ 与模型 shape 一致
  input_type_train: 'bgr;featuremap'
  input_layout_train: 'NCHW;NCHW'
  norm_type: 'data_mean_and_scale;no_preprocess'
  mean_value: '123.675 116.28 103.53;0'
  scale_value: '0.01712475 0.017507 0.01742919;1'
  input_type_rt: 'bgr;featuremap'
  input_layout_rt: 'NHWC;NHWC'

步骤 2:生成 4 维特征校准数据

# save_calib_feature_4d.py
import numpy as np
import os

feat_dim = 157
calib_num = 30  # 与图像校准数据数量一致
out_dir = '/data/workspace/gai/calibration_data/features'
os.makedirs(out_dir, exist_ok=True)

for i in range(calib_num):
    # 生成随机特征(或加载你的真实数据)
    feat = np.random.randn(feat_dim).astype(np.float32)
    
    # Reshape 成 4 维 (1, 157, 1, 1) - 与 YAML input_shape 一致
    feat_4d = feat.reshape(1, 157, 1, 1)
    
    # 保存为 .feature 二进制文件
    feat_4d.tofile(f'{out_dir}/{i:05d}.feature')

print(f"Generated {calib_num} feature calibration files")
print(f"File size: {1 * 157 * 1 * 1 * 4} = 628 bytes")

运行:

python3 save_calib_feature_4d.py

步骤 3:验证校准数据

# 检查两个目录
echo "=== 图像校准数据 ==="
ls -lh /data/workspace/gai/calibration_data/image/*.rgb | head -3
echo "数量:$(ls /data/workspace/gai/calibration_data/image/*.rgb | wc -l)"

echo "=== 特征校准数据 ==="
ls -lh /data/workspace/gai/calibration_data/features/*.feature | head -3
echo "数量:$(ls /data/workspace/gai/calibration_data/features/*.feature | wc -l)"

# 验证单个文件大小
ls -l /data/workspace/gai/calibration_data/features/00000.feature
# 应该是 628 bytes

步骤 4:重新运行转换

cd /data/workspace/gai/BPU
hb_mapper makertbin --config convnext.yaml --model-type onnx

:clipboard: 完整 YAML 模板

model_parameters:
  onnx_model: '/data/workspace/model_output/convnext.onnx'
  march: 'bernoulli2'
  working_dir: 'model_output'
  output_model_file_prefix: 'convnext_bubble'

input_parameters:
  input_name: 'image;features'
  input_shape: '1x3x224x224;1x157x1x1'   # ✅ 4 维,与模型一致
  input_type_train: 'bgr;featuremap'
  input_layout_train: 'NCHW;NCHW'
  norm_type: 'data_mean_and_scale;no_preprocess'
  mean_value: '123.675 116.28 103.53;0'
  scale_value: '0.01712475 0.017507 0.01742919;1'
  input_type_rt: 'bgr;featuremap'
  input_layout_rt: 'NHWC;NHWC'

calibration_parameters:
  cal_data_dir: './calibration_data/image;./calibration_data/features'
  calibration_type: 'max'

compiler_parameters:
  compile_mode: 'latency'
  debug: False
  optimize_level: 'O3'

:bar_chart: 配置对照表

项目 YAML 配置 ONNX 模型 校准数据
图像输入 1x3x224x224 [1,3,224,224] .rgb, 150528 bytes
特征输入 1x157x1x1 [1,157,1,1] .feature, 628 bytes

三者必须一致!


:rocket: 执行顺序

  1. 修改 YAML input_shape1x157x1x1
  2. 运行 4 维特征校准数据生成脚本
  3. 验证文件数量和大小
  4. 重新运行 hb_mapper

完成后告诉我结果!如果还有问题,请提供完整日志。

这块建议先全部配置featuremap输入来进行校准, 3可以在量化过程中将输入类型设置为 NCHW 和 featuremap ,包括 train 和 rt 的两个 type,前处理类型修改为no_preprocess , 这样编译出来的 quantized 模型和 bin 模型所需要的数据,也就是所需要的前处理,和浮点 onnx 完全一致。建议在全 featuremap 的基础上进行准备校准数据,和 bin 模型编译。

校准数据准备:
Dump 送入浮点 ONNX 模型之前 的数据(即已经过 Resize、Normalize、HWC->CHW 等 CPU 预处理后的数据)。保存为 .bin.npy。此时量化模型(Quantized Model)的输入与浮点 Baseline 完全一致,排除了 BPU 硬件前处理(如 NV12 解码、缩放算法差异)带来的干扰,专注于量化本身的精度损失。