
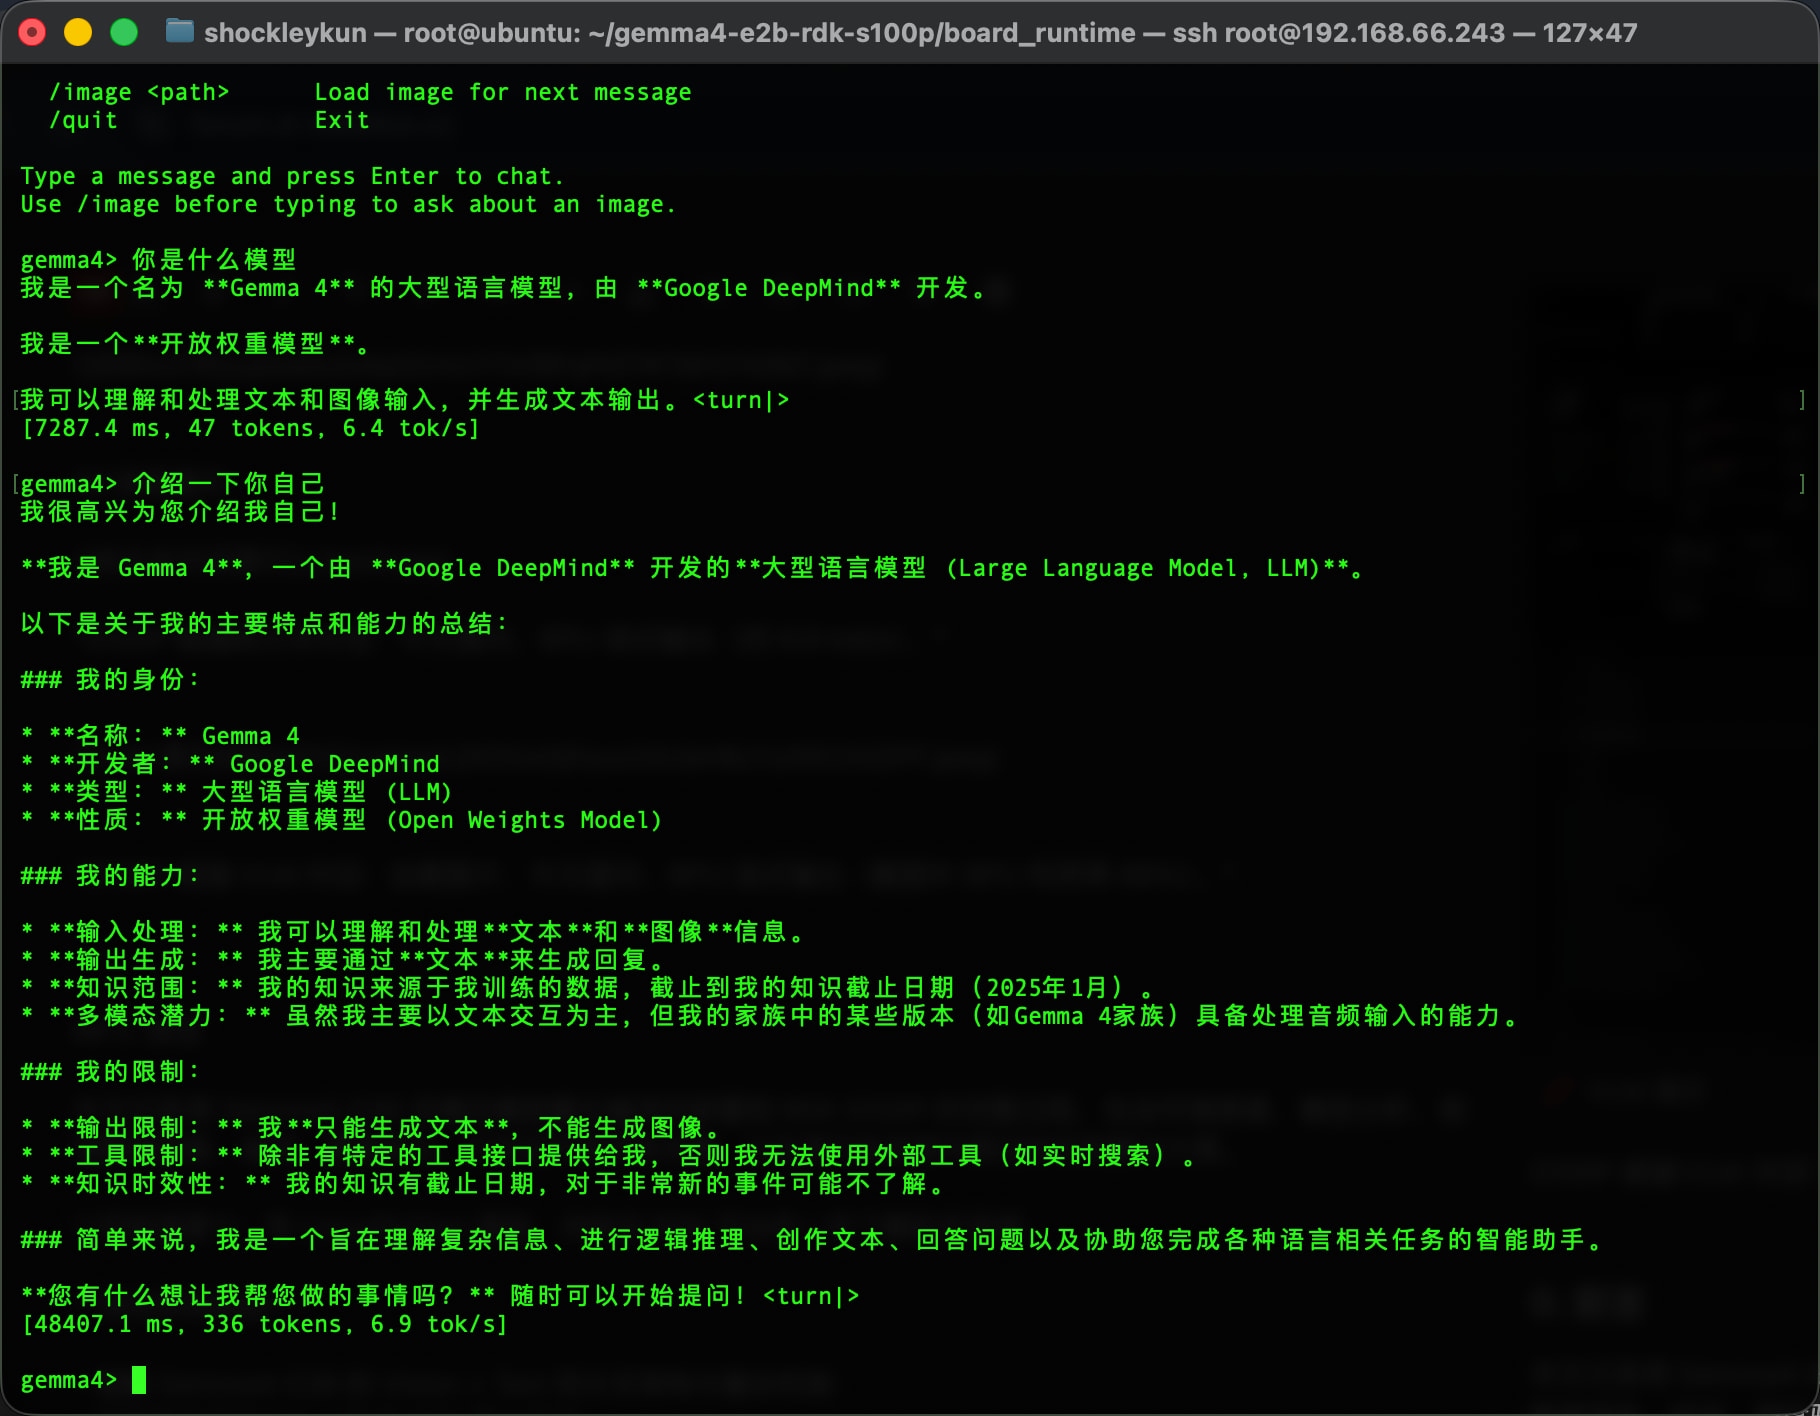
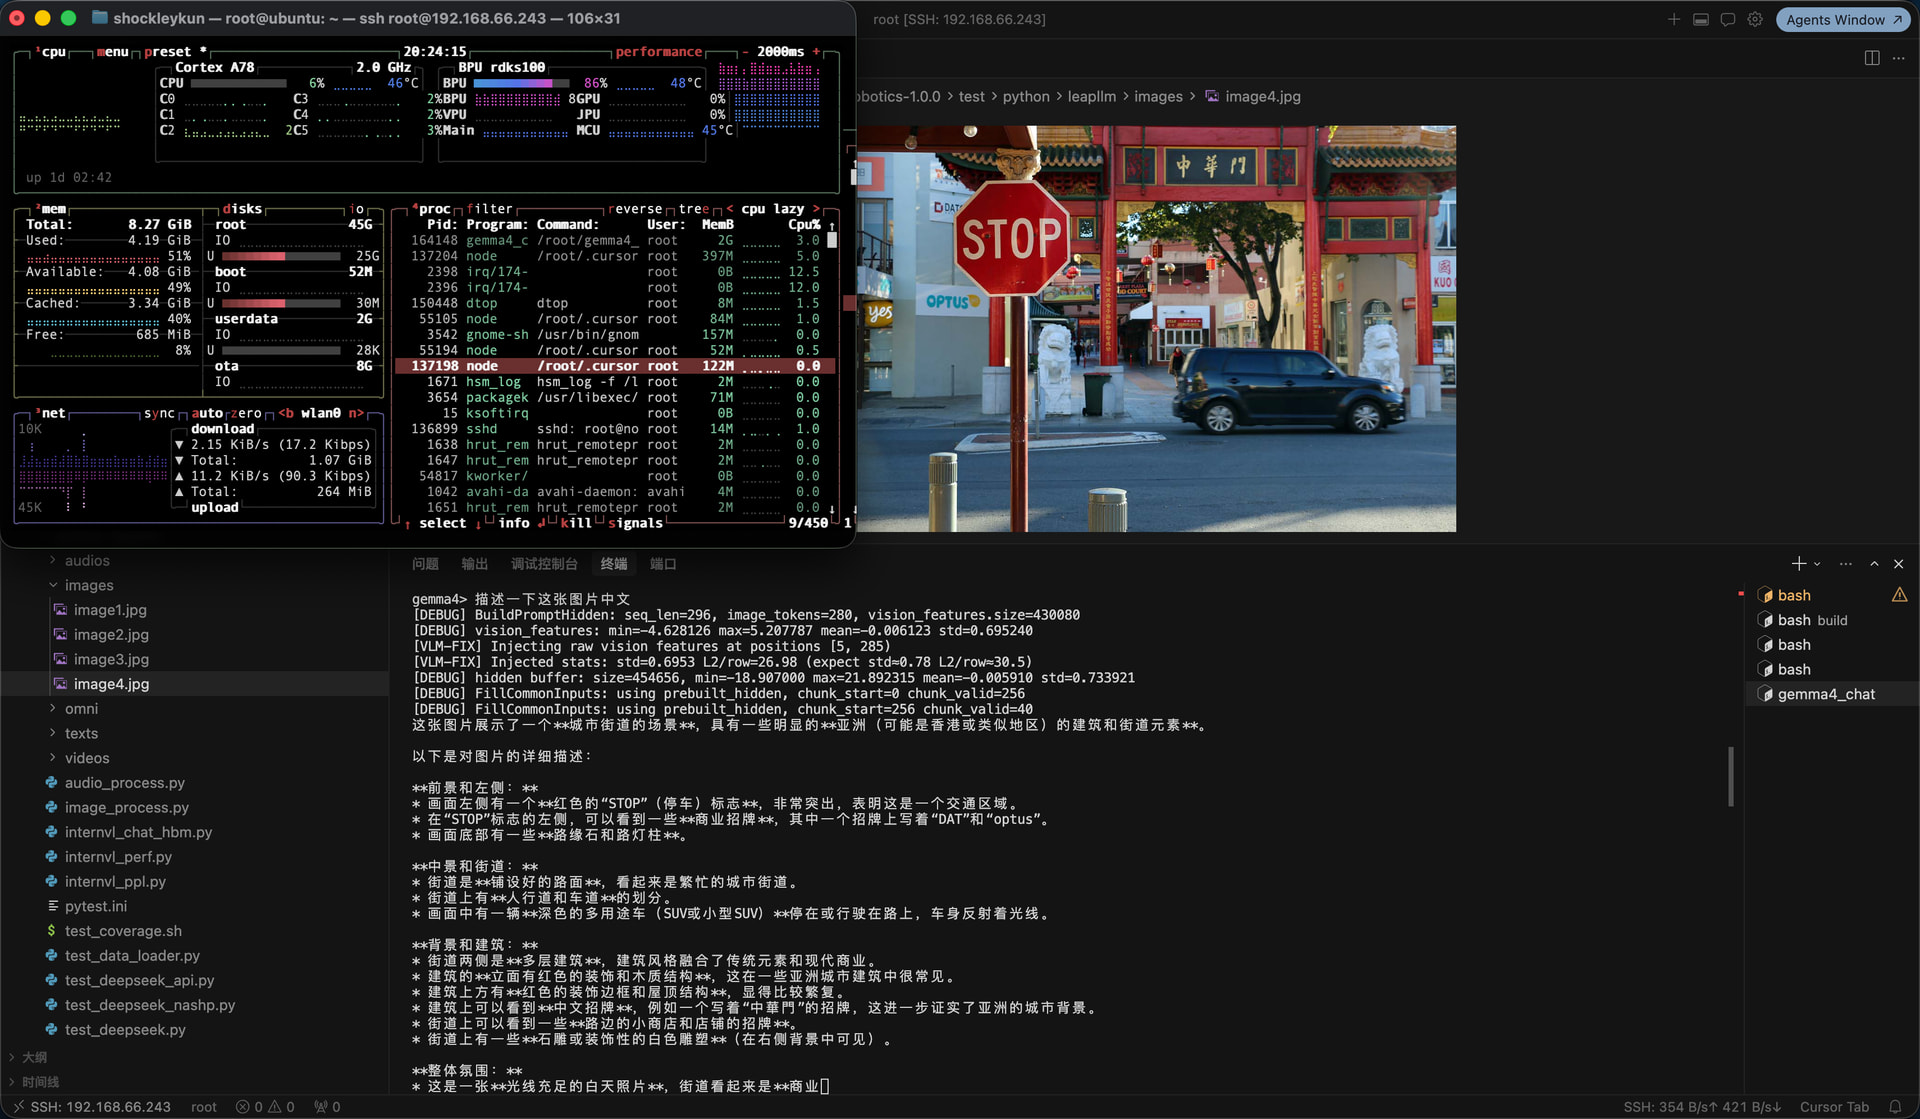
效果展示
S100P 板端纯文本对话:中文提问,BPU 流式输出(约 6.9 tok/s)。
S100P 板端 VLM 对话:加载图片、中文提问、BPU 流式输出(截图中 BPU 利用率 86%)。
0. 前言
本文记录将 Gemma4-E2B 多模态模型量化编译并部署到 RDK S100P 的完整过程,包含环境搭建、模型分析、校准数据准备、编译、精度验证、打包交付等所有步骤,以及我们在实践中踩过的坑和解决方案,如果想直接跑看效果不想编译的可以直接跳到 9.2 路径 A:快速部署。
目标读者:有 Linux/Python 基础、对地瓜 RDK 平台有一定了解的开发者。
读完你将得到:
- 理解 Gemma4-E2B 的 Vision + Text 双分支架构与融合机制
- 能够在自己的 PC 上完成 PTQ 量化编译
- 掌握校准数据选择对精度的影响
- 知道如何验证量化精度(包括端到端融合验证)
- 产出可直接部署到 S100P 的 HBM 模型包
1. 项目全景
1.1 什么是 Gemma4-E2B
Google Gemma4 是 2026 年3月31日发布的多模态模型家族,E2B 是其中的轻量版本:
| 规格 | 值 |
|---|---|
| Vision Encoder | 16 层 ViT,hidden=768,约 150M 参数 |
| Audio Encoder | 12 层 Conformer(本教程不涉及) |
| Text LLM | 35 层 Decoder,hidden=1536,约 2B 有效参数 |
| Vocab | 262,144 |
| Vision soft tokens | 每张图 280 个 |
E2B 的 Vision 和 Text 是独立定义的(Gemma4Config),这与 12B 的统一架构(Gemma4UnifiedConfig)不同,适配方式也不同。
1.2 RDK S100P 硬件约束
本文量化与板端部署均在 RDK S100P 上完成,编译参数 --march nash-m。
| 项 | 值 | 量化影响 |
|---|---|---|
| RAM | 12 GB LPDDR5 | 模型+KV+系统需控制在 ~10GB |
| BPU | Nash-M,80 TOPS | march=nash-m |
| BPU 核数 | 1 | core_num=1、vit_core_num=1 |
1.3 OE-LLM 工具链
OE-LLM 是地瓜官方的 LLM 量化编译框架,核心组件:
| 组件 | 作用 |
|---|---|
leap_llm |
PyTorch 模型定义、校准 forward、compile mode 导出 |
hbdk4_compiler |
MLIR 转换 + HBO 编译(BPU 指令生成) |
oellm_build.py |
一键入口:校准 → 导出 → 编译 → 链接 |
hbdk4_runtime |
板端 BPU 推理 C++ runtime |
1.4 端到端数据流
原始图像 (任意尺寸)
    │
    ▼  Resize 672×960 + [0,1] 归一化 + 16×16 patchify
[2520, 768] f16  (patch embeddings)
    │
    ▼  Vision HBM (ViT 16层 + Pooler + Projector)
[280, 1536] f32  (soft tokens,已投影到 text hidden 空间)
    │
    ▼  替换 input_ids 中 249560 位置的 embedding (masked_scatter)
inputs_embeds [seq_len, 1536]  (文本 embedding + 视觉 soft tokens)
    │
    ▼  Text HBM (35层 Decoder + PLE + LM Head)
logits [1, seq_len, 262144]
    │
    ▼  采样 → 下一 token
两个 HBM,一个外挂 embedding 表,这就是部署的全部模型文件。
2. 模型架构解读
量化前必须理解模型结构,否则编译参数会设错、板端推理对不齐。
2.1 Gemma4 家族差异
| 模型 | 架构 | Vision | Text layers | Text hidden | 本教程 |
|---|---|---|---|---|---|
| E2B | Gemma4Config |
16层 ViT | 35 | 1536 | |
| E4B | Gemma4Config |
16层 ViT | 42 | 2048 | 可推广 |
| 12B | Gemma4UnifiedConfig |
统一架构 | — | — | 不同适配方式 |
E2B 和 E4B 同属 Gemma4Config,适配代码可复用,主要差异是 Text 层数和 hidden_size。
2.2 Vision Encoder
Vision 的完整链路:PatchEmbed → 16 层 ViT Encoder → Pooler → Projector
输入: pixel_values [num_patches, patch_dim]   即 [2520, 768] f16
  │
  ├─ PatchEmbedding
  │   x = 2*(pixel_values - 0.5)        ← [0,1] → [-1,1]
  │   x = ConstFakeQuant(8)(x)
  │   hidden = Linear(768, 768)(x)       ← input_proj
  │   hidden += position_embeddings      ← 预计算的 2D 位置编码
  │
  ├─ 16 层 ViT Encoder Layer
  │   每层: RMSNorm → Attention(12 heads) → Residual → RMSNorm → MLP → Residual
  │   使用 2D RoPE (rope_theta=100)
  │
  ├─ Pooler (3×3 average pooling)
  │   2520 patches → 280 patches (42/3 × 60/3 = 14 × 20)
  │   pooled *= sqrt(768)                ← hidden_size^0.5 缩放
  │
  └─ Projector (RMSNorm + Linear)
      768 → 1536                         ← 投影到 text hidden 空间

输出: [280, 1536] f32
关键参数(从 E2B 的 config.json 自动推断):
# vision_config 中的关键字段
default_output_length = 280    # → 决定 h_patches, w_patches
patch_size = 16
pooling_kernel_size = 3        # 3×3 pooling

# 反推 patch grid:
# num_patches_before_pool = 280 * 3 * 3 = 2520
# 找最接近正方形的 h, w 使得 h*w=2520 且 h%3==0, w%3==0
# → h_patches=42, w_patches=60
# → 输入图像 42*16=672 × 60*16=960
注意:Gemma4VisionConfig 默认 h_patches=w_patches=48,但 E2B 实际是 42×60。load_model 会从 default_output_length 和 pooling_kernel_size 自动推断正确的值,不要手动覆盖。
2.3 Text LLM
Text 的核心结构:Embedding + 35 层 Decoder + RMSNorm + LM Head
输入: inputs_embeds [seq_len, 1536] + input_ids [1, seq_len]
  │
  ├─ 主 Embedding (外挂 tok_embeddings.bin)
  │   embed = weight[token_id] * √1536
  │   √1536 ≈ 39.19
  │
  ├─ Per-Layer Embeddings (PLE) — Gemma4 独有
  │   token_identity = embed_tokens_per_layer(token_id) * √256
  │   context_aware  = RMSNorm(Linear(inputs_embeds)) * (1/√1536)
  │   per_layer_input = (token_identity + context_aware) * (1/√2)
  │   → 送入每层 Decoder
  │
  ├─ 35 层 Decoder
  │   每 5 层一个 full_attention (层 4,9,14,19,24,29,34)
  │   其余为 sliding_attention
  │   KV 共享:后 20 层复用前 15 层中同类型的 KV cache
  │
  ├─ RMSNorm
  └─ LM Head (Linear 1536 → 262144)

输出: logits [1, seq_len, 262144]
关键参数:
| 参数 | 值 | 说明 |
|---|---|---|
chunk_size |
256 | prefill 每次处理的序列长度 |
cache_len |
4096 | KV cache 最大长度 |
sliding_window |
512 | sliding attention 的窗口大小 |
head_dim |
256 (sliding) / 512 (full) | 注意力头维度 |
num_attention_heads |
8 | |
num_key_value_heads |
1 | GQA,1 个 KV head |
num_kv_shared_layers |
20 | 后 20 层共享 KV |
embed_scale |
√1536 ≈ 39.19 | 主 embedding 缩放 |
per_layer_input_scale |
1/√2 ≈ 0.707 | PLE 合并后缩放 |
Text HBM 的输入(5 个主要输入 + 30 个 KV cache):
| 输入 | 形状 | 类型 | 说明 |
|---|---|---|---|
_input_0 |
[256, 1536] |
f32 | inputs_embeds(已含 √1536,Vision 注入后在这里) |
_input_1 |
[1, 256] |
i64 | input_ids |
_input_2 |
[256] |
i32 | position_ids |
_input_3 |
[256, 4096] |
si16 | full_mask |
_input_4 |
[256, 4096] |
si16 | sliding_mask |
_input_5~34 |
[4096, 1, 256/512] |
si8 | 15 路 K + 15 路 V cache |
tok_embeddings.bin 为什么外挂:vocab_size=262144 × hidden_size=1536 × 4 bytes ≈ 1.5GB,编入 HBM 会显著增大模型体积且查表操作在 BPU 上效率不高,所以 OELLM 选择在 runtime 侧做 embedding 查表 + √1536 缩放,再以 inputs_embeds 形式喂入 HBM。
2.4 Vision-Text 融合机制
这是板端最容易出错的部分。Gemma4 的 VLM 融合分三步:
Step 1:构建 token 序列
[255999]  [249560]×280  [258882]  [text tokens...]
 <|image>   ── soft     <image|>   "What do you see?"
 BOI       占位符×280    EOI       实际文本
其中 249560 是 ![]() (U+1F5BC)image soft token 的 ID,每个位置对应 ViT 输出的一行。
(U+1F5BC)image soft token 的 ID,每个位置对应 ViT 输出的一行。
Step 2:用 masked_scatter 替换 embedding
HuggingFace 原始代码中,对 249560 位置的 inputs_embeds 做替换:
# 伪代码
inputs_embeds = embed_tokens(input_ids) * embed_scale  # 全部 token 先查表
image_mask = (input_ids == 249560)                      # 找到 280 个位置
inputs_embeds[image_mask] = vision_features             # 直接替换,不做任何后处理
直接替换,不做 L2-norm,不乘 √1536,不缩放。 Vision HBM 输出已经在 Projector 里投影到 text hidden 空间了。
Step 3:PLE 对 image 位置
PLE 的 token-identity 分支对 249560 位置不用 image token 的 per-layer embedding,而是用 pad embedding(token_id=0) 的 per-layer 向量。这是 HuggingFace 源码的原始行为。
3. 环境搭建
3.1 系统要求
| 项 | 最低 | 推荐 |
|---|---|---|
| OS | Ubuntu 22.04 | 同 |
| RAM | 64 GB | 128 GB+(Text 编译峰值 ~100GB) |
| GPU | 无(CPU 可校准) | CUDA GPU(Vision 校准加速) |
| 磁盘 | 200 GB 可用 | 300 GB+(Text 中间文件 ~68GB) |
3.2 安装 SDK + conda + 依赖
# 1. 下载 OE-LLM SDK(从地瓜官方渠道获取)
# Download OE-LLM SDK from D-Robotics official channel
# Refer to: https://developer.d-robotics.cc/
tar xzf D-Robotics_LLM_S100_1.0.0_SDK.tar.gz

# 2. 创建 conda 环境
conda create -n oellm python=3.10 -y
conda activate oellm

# 3. 安装依赖(顺序很重要!)
cd D-Robotics_LLM_S100_1.0.0_SDK/oellm_build
pip install -r requirements.txt
pip install hbdk4_compiler-*.whl
pip install hbdk4_runtime_aarch64*.whl   # 板端 runtime,PC 可选
pip install leap_llm-*.whl
安装顺序为什么重要:requirements.txt 中包含 PyTorch 等基础依赖,必须先装;hbdk4_compiler 和 leap_llm 之间有版本耦合,按顺序装可避免冲突。
3.3 获取社区适配代码
SDK 自带的 leap_llm 不含 Gemma4 模型定义,需要从社区仓库获取:
cd ~/gemma   # 你的工作目录

# 克隆社区参考仓库
git clone https://github.com/xiongqi123123/RDK_OE_LLM_ZOO.git

# 将 leap_llm 软链接到项目目录(方便修改代码)
ln -s $(python -c "import leap_llm; import os; print(os.path.dirname(leap_llm.__file__))") leap_llm
社区仓库的 leap_llm/models/gemma4/ 和 leap_llm/apis/model/gemma4.py 是 Gemma4 的核心适配代码,model_factory.py 中注册了 gemma4-e2b-vision 和 gemma4-e2b-text。
3.4 下载 Gemma4-E2B 权重
从 HuggingFace 下载(需先申请访问权限):
# 方式 A:huggingface-cli
huggingface-cli download google/gemma-4-e2b-pt --local-dir ./gemma4-e2b

# 方式 B:git lfs(需安装 git-lfs)
git lfs install
git clone https://huggingface.co/google/gemma-4-e2b-pt ./gemma4-e2b
下载后目录中应包含:config.json、model.safetensors、tokenizer.json、tokenizer_config.json、chat_template.jinja 等。
4. 校准数据准备
PTQ(Post-Training Quantization)不训练权重,只根据校准数据的激活分布计算量化 scale。校准数据的分布越接近真实推理,量化精度越好。
4.1 为什么校准数据重要
PTQ 的工作原理:
- 用浮点模型跑一遍校准数据(forward pass)
- 收集每一层激活值的 min/max/分布
- 根据分布计算 INT8 的 scale 和 zero-point
- 用这些 scale 量化权重和激活
如果校准数据分布与实际推理差距大(比如用纯色块校准,但推理输入真实照片),量化后的 scale 就不准,特征方向会被扭曲。
4.2 Vision 校准
Vision 校准使用 50 张 COCO val2017 真实图像,保存到 calibration_data/images/。下载脚本:
python download_coco_calib_images.py
也可以手动准备自己的图像,放入 calibration_data/images/ 目录,支持 jpg/png/bmp/webp。
4.3 Text 校准
Text 校准需要多样化的 prompt 文本,OELLM 的格式是 JSON:
[
  {"text": "What is the capital of France?"},
  {"text": "请用一句话介绍中国的长城。"},
  ...
]
建议准备 100-200 条,覆盖不同语言、不同长度、不同话题。我们使用了 150 条(703 行 JSON 文件中每条一个 text 字段)。
4.4 校准数据目录结构
calibration_data/
├── images/              # Vision 校准图像(50 张 COCO)
│   ├── coco_00_000000000802.jpg
│   ├── coco_01_000000280325.jpg
│   └── ...
├── text/                # Text 校准文本(150 条)
│   └── calibration.json
└── text_verify/         # Text 精度验证(2 条短 prompt)
    └── calibration.json
5. Vision 编译
5.1 编译命令
cd ~/gemma
conda activate oellm

# 增大栈大小(hbdk4 compile_hbo 需要,否则可能 segfault)
ulimit -s unlimited

python -u $(python -c "import leap_llm; import os; print(os.path.dirname(leap_llm.__file__))")/apis/oellm_build.py \
    --model_name gemma4-e2b-vision \
    --march nash-m \
    --input_model_path ./gemma4-e2b \
    --output_model_path ./output/gemma4_e2b_vision \
    --calib_image_path ./calibration_data/images \
    --device cuda:0 \
    --vit_core_num 1 \
    2>&1 | tee output/vision_compile.log
参数说明:
| 参数 | 值 | 说明 |
|---|---|---|
--model_name |
gemma4-e2b-vision |
已在 model_factory.py 注册 |
--march |
nash-m |
S100P 对应 march |
--input_model_path |
HuggingFace 权重目录 | 含 config.json + model.safetensors |
--output_model_path |
输出目录 | 编译产出会写到这里 |
--calib_image_path |
COCO 图目录 | 50 张真实图像 |
--device |
cuda:0 |
GPU 加速校准 forward(CPU 也可,更慢) |
--vit_core_num |
1 |
本文编译使用 1 核 |
不要加 --verifier:编译后 verifier 会报 gemma4-e2b-vision does not support LLM(它试图用 LLM 验证逻辑验证 VLM),HBM 本身是有效的,单独跑 verifier_cli.py 即可。
5.2 编译流程
oellm_build.py 内部执行四步:
1. Export     — 浮点模型 → BC (计算图,含量化 scale 信息)
2. Convert   — BC → MLIR (目标架构指令)
3. Compile   — MLIR → HBO (BPU 二进制)      ← 最耗时,约 100 分钟
4. Link      — HBO → HBM (最终模型文件)
典型日志输出:
[Gemma4VisionApi] Loaded 50 calibration images
[Gemma4VisionApi] Running calibration...
Calibrating: 100%|██████████| 50/50 [02:30<00:00]
[Gemma4Vision] Exporting...
Function 'export_module' done in 5.3s
[Gemma4Vision] Converting MLIR...
Function 'convert_mlir' done in 19.3s
[Gemma4Vision] Compiling HBO (core_num=1)...
Function 'compile_hbo' done in 6620.3s     ← 约 110 分钟
[Gemma4Vision] Linking HBM...
Function 'link_models' done in 10.5s
[Gemma4Vision] Done: ./output/gemma4_e2b_vision/gemma4-e2b_vit_ptq.hbm
compile_hbo 是纯 CPU 单核运算(ViT 模型特性),HBDK_JOBS 参数对它基本无影响。
5.3 编译产出
output/gemma4_e2b_vision/
├── gemma4-e2b_vit_ptq.bc              # 620 MB  导出的 BC 计算图
├── gemma4-e2b_vit_ptq.convert.bc      # 202 MB  MLIR 转换后
├── gemma4-e2b_vit_ptq.hbo             # 363 MB  HBO 二进制
└── gemma4-e2b_vit_ptq.hbm             # 329 MB  ← 最终部署文件
板端只需要 .hbm 文件,其余是中间文件可后续删除。
5.4 常见问题
Q:compile_hbo 期间 segfault
ulimit -s unlimited # 必须在运行前执行
Q:--verifier 报错 gemma4-e2b-vision does not support LLM
HBM 已正常生成,verifier 的逻辑是把 VLM 当 LLM 验证导致报错。单独用 verifier_cli.py 验证即可,不影响编译结果。
Q:conda run 日志长时间无输出
conda run 会缓冲 stdout,改为 conda activate oellm + python -u ... | tee log:
conda activate oellm
PYTHONUNBUFFERED=1 python -u ... | tee output/vision_compile.log
Q:Vision HBM 的输入输出是什么?
输入: _input_0  [2520, 768]   float16   (patchify 后的图像)
输出: _output_0 [280, 1536]   float32   (投影后的 soft tokens)
可以用脚本确认:
from hbdk4.compiler import load
bc = load("output/gemma4_e2b_vision/gemma4-e2b_vit_ptq.bc")
for inp in bc.functions[0].inputs:
    print(inp.name, list(inp.type.shape), inp.type.np_dtype)
for out in bc.functions[0].outputs:
    print(out.name, list(out.type.shape), out.type.np_dtype)
6. Text 编译
6.1 编译命令
Text 分 prefill 和 decode 两个阶段,OELLM 会自动编译两阶段并 link 成一个 .hbm:
conda activate oellm
ulimit -s unlimited

python -u $(python -c "import leap_llm; import os; print(os.path.dirname(leap_llm.__file__))")/apis/oellm_build.py \
    --model_name gemma4-e2b-text \
    --march nash-m \
    --input_model_path ./gemma4-e2b \
    --output_model_path ./output/gemma4_e2b_text \
    --calib_text_path ./calibration_data/text \
    --chunk_size 256 \
    --cache_len 4096 \
    --device cpu \
    --core_num 1 \
    2>&1 | tee output/text_compile.log
参数说明:
| 参数 | 值 | 说明 |
|---|---|---|
--model_name |
gemma4-e2b-text |
Text 分支 |
--chunk_size |
256 |
prefill 每次处理 256 tokens |
cache_len |
4096 |
KV cache 最大长度 |
--device |
cpu |
Text 校准无 GPU 加速优势,CPU 即可 |
--core_num |
1 |
本文编译使用 1 核 |
编译会自动导出 tok_embeddings.bin:
# 在 Gemma4TextApi.__init__ 中自动执行
tok_embs = model.embed_tokens.weight.data * model.embed_tokens.embed_scale
tok_embs.detach().cpu().numpy().tofile("output/gemma4_e2b_text/tok_embeddings.bin")
6.2 编译产出
output/gemma4_e2b_text/
├── gemma4-e2b_lm_chunk_256_cache_4096_ptq.prefill.bc          # 18.5 GB
├── gemma4-e2b_lm_chunk_256_cache_4096_ptq.prefill_convert.bc  # 4.7 GB
├── gemma4-e2b_lm_chunk_256_cache_4096_ptq.prefill.hbo          # 4.8 GB
├── gemma4-e2b_lm_chunk_256_cache_4096_ptq.decode.bc            # 18.5 GB
├── gemma4-e2b_lm_chunk_256_cache_4096_ptq.decode_convert.bc    # 4.7 GB
├── gemma4-e2b_lm_chunk_256_cache_4096_ptq.decode.hbo           # 4.7 GB
├── gemma4-e2b_lm_chunk_256_cache_4096_ptq.hbm                  # 4.5 GB  ← 最终部署文件
└── tok_embeddings.bin                                           # 1.5 GB  ← 外挂 embedding
总计约 68 GB,但板端只需要 .hbm(4.5 GB)和 tok_embeddings.bin(1.5 GB)。
6.3 内存管理
Text decode 编译峰值内存约 100 GB RSS,如果机器内存不够:
方案 1:创建 swap 文件
sudo bash setup_swap.sh # 创建 64GB swap
方案 2:限制虚拟内存
export HBDK_JOBS=29       # 开发机编译并行度
export HBDK_OPT=0
export HBDK_CACHE_MODE=enable

# 限制进程虚拟内存 110GB(防 OOM 拖垮整机)
prlimit --as=$((110 * 1024**3)) python -u compile_text_decode_resume.py 2>&1 | tee log
注意:HBDK_JOBS=29 是开发机 hbdk 编译的并行度,不是板端 BPU 核数。
6.4 调整上下文长度与编译参数
Text HBM 的几个关键参数是编译时固定的,决定了板端推理的上下文容量。默认值如下:
| 参数 | 在哪改 | 默认值 | 说明 |
|---|---|---|---|
| KV cache 长度 | 环境变量 CACHE_LEN |
4096 | 输入 + 输出 token 共享这个预算。越大越占 DDR、编译越久。 |
| Prefill 分块大小 | 环境变量 CHUNK_SIZE |
256 | 每次 prefill 处理的 token 数。越大步数越少、峰值显存越高。 |
这两个参数对应板端的 gemma4_config.h 里的 kCacheLen / kChunkSize,改了 HBM 编译参数后必须同步改源码配置,否则推理会错位。
示例:把上下文从 4096 扩到 8192
# 1. 重新编译 Text HBM(PC 上,耗时数小时)
CHUNK_SIZE=512 CACHE_LEN=8192 bash scripts/compile/run_text_compile.sh
// 2. 更新板端 runtime 配置(board_runtime/cpp/gemma4_config.h)
constexpr int kChunkSize = 512;   // 必须和上面的 CHUNK_SIZE 一致
constexpr int kCacheLen  = 8192;  // 必须和上面的 CACHE_LEN 一致
# 3. 重新编译 runtime
cd board_runtime/cpp && mkdir build && cd build
cmake .. && make -j$(nproc)
仅 runtime 可调的参数(无需重编 HBM):
| 参数 | 在哪改 | 默认值 | 说明 |
|---|---|---|---|
| 滑动窗口 | kSlidingWindow |
512 | decode 时滑动注意力的窗口大小,必须 ≤ kCacheLen。 |
| 最大输出 token | --max-tokens N 启动参数 |
kCacheLen |
限制每轮生成长度,运行时传入即可。 |
内存代价:
CACHE_LEN翻倍,KV cache 占用的 DDR 也会翻倍。请先确认板端空闲内存足够再加大。
HBM 文件名gemma4-e2b_lm_chunk_256_cache_4096_ptq.hbm里的数字只是命名习惯,改参数后实际产出的文件名不会自动变化,但内容已经是新参数编译的。
7. 精度验证
在 PC 上用量化模型(BC)和原始浮点模型对比,指标为 cosine similarity(1 表示完全一致,越接近 1 越好)。
7.1 本模型量化精度
| 模型 | 精度 |
|---|---|
Vision HBM(gemma4-e2b_vit_ptq.hbm) |
0.9888 |
Text HBM(gemma4-e2b_lm_chunk_256_cache_4096_ptq.hbm) |
0.9540 |
分别验证 Vision、Text 量化输出与浮点模型的接近程度。
7.2 如何验证
Vision BC
cd ~/gemma && conda activate oellm

python -u leap_llm/apis/verifier_cli.py \
    --model_name gemma4-e2b-vision \
    --model_dir ./gemma4-e2b \
    --quant_vlm_model_path ./output/gemma4_e2b_vision/gemma4-e2b_vit_ptq.bc \
    --input_image_path ./calibration_data/images/coco_00_000000000802.jpg
Text BC(纯文本,不含 Vision)
python -u quick_text_verify.py
# 结果:output/e2b_text_verify_quick.json
若开发机与板端同网段,还可在板端 BPU 上跑 HBM 对比:
bash run_remote_hbm_verify.sh # 需 --remote_ip 指定板子 IP
8. 打包部署文件
8.1 部署目录结构
mkdir -p gemma4_e2b_deploy/{model,tokenizer}

# 模型文件(3 个大文件)
cp output/gemma4_e2b_vision/gemma4-e2b_vit_ptq.hbm \
   gemma4_e2b_deploy/model/

cp output/gemma4_e2b_text/gemma4-e2b_lm_chunk_256_cache_4096_ptq.hbm \
   gemma4_e2b_deploy/model/

cp output/gemma4_e2b_text/tok_embeddings.bin \
   gemma4_e2b_deploy/model/

# Tokenizer 文件
cp gemma4-e2b/tokenizer.json \
   gemma4-e2b/tokenizer_config.json \
   gemma4-e2b/chat_template.jinja \
   gemma4-e2b/config.json \
   gemma4_e2b_deploy/tokenizer/
最终结构:
gemma4_e2b_deploy/
├── model/
│   ├── gemma4-e2b_vit_ptq.hbm                              # 329 MB  Vision
│   ├── gemma4-e2b_lm_chunk_256_cache_4096_ptq.hbm          # 4.5 GB  Text
│   └── tok_embeddings.bin                                  # 1.5 GB  Token embedding
└── tokenizer/
    ├── tokenizer.json                                      # 31 MB
    ├── tokenizer_config.json
    ├── chat_template.jinja
    └── config.json
8.2 要打包 vs 不打包
| 文件 | 大小 | 是否打包 | 原因 |
|---|---|---|---|
Vision .hbm |
329 MB | 部署必需 | |
Text .hbm |
4.5 GB | 部署必需 | |
tok_embeddings.bin |
1.5 GB | 部署必需 | |
| Tokenizer | ~32 MB | 部署必需 | |
Vision/Text .bc |
~37 GB | 编译中间文件 | |
Vision/Text .hbo |
~5 GB | 编译中间文件 | |
compile_cache/ |
~26 GB | 编译缓存 |
打包后约 4.3 GB(gzip),解压后约 6.3 GB。
9. 板端部署与 VLM 推理
本节介绍如何将编译好的 HBM 模型部署到 S100P 板端,并运行 Gemma4-E2B VLM 推理。
9.1 两条路径:直接跑 vs 自己编译
| 路径 A:直接跑(推荐) | 路径 B:从源码编译 | |
|---|---|---|
| 适合 | 想快速体验 VLM 推理的用户 | 想修改 runtime 代码或移植到其他平台的开发者 |
| 需要 | 下载预编译 HBM + 编译 C++ runtime(~1 min) | 完整 OE-LLM SDK + 本仓库全部代码 |
| 步骤 | 见下方 9.2 | 见 board_runtime/README.md |
大多数用户只需要路径 A:下载模型 → 编译 runtime(板端 gcc 即可,不需要 OE-LLM 编译工具链)→ 直接跑。
9.2 路径 A:快速部署(板端 5 分钟)
Step 1:下载预编译模型
在 S100P 板端执行:
pip install huggingface_hub
hf download ShockleyWong/gemma4-e2b-rdk-s100p --local-dir ~/gemma4_e2b
下载完成后检查文件完整性:
# 验证 SHA256(可选)
sha256sum ~/gemma4_e2b/model/*.hbm

# 预期输出:
# 470791849d21cffadb388cc61c8f4b1452078c1722d302fd8a8ac775ee9769f1  ...vit_ptq.hbm
# 3e4d4940051e4e8dc0cb434e972e7aae75d49504da3fac435e303f68af73a25f  ...lm_..._ptq.hbm
Step 2:编译 C++ runtime
需要 cmake、g++、libopencv-dev 和 cargo(仅首次编译,用于构建自带的 tokenizers-cpp)。
cd gemma4-e2b-rdk-s100p/board_runtime/cpp
mkdir build && cd build
cmake ..
make -j$(nproc)
# 产出:gemma4_chat, gemma4_server, gemma4_demo, gemma4_text_bench, gemma4_golden_verify
注意:板端编译只需要
gcc、cmake、libopencv-dev和 Horizon BPU runtime 头文件(/usr/hobot/),不需要 PC 端的hbdk4_compiler或leap_llm。分词走原生 C++tokenizers-cpp,不依赖 Python。
Step 3:运行 VLM 推理
export GEMMA4_HOME=~/gemma4_e2b
./gemma4_chat
交互示例:
gemma4> /image /path/to/red_panda.jpg
Processing image... Image loaded (430080 features).
gemma4> Describe this image
This is a photograph of a Red Panda resting on a wooden structure.
It has reddish-brown fur, white accents on its face and chest...
9.3 VLM 融合机制(板端实现要点)
板端 runtime 在 Vision→Text 融合时必须严格遵守以下规则,否则会导致输出乱码:
① Vision 特征原样注入
// 正确:直接 std::copy,不做任何后处理
for (int t = 0; t < 280; ++t) {
    std::copy(vision_output + t * 1536,
              vision_output + (t+1) * 1536,
              inputs_embeds + image_pos[t] * 1536);
}
② PLE 对 image 位置用 pad embedding
Gemma4 Text 的 Per-Layer Embedding(PLE)有两条路径:
- token-identity:
embed_tokens_per_layer(token_id) - context-aware:依赖
inputs_embeds
对 image soft token(token_id=249560)位置,token-identity 用 pad(token_id=0),不是 249560 的 per-layer embedding。
// Text HBM input[1] (input_ids) 中,image 位置应为 0 (pad),不是 249560
for (auto& id : input_ids) {
    if (id == 249560) id = 0;  // pad_token_id
}
③ Chat template 格式
Prompt 必须走 chat_template.jinja,不能直接拼裸文本:
<bos><|turn>user
<|image>[249560×280]<image|>What do you see?<turn|>
<|turn>model
C++ TokenizerBridge(原生 tokenizers-cpp)会自动处理这个格式化,无需 Python。
9.4 验证板端推理正确性
Golden mask/KV 对齐
# 将 golden_mask_kv/ 放到 $GEMMA4_HOME/golden_mask_kv/
# (来源:pc_delivery/golden_mask_kv.tar.gz)

export GEMMA4_HOME=~/gemma4_e2b
./gemma4_golden_verify --prompt prompt_0
预期输出:
input_ids: OK
position_ids: OK
inputs_embeds: OK max_diff=0 cosine=1
full_mask: OK max_diff=0 cosine=1
sliding_mask: OK max_diff=0 cosine=1
=== Summary ===
ALL PASSED
VLM 图像测试
使用 docs/image1.jpg(红熊猫)在板端验证:
export GEMMA4_HOME=~/gemma4_e2b
cd board_runtime/cpp/build
./gemma4_chat
gemma4> /image ../../docs/image1.jpg
gemma4> What do you see?
gemma4> 你看到什么,说中文

| 测试图 | 预期输出 | 板端实际输出 |
|---|---|---|
红熊猫 (image1.jpg) |
识别为 Red Panda / 红熊猫,并描述外观 |
9.5 性能参考
S100P 单核 BPU 上的典型性能(core_num=1):
| 阶段 | 耗时 | 说明 |
|---|---|---|
| Vision 推理 | ~300 ms | 单张图,ViT 16 层 |
| Text prefill | ~500 ms | 294 token prompt(VLM) |
| Text decode | ~200 ms/tok | 单 token 生成 |
| 端到端 VLM | ~50 s | 294 prompt + 250 输出 tokens |
9.6 常见问题
Q:板端编译报错 Horizon BPU SDK not found
# 检查 BPU runtime 是否安装
ls /usr/hobot/lib/libdnn.so
ls /usr/include/hobot/dnn/hb_dnn.h
如果缺失,安装 OE-LLM board runtime 包(hbdk4_runtime_aarch64*.whl 或板端 image 自带)。
Q:VLM 输出乱码 / 语义错误
按以下顺序排查:
- 确认 Vision HBM SHA256 =
47079184...(COCO 重校准版) - 确认注入后 vision features std ≈ 0.65~0.79(不是 1.0)
- 确认
input_ids中 image 位置为0(pad),不是249560 - 确认 prompt 走 chat template(含
<|turn>user/<|turn>model) - 跑
gemma4_golden_verify确认 mask/KV 对齐
Q:输出被截断(只生成 256 tokens)
KV cache 容量 kCacheLen=4096 是 HBM 编译时固定的。prompt + 输出 ≤ 4096。VLM prompt 约 294 tokens,所以最多输出约 3800 tokens。模型遇到 <turn|> 会自动停止。
附录:模型文件下载
预编译的 HBM 模型文件已上传 HuggingFace:
pip install huggingface_hub
hf download ShockleyWong/gemma4-e2b-rdk-s100p --local-dir ./gemma4_e2b_deploy
| 文件 | 说明 |
|---|---|
gemma4-e2b_vit_ptq.hbm |
Vision HBM(329 MB) |
gemma4-e2b_lm_chunk_256_cache_4096_ptq.hbm |
Text HBM(4.5 GB) |
tok_embeddings.bin |
Token embedding 表(1.5 GB) |
tokenizer/ |
Tokenizer 文件 |