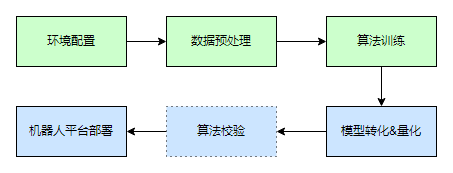
大家好,我是徐国晟,本期教程是关于yolov5的全流程部署的手把手教程,从cuda的安装,到算法的训练以及模型转换和机器人平台的部署都会纳入进来,整体流程如下:
第一章:环境配置
Ubuntu系统安装不再赘述,方案非常多,教程使用的是ubuntu22.04系统,大家可以直接从ubuntu官网下载安装使用。
第一步:安装包下载
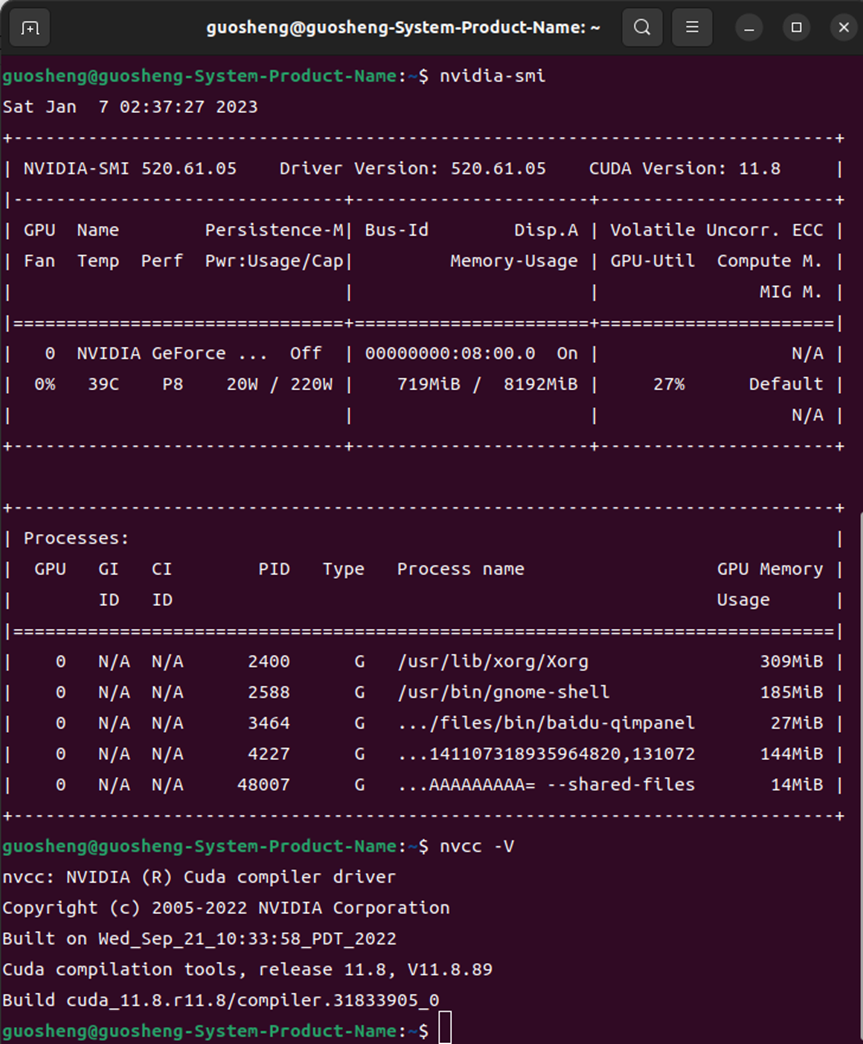
安装好系统后,我们首先需要安装cuda以及cudnn,cuda版本我用的是11.8.0版本,最新的12系列目前没有对应的cudnn,所以没有使用,大家可以根据自身显卡的情况选择版本,这里差别不是很大。
cuda下载地址:https://developer.nvidia.com/cuda-toolkit-archive
这里面选择的安装版本是runfile,deb安装的命令比较多,由于后续需要切换到命令行界面安装,所以使用了 .run的安装包(需要的命令较少,适合偷懒)
cudnn下载地址:https://developer.nvidia.com/rdp/cudnn-archive (需要注册NV账号)
第二步:旧有驱动卸载
一般新安装的系统不需要进行此处操作,但是版本更新、重复安装、或者其他操作会带上nv驱动,所以需要此步骤
1. 卸载NV相关驱动:
sudo apt purge nvidia*2. 禁用显卡驱动
sudo gedit /etc/modprobe.d/blacklist-nouveau.conf文本中填入以下指令后报错推出:
blacklist nouveau
options nouveau modeset=0
3. 更新,使其生效
sudo update-initramfs -u
sudo reboot
4. 重启后进入命令行格式:
系统启动后进入文本模式:Ctrl+Alt+F2 5. 卸载内核中的nv驱动,前面的步骤没有卸载干净,内核中还在运行:
sudo modprobe -r nvidia-drm
sudo modprobe -r nvidia_modeset
第三步:安装对应版本cuda
安装cuda,根据官方指令即可安装成功,由于此时驱动已经卸载,安装时需要选中驱动模块
sudo sh cuda_11.8.0_520.61.05_linux.run第四步:安装对应版本cudnn
sudo dpkg -i cudnn-local-repo-ubuntu2204-8.6.0.163_1.0-1_amd64.deb第五步:配置环境变量
配置好环境变量,重启后可以直接使用cuda环境,否则不生效
sudo gedit .bashrc以下命令直接加在.bashrc文件最下面即可
export PATH=/usr/local/cuda-11.8/bin:$PATH
export LD_LIBRARY_PATH=/usr/local/cuda-11.8/lib64:$LD_LIBRARY_PATH
TIPS:
Ubuntu系统更新后,新的内核会丢失驱动,需要重新导向,方法如下
guosheng@guosheng-System-Product-Name:~$ ls /usr/src/
gmock       linux-headers-5.15.0-56          linux-headers-5.15.0-57-generic
googletest  linux-headers-5.15.0-56-generic  nvidia-520.61.05
gtest       linux-headers-5.15.0-57          rtl8814au-5.8.5.1

guosheng@guosheng-System-Product-Name:~$ sudo dkms install -m nvidia -v 520.61.05
Creating symlink /var/lib/dkms/nvidia/520.61.05/source -> /usr/src/nvidia-520.61.05
Kernel preparation unnecessary for this kernel. Skipping...
第二章:数据处理
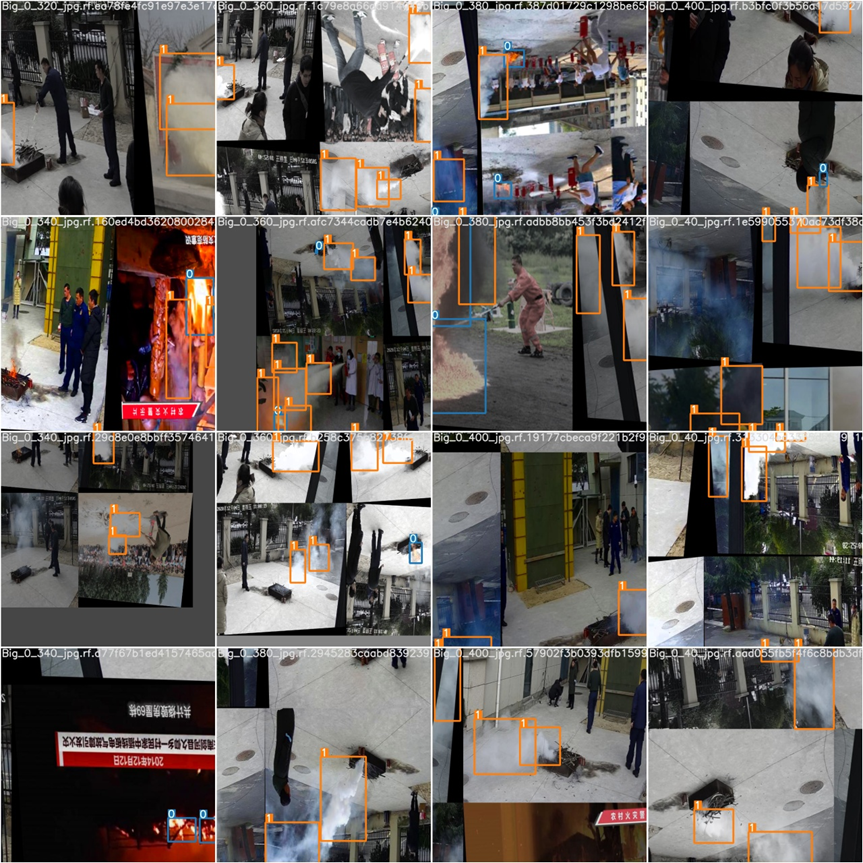
本次测试数据来源为公开火灾视频以及部分本人在消防队采集的视频
第一步:数据打标
数据打标目前很方便,没有难点,大家直接安装labelme即可,进行打标操作
第二步:数据处理
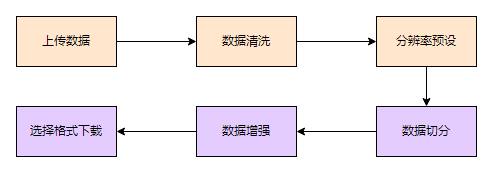
这里直接使用了yolov5公司出品的云端工具,他们提供的不仅仅是yolov5以及yolov8算法,还提供了整个算法全流程处理的云端平台,当然也就包括了数据处理相关的模块,传送门:
具体处理流程如下:https://roboflow.com/?ref=ultralytics

第三章:算法训练
本次使用的是官方的yolov5版本,为了和工具链的转换方式保持一致,使用了V2.0版本:https://github.com/ultralytics/yolov5/releases/tag/v2.0
第一步:代码下载&分支切换:
guosheng@guosheng-System-Product-Name:~/code$ git clone https://github.com/ultralytics/yolov5
正克隆到 'yolov5'...
remote: Enumerating objects: 14944, done.
remote: Counting objects: 100% (36/36), done.
remote: Compressing objects: 100% (33/33), done.
remote: Total 14944 (delta 17), reused 13 (delta 3), pack-reused 14908
接收对象中: 100% (14944/14944), 14.02 MiB | 9.11 MiB/s, 完成.
处理 delta 中: 100% (10256/10256), 完成.
guosheng@guosheng-System-Product-Name:~/code$ cd yolov5/
guosheng@guosheng-System-Product-Name:~/code/yolov5$ git checkout v2.0
HEAD 现在位于 5e970d4 Update train.py (#462)
第二步:算法环境配置,创建yolov5的虚拟环境:
conda create -n yolov5 python=3.7
conda activate -n yolov5
conda install pytorch torchvision torchaudio pytorch-cuda=11.7 -c pytorch -c nvidia
pip install -r requirements.txt -i https://pypi.tuna.tsinghua.edu.cn/simple
pip install apex -i https://pypi.tuna.tsinghua.edu.cn/simple
第三步:使用训练好的模型文件进行简单的验证
python3 detect.py --source ./inference/images/ --weights yolov5s.pt --conf 0.4当时出现了bug,做了简单的代码调整,
问题一:File "/home/guosheng/.local/lib/python3.10/site-packages/torch/nn/modules/upsampling.py", line 157, in forward
recompute_scale_factor=self.recompute_scale_factor)
def forward(self, input: Tensor) -> Tensor:
    # return F.interpolate(input, self.size, self.scale_factor, self.mode, self.align_corners,
    #                      recompute_scale_factor=self.recompute_scale_factor)
    return F.interpolate(input, self.size, self.scale_factor, self.mode, self.align_corners)
第四步:训练模型:
python train.py --img 672 --batch 16 --epochs 1 --data /home/guosheng/code/data/data/data.yaml --weights yolov5s.pt训练过程中:
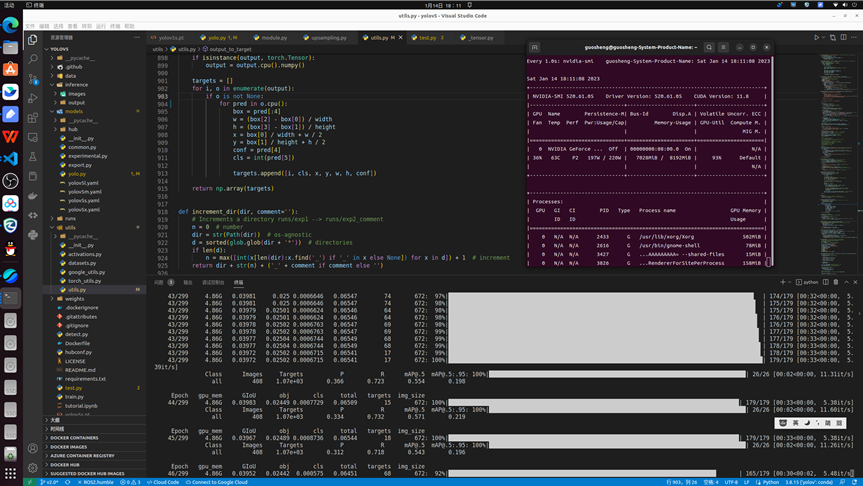
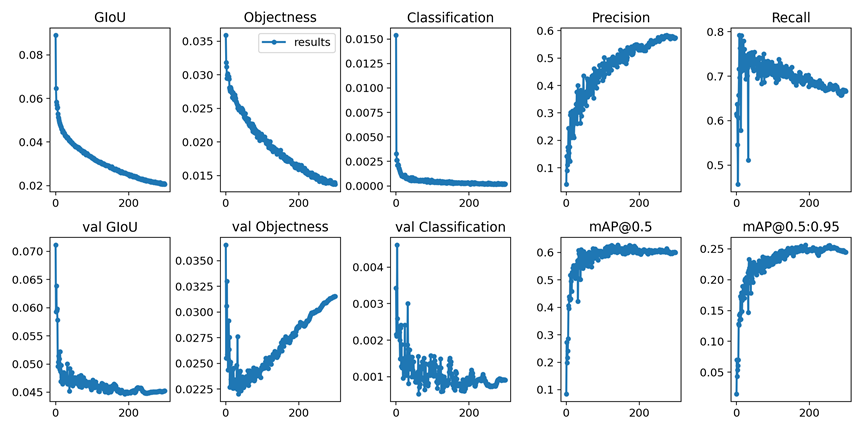
训练结果:
评估数据:
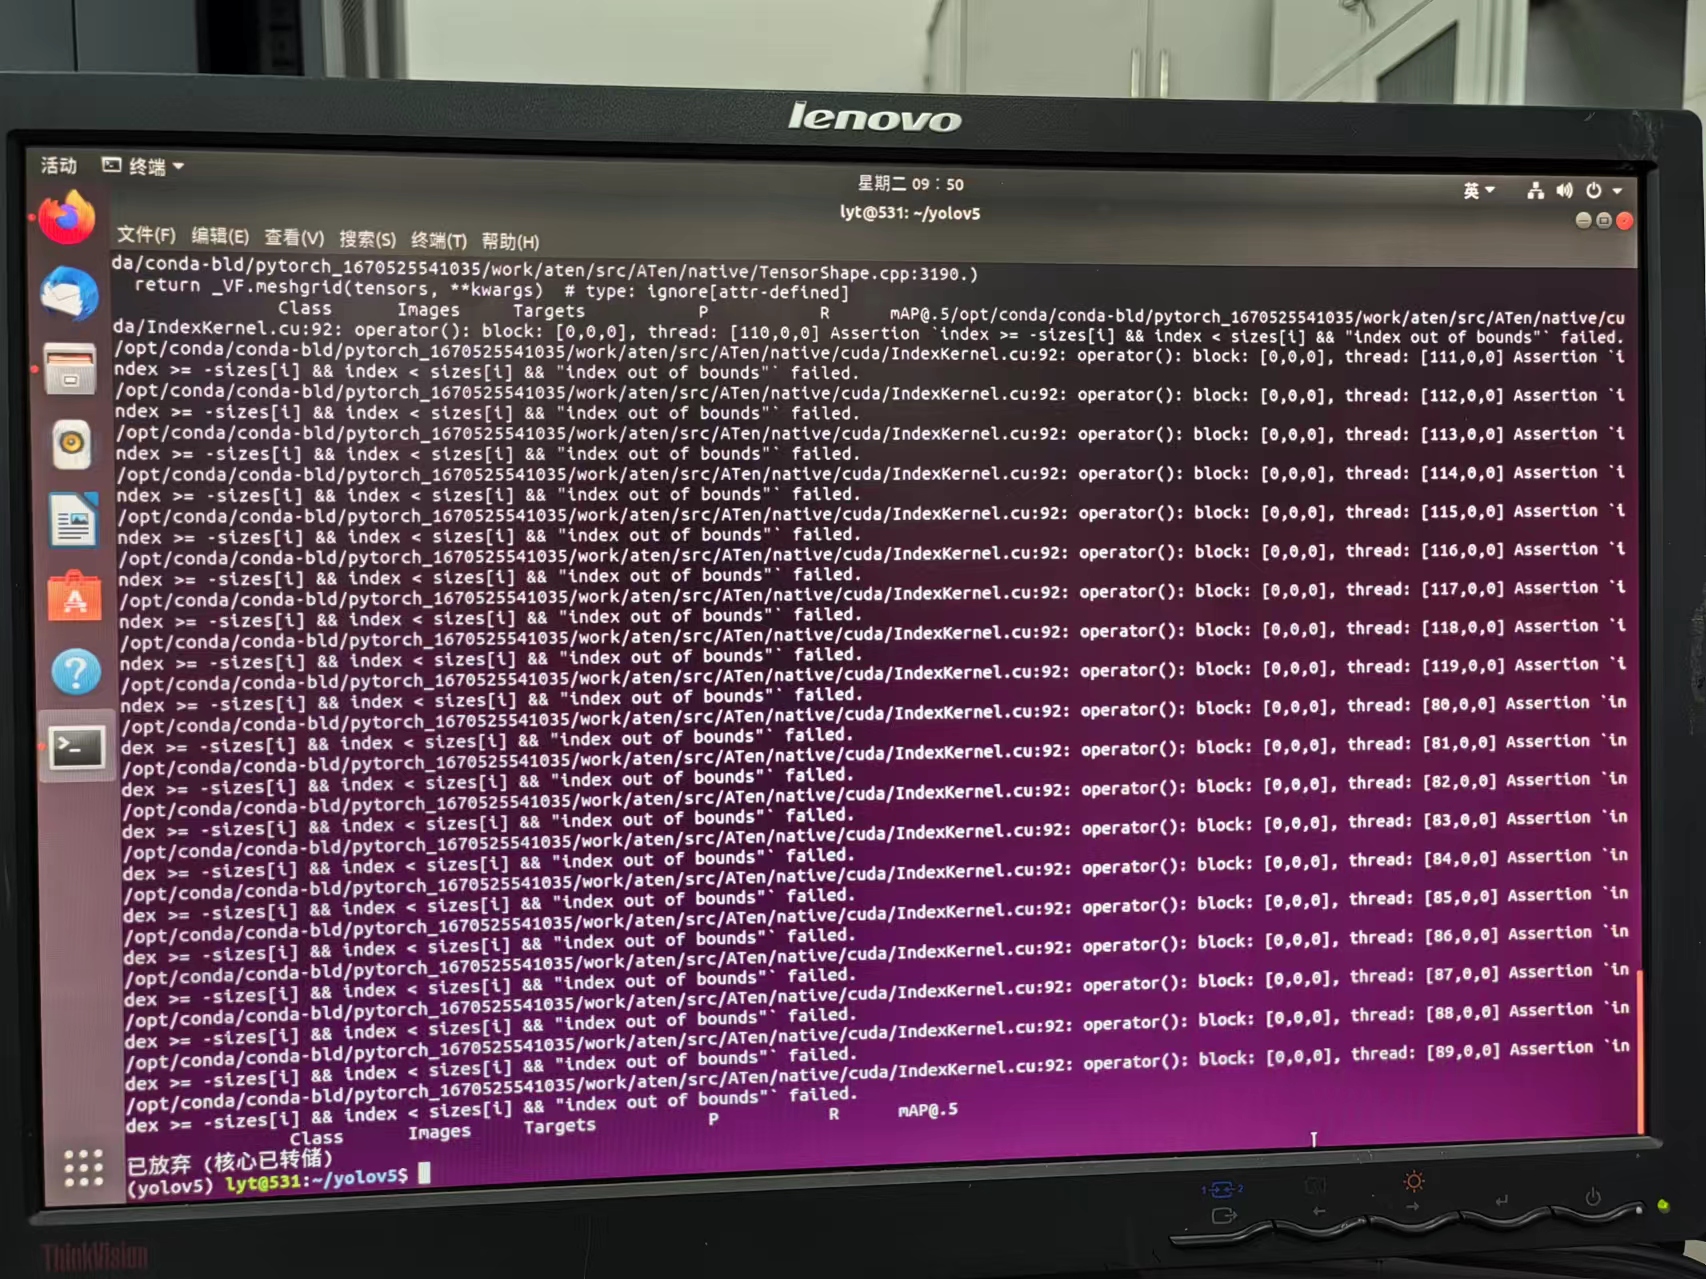
问题1:    b[:, 4] += math.log(8 / (640 / s) ** 2)  # obj (8 objects per 640 image)
RuntimeError: a view of a leaf Variable that requires grad is being used in an in-place operation.
for mi, s in zip(m.m, m.stride):  #  from
            b = mi.bias.view(m.na, -1)  # conv.bias(255) to (3,85)
            with torch.no_grad(): #ADD
                b[:, 4] += math.log(8 / (640 / s) ** 2)  # obj (8 objects per 640 image)
                b[:, 5:] += math.log(0.6 / (m.nc - 0.99)) if cf is None else torch.log(cf / cf.sum())  # cls
            mi.bias = torch.nn.Parameter(b.view(-1), requires_grad=True)
问题2:
File "/home/guosheng/code/yolov5/utils/utils.py", line 533, in build_targets
a, t = at[j], t.repeat(na, 1, 1)[j]  # filter
RuntimeError: indices should be either on cpu or on the same device as the indexed tensor (cpu)
    # at = torch.arange(na).view(na, 1).repeat(1, nt)  # anchor tensor, same as .repeat_interleave(nt)
    at = torch.tensor(torch.arange(na).view(na, 1).repeat(1, nt),device=targets.device)  # anchor tensor, same as .repeat_interleave(nt)
问题3:
TypeError: can't convert cuda:0 device type tensor to numpy. Use Tensor.cpu() to copy the tensor to host memory first.
# for pred in o:
for pred in o.cpu():
第四章:模型转换
第一步:原始pt模型转onnx模型
由于地平线的工具链支持版本为onnx6 和7,opset版本为10和11,所以要进行对应版本调整,同时由于输出限定为1*X*X*X,需要对输出进行维度同步调整
1. 依赖环境安装
pip install onnx==1.7 -i https://pypi.tuna.tsinghua.edu.cn/simple2. 修改版本导出版本:export.py 文件第48行
torch.onnx.export(model, img, f, verbose=False, opset_version=11, input_names=['images'],
                          output_names=['classes', 'boxes'] if y is None else ['output'])
3. 修改输出节点维度信息:yolo.py 文件 29行
x[i] = x[i].permute(0, 2, 3, 1).contiguous()4. 执行模型转换操作:
export PYTHONPATH="$PWD"
python models/export.py --weights runs/exp3/weights/best.pt --img-size 672 --batch-size 1
#这里分辨率可以调整
第二步:模型量化
具体参考地平线旭日X3派用户手册,需要进行环境的配置安装,创建转换环境,下载事例包,在事例包中替换校准数据(训练数据中取50张标准数据)、校准模型(转换好的onnx模型)
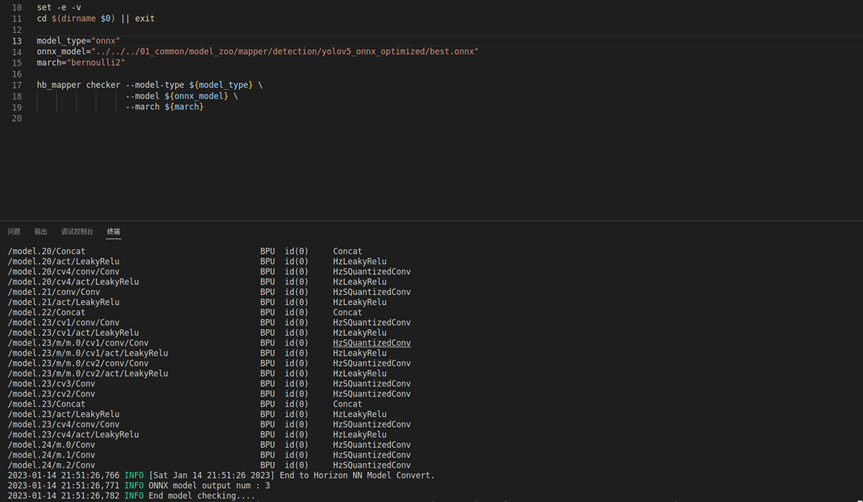
1. 模型校验:sh 01_check.sh
2. 数据预处理:sh 02_preprocess.sh
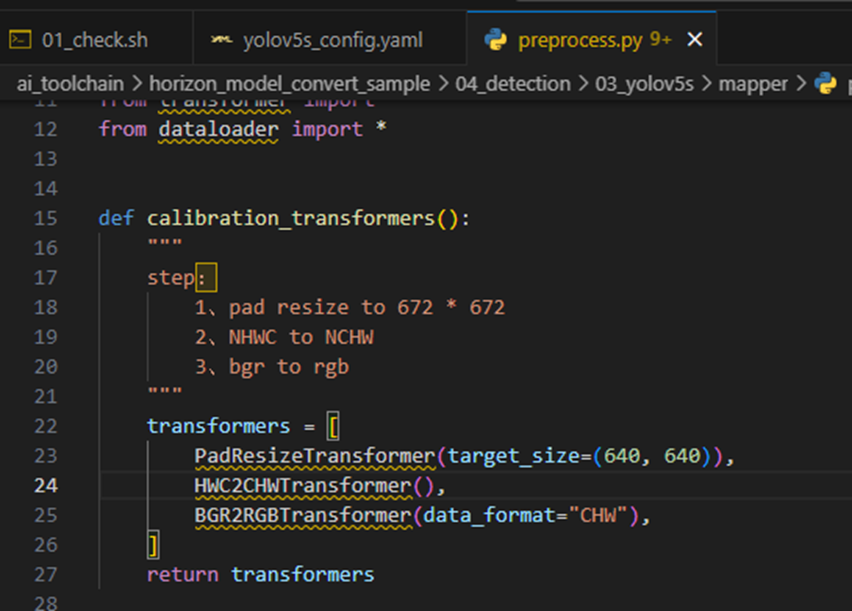
1. 这里需要注意一下,我使用的数据分辨率为672*672,和OE文档中的数据保持一致,所以直接数据预处理即可,如果使用yolo官方的分辨率640*640,需要修改校准图像的分辨率,具体路径如下:
3. 量化模型:sh 03_build.sh
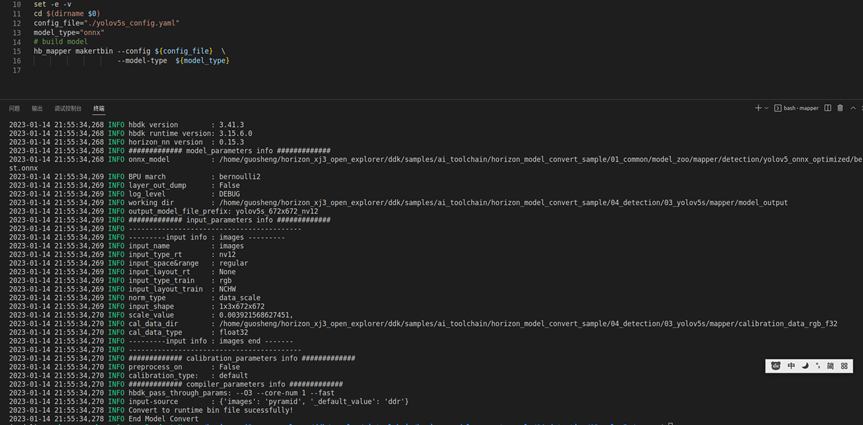
这里大家需要注意下,运行的过程中会有模型的输出结构信息,需要记录下来,上板我们的后处理需要根据这里进行一定的调整和修改,这里是640分辨率,2分类的输出,不同分辨率会有不同的特征输出。
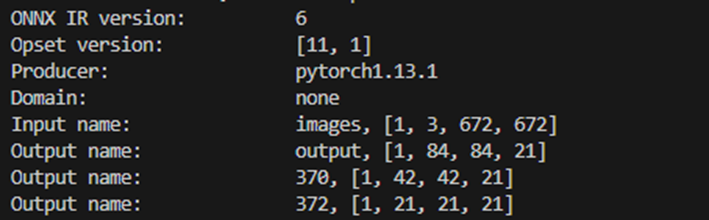
672*672分辨率,二分类的模型特征输出如下:
4. 量化模型效果验证:sh 04_inference.sh
5. 量化模型精度校验:耗时较长,未验证
第五章:板端部署
第一步:python推理部署
版本自带的python推理算法包括了yolov5,可以直接借鉴使用
1. 修改配置文件:检测类别由coco数据集的80类,改为2分类,然后数据标签改为 fire smoke
2. 替换掉原有的bin模型
3. 修改代码中的类别模块相关代码,如果分辨率做了调整,也要调整下对应的数据处理模块
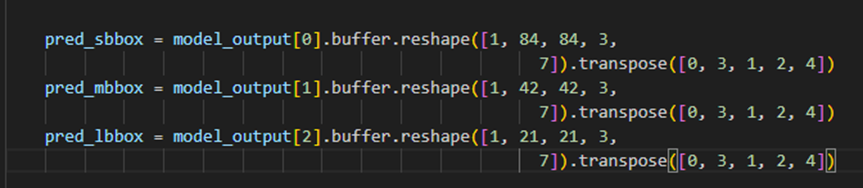
672*672分辨率,2分类下,原有80分类的解析85=(80+4+1)修改为7=(2+4+1),具体如下
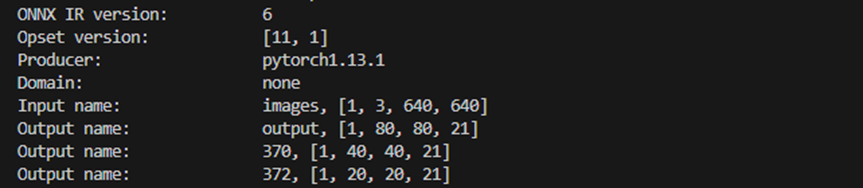
640*640分辨率,2分类下,原有80分类的解析85=(80+4+1)修改为7=(2+4+1),特征分辨率分别调整为80、40和20,具体如下

第二步:机器人平台部署
算法推理源码链接:https://c-gitlab.horizon.ai/HHP/box/hobot_dnn 注册后下载,切换到系统对应分支
- 替换配置文件,修改代码
git clone https://c-gitlab.horizon.ai/HHP/box/hobot_dnn.git git checkout tros_1.1.3
PTQYolo5Config yolo5_config_ = {     {8, 16, 32},     {{{10, 13}, {16, 30}, {33, 23}},      {{30, 61}, {62, 45}, {59, 119}},      {{116, 90}, {156, 198}, {373, 326}}},     2,     {"fire","smoke"}};
- 重新编译并替换机器人平台的执行文件
当前编译终端已设置TROS环境变量:source /opt/tros/setup.bash。
已安装ROS2软件包构建系统ament_cmake。安装命令:apt update; apt-get install python3-catkin-pkg; pip3 install empy
已安装ROS2编译工具colcon。安装命令:pip3 install -U colcon-common-extensions
编译命令:colcon build --packages-select dnn_node_sample
编译结束后,把生成的二进制文件、模型和图片替换掉tros的相关内容即可
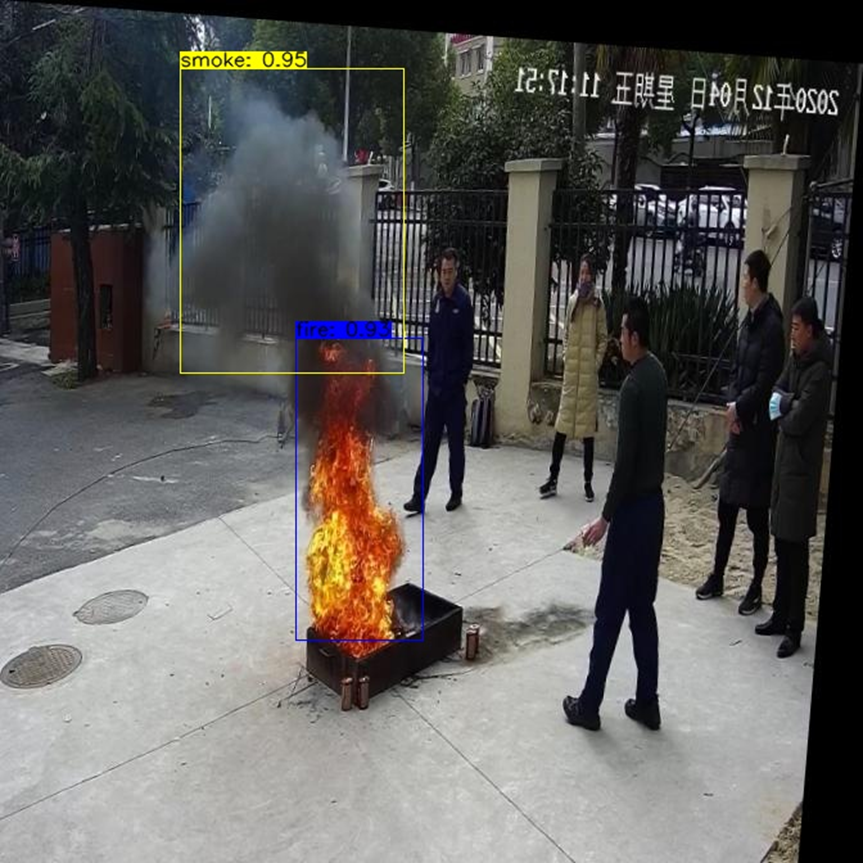
- 运行效果
本地回灌:
source /opt/tros/setup.bash
# 配置本地图片回灌
export CAM_TYPE=fb
# 使用的本地图片为/opt/tros/lib/dnn_node_sample/config/target.jpg
 ros2 launch dnn_node_sample hobot_dnn_node_sample.launch.py
简单部署方案:
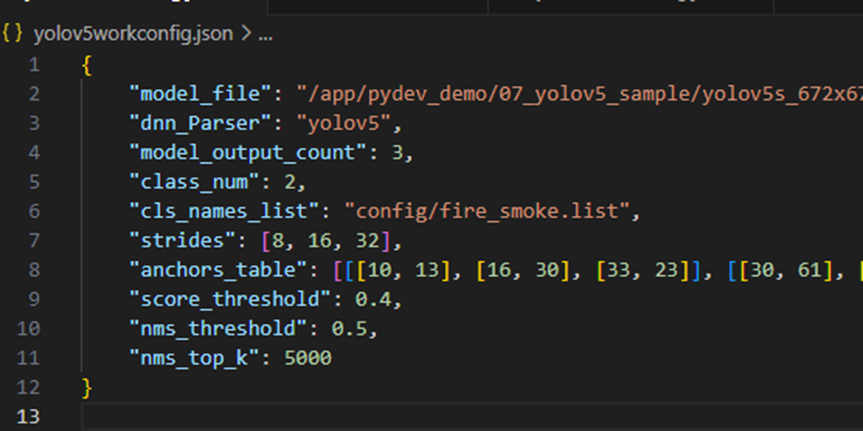
- 找到配置文件,/opt/tros/lib/dnn_node_example/config/yolov5workconfig.json
- 修改模型路径、模型输出类别、配置文件类别,直接按照tros运行推理即可
链接:https://pan.baidu.com/s/1oEy83ZljAZt9HXesc4cR1Q?pwd=ddhd
提取码:ddhd
--来自百度网盘超级会员V6的分享