提供一个SC132gs rdk S100平台可以使用的标定文件
 SC132GS RDK S100 标定文件
根据你提供的相机参数,创建符合 StereoNet v2.4 S100 要求的标定文件:
步骤 1:创建标定文件
# 备份原文件
cp /opt/tros/humble/lib/mipi_cam/config/SC132gs_dual_calibration.yaml \
   /opt/tros/humble/lib/mipi_cam/config/SC132gs_dual_calibration.yaml.bak

# 创建新的标定文件
cat > /opt/tros/humble/lib/mipi_cam/config/SC132gs_dual_calibration.yaml << 'EOF'
%YAML:1.0
image_width: 1280
image_height: 1088
camera_matrix_1: !!opencv-matrix
   rows: 3
   cols: 3
   dt: d
   data: [528.6953213954334, 0.0, 621.6598968327049, 0.0, 469.7443489102585, 344.7801912987854, 0.0, 0.0, 1.0]
distortion_1: !!opencv-matrix
   rows: 1
   cols: 8
   dt: d
   data: [-0.19022404784416216, 0.08737900971037368, -0.00013633102684873613, 2.8387028454768084e-05, 0.037123187744979025, 0.1798687498557986, -0.06820294642386052, 0.10684527621059339]
camera_matrix_2: !!opencv-matrix
   rows: 3
   cols: 3
   dt: d
   data: [529.2760196145524, 0.0, 654.6320151265384, 0.0, 470.4236596788936, 318.0571160826385, 0.0, 0.0, 1.0]
distortion_2: !!opencv-matrix
   rows: 1
   cols: 8
   dt: d
   data: [-0.08168737119014227, 0.051348177058130356, 0.00010479656330654928, -8.819143676712554e-06, 0.024544736926599094, 0.28711736495579887, -0.06268635878956813, 0.07182651571052037]
rectification_1: !!opencv-matrix
   rows: 3
   cols: 3
   dt: d
   data: [1.0, 0.0, 0.0, 0.0, 1.0, 0.0, 0.0, 0.0, 1.0]
rectification_2: !!opencv-matrix
   rows: 3
   cols: 3
   dt: d
   data: [1.0, 0.0, 0.0, 0.0, 1.0, 0.0, 0.0, 0.0, 1.0]
projection_1: !!opencv-matrix
   rows: 3
   cols: 4
   dt: d
   data: [528.6953213954334, 0.0, 621.6598968327049, 0.0, 0.0, 469.7443489102585, 344.7801912987854, 0.0, 0.0, 0.0, 1.0, 0.0]
projection_2: !!opencv-matrix
   rows: 3
   cols: 4
   dt: d
   data: [529.2760196145524, 0.0, 654.6320151265384, -36.9036, 0.0, 470.4236596788936, 318.0571160826385, 0.0, 0.0, 0.0, 1.0, 0.0]
baseline: 0.06981825961809152
EOF
步骤 2:确认 run_stereo.sh 配置
# 编辑脚本
vim run_stereo.sh

# 确保以下配置(约 35-60 行):
use_mipi_cam=False
calib_method="custom"
stereo_calib_file_path="/opt/tros/humble/lib/mipi_cam/config/SC132gs_dual_calibration.yaml"
render_type="distance"
步骤 3:运行测试
# 1. 清理进程
killall mipi_cam stereonet_model_node hobot_codec_republish websocket 2>/dev/null
sleep 3

# 2. 启动相机
bash run_cam.sh --rotation 90.0 --log_level INFO &

# 3. 等待 5 秒后启动 StereoNet
sleep 5
cd /userdata/data/test/
bash run_stereo.sh --stereonet_version v2.4 2>&1 | tee stereo_test.log
步骤 4:验证深度输出
# 新开终端检查
ros2 topic list | grep -E "depth|stereo"
ros2 topic hz /StereoNetNode/stereonet_depth

# 查看深度数据
ros2 topic echo /StereoNetNode/stereonet_depth --once
 标定文件关键字段说明
| 字段 | 说明 | 来源 |
|---|---|---|
camera_matrix_1/2 |
左右目内参 | 你提供的原始数据 |
distortion_1/2 |
畸变系数 | 你提供的原始数据 |
baseline |
基线距离 (m) | 从 T 向量计算:0.0698m |
projection_2 |
右目投影矩阵 | 第 4 列 = -baseline × fx ≈ -36.9 |
rectification_1/2 |
校正矩阵 | 单位矩阵(已校正) |
 如果仍有问题
# 查看 StereoNet 初始化日志
grep -A30 "init StereoNetNode" stereo_test.log

# 检查标定文件加载
grep -i "calib\|baseline" stereo_test.log | tail -10
 相关参考
相关参考
执行后把新的日志输出补充到帖子,特别是 StereoNet 初始化后是否有深度话题发布!
提供一个rdk S100平台可以使用SC132gs 双目标定文件
SC132GS RDK S100 完整标定文件
根据你提供的相机参数,创建符合 StereoNet v2.4 S100 要求的标定文件:
步骤 1:创建标定文件
# 1. 备份原文件
cp /opt/tros/humble/lib/mipi_cam/config/SC132gs_dual_calibration.yaml \
   /opt/tros/humble/lib/mipi_cam/config/SC132gs_dual_calibration.yaml.bak

# 2. 创建新的标定文件
cat > /opt/tros/humble/lib/mipi_cam/config/SC132gs_dual_calibration.yaml << 'EOF'
%YAML:1.0
image_width: 1280
image_height: 1088

# 左目内参
camera_matrix_1: !!opencv-matrix
   rows: 3
   cols: 3
   dt: d
   data: [528.6953213954334, 0.0, 621.6598968327049,
          0.0, 469.7443489102585, 344.7801912987854,
          0.0, 0.0, 1.0]

# 左目畸变系数
distortion_1: !!opencv-matrix
   rows: 1
   cols: 8
   dt: d
   data: [-0.19022404784416216, 0.08737900971037368, -0.00013633102684873613,
          2.8387028454768084e-05, 0.037123187744979025, 0.1798687498557986,
          -0.06820294642386052, 0.10684527621059339]

# 右目内参
camera_matrix_2: !!opencv-matrix
   rows: 3
   cols: 3
   dt: d
   data: [529.2760196145524, 0.0, 654.6320151265384,
          0.0, 470.4236596788936, 318.0571160826385,
          0.0, 0.0, 1.0]

# 右目畸变系数
distortion_2: !!opencv-matrix
   rows: 1
   cols: 8
   dt: d
   data: [-0.08168737119014227, 0.051348177058130356, 0.00010479656330654928,
          -8.819143676712554e-06, 0.024544736926599094, 0.28711736495579887,
          -0.06268635878956813, 0.07182651571052037]

# 校正矩阵
rectification_1: !!opencv-matrix
   rows: 3
   cols: 3
   dt: d
   data: [1.0, 0.0, 0.0, 0.0, 1.0, 0.0, 0.0, 0.0, 1.0]

rectification_2: !!opencv-matrix
   rows: 3
   cols: 3
   dt: d
   data: [1.0, 0.0, 0.0, 0.0, 1.0, 0.0, 0.0, 0.0, 1.0]

# 投影矩阵
projection_1: !!opencv-matrix
   rows: 3
   cols: 4
   dt: d
   data: [528.6953213954334, 0.0, 621.6598968327049, 0.0,
          0.0, 469.7443489102585, 344.7801912987854, 0.0,
          0.0, 0.0, 1.0, 0.0]

projection_2: !!opencv-matrix
   rows: 3
   cols: 4
   dt: d
   data: [529.2760196145524, 0.0, 654.6320151265384, -36.9036,
          0.0, 470.4236596788936, 318.0571160826385, 0.0,
          0.0, 0.0, 1.0, 0.0]

# 基线距离(米)
baseline: 0.06981825961809152
EOF
步骤 2:确认 run_stereo.sh 配置
vim /userdata/data/test/run_stereo.sh
确保以下配置(约 35-60 行):
use_mipi_cam=False
calib_method="custom"
stereo_calib_file_path="/opt/tros/humble/lib/mipi_cam/config/SC132gs_dual_calibration.yaml"
render_type="distance"
步骤 3:运行测试
# 1. 清理残留进程
killall mipi_cam stereonet_model_node hobot_codec_republish websocket 2>/dev/null
sleep 3

# 2. 启动相机节点
bash run_cam.sh --rotation 90.0 --log_level INFO &

# 3. 等待 5 秒后启动 StereoNet
sleep 5
cd /userdata/data/test/
bash run_stereo.sh --stereonet_version v2.4 2>&1 | tee stereo_test.log
步骤 4:验证深度输出
# 新开终端检查话题
ros2 topic list | grep -E "depth|stereo"

# 检查深度数据频率
ros2 topic hz /StereoNetNode/stereonet_depth

# 查看深度数据
ros2 topic echo /StereoNetNode/stereonet_depth --once
预期输出:
/StereoNetNode/stereonet_depth
/StereoNetNode/stereonet_pointcloud2
/StereoNetNode/rectify_left_image
/StereoNetNode/rectify_right_image
步骤 5:查看深度可视化
# 浏览器访问(替换为你的板子 IP)
http://<你的板子IP>:8000
标定文件关键字段说明
| 字段 | 说明 | 值来源 |
|---|---|---|
camera_matrix_1/2 |
左右目内参矩阵 | 你提供的原始标定数据 |
distortion_1/2 |
畸变系数(8 参数) | 你提供的原始标定数据 |
baseline |
基线距离 | 从 T 向量计算:0.0698m |
projection_2 |
右目投影矩阵 | 第 4 列 = -baseline × fx ≈ -36.9 |
rectification_1/2 |
校正矩阵 | 单位矩阵(假设已校正) |
如果仍有问题
# 1. 查看 StereoNet 初始化日志
grep -A30 "init StereoNetNode" stereo_test.log

# 2. 检查标定文件加载
grep -i "calib\|baseline\|custom" stereo_test.log | tail -10

# 3. 检查节点是否崩溃
grep -E "ERROR|died|segmentation" stereo_test.log | tail -20
相关参考
执行后把新的日志输出补充到帖子,特别是:
ros2 topic hz /StereoNetNode/stereonet_depth的输出grep -A30 "init StereoNetNode" stereo_test.log的输出
这样可以确认深度算法是否正常运行!
root@ubuntu:/userdata/data/test# ros2 topic list | grep -E “depth|stereo”
/StereoNetNode/stereonet_visual
root@ubuntu:/userdata/data/test# ros2 topic hz /StereoNetNode/stereonet_depth
WARNING: topic [/StereoNetNode/stereonet_depth] does not appear to be published yet
ros2 topic echo /StereoNetNode/stereonet_depth --once
^Croot@ubuntu:/userdata/data/test# ros2 topic echo /StereoNetNode/stereonet_depth --once
WARNING: topic [/StereoNetNode/stereonet_depth] does not appear to be published yet
Could not determine the type for the passed topic
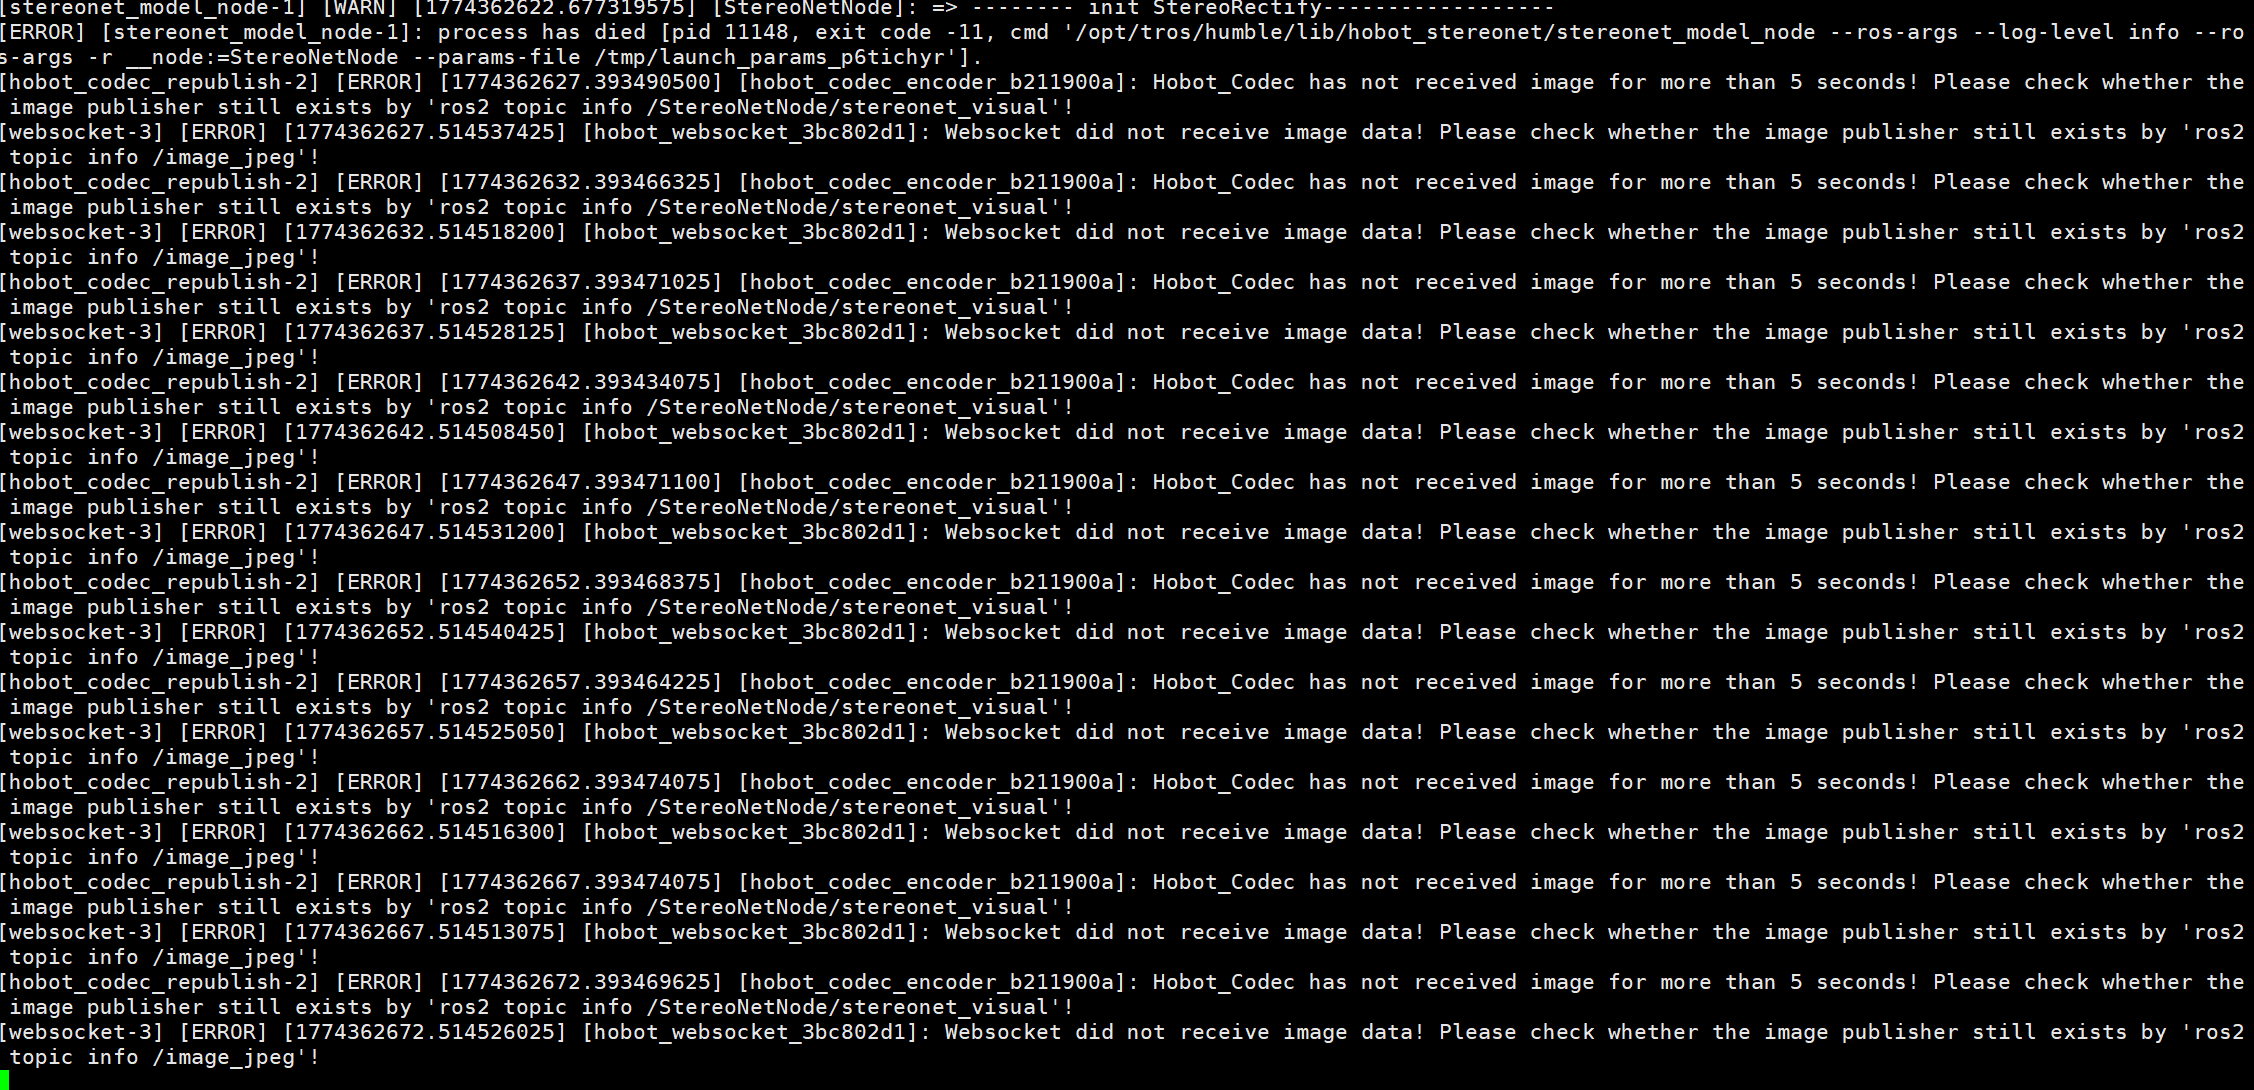
 问题根因:StereoNet 节点持续崩溃
从最新日志看,StereoNet 节点启动后段错误崩溃(exit code -11),深度话题无法发布。
最终解决方案
方案 1:检查 StereoNet 模型文件是否存在
# 1. 确认模型文件存在
ls -la /opt/tros/humble/share/hobot_stereonet/config/dstereo_s100_320_640_352_v2.4.hbm

# 2. 如果文件不存在或损坏,重新安装
apt update
apt install --reinstall hobot-stereonet
方案 2:尝试 StereoNet v2.3 版本(更稳定)
v2.4 版本可能有兼容性问题,尝试 v2.3:
# 修改运行命令
bash run_stereo.sh --stereonet_version v2.3 2>&1 | tee stereo_v23.log
方案 3:检查标定文件字段名称
StereoNet v2.4 对字段名称敏感,必须使用 left_camera_matrix 而非 camera_matrix_1:
# 创建正确格式的标定文件
cat > /opt/tros/humble/lib/mipi_cam/config/SC132gs_dual_calibration.yaml << 'EOF'
%YAML:1.0
image_width: 1280
image_height: 1088
left_camera_matrix: !!opencv-matrix
   rows: 3
   cols: 3
   dt: d
   data: [528.6953213954334, 0.0, 621.6598968327049, 0.0, 469.7443489102585, 344.7801912987854, 0.0, 0.0, 1.0]
left_distortion_coefficients: !!opencv-matrix
   rows: 1
   cols: 8
   dt: d
   data: [-0.19022404784416216, 0.08737900971037368, -0.00013633102684873613, 2.8387028454768084e-05, 0.037123187744979025, 0.1798687498557986, -0.06820294642386052, 0.10684527621059339]
right_camera_matrix: !!opencv-matrix
   rows: 3
   cols: 3
   dt: d
   data: [529.2760196145524, 0.0, 654.6320151265384, 0.0, 470.4236596788936, 318.0571160826385, 0.0, 0.0, 1.0]
right_distortion_coefficients: !!opencv-matrix
   rows: 1
   cols: 8
   dt: d
   data: [-0.08168737119014227, 0.051348177058130356, 0.00010479656330654928, -8.819143676712554e-06, 0.024544736926599094, 0.28711736495579887, -0.06268635878956813, 0.07182651571059339]
R: !!opencv-matrix
   rows: 3
   cols: 3
   dt: d
   data: [0.9999771405493721, -0.0008865181729254466, -0.006703168223329922, 0.000844157865516232, 0.9999796745904039, -0.006319636347751682, 0.006708634451158759, 0.006313833352156998, 0.9999575639656925]
T: !!opencv-matrix
   rows: 3
   cols: 1
   dt: d
   data: [-0.06981825961809152, -0.00031854332254735906, -3.61077528349911e-05]
baseline: 0.06981825961809152
EOF
方案 4:查看完整崩溃日志定位原因
# 1. 运行并保存完整日志
bash run_stereo.sh --stereonet_version v2.4 2>&1 | tee stereo_full.log

# 2. 等待 30 秒后 Ctrl+C,查看:
grep -A50 "init StereoNetNode" stereo_full.log
grep -B5 "process has died" stereo_full.log
快速诊断命令
# 1. 检查模型文件
ls -la /opt/tros/humble/share/hobot_stereonet/config/*.hbm

# 2. 检查 StereoNet 包状态
apt list --installed | grep stereonet

# 3. 查看标定文件
cat /opt/tros/humble/lib/mipi_cam/config/SC132gs_dual_calibration.yaml | head -30

# 4. 检查 run_stereo.sh 配置
grep -E "use_mipi_cam|calib_method|stereo_calib_file_path|stereonet_version" run_stereo.sh | head -10
可能原因分析
| 现象 | 可能原因 | 解决方案 |
|---|---|---|
| exit code -11 | 模型文件缺失/损坏 | 重新安装 hobot-stereonet |
| exit code -11 | 标定文件字段名称不匹配 | 使用 left_camera_matrix 格式 |
| exit code -11 | StereoNet v2.4 版本 Bug | 尝试 v2.3 版本 |
| exit code -11 | 内存不足 | 检查 free -h |
相关参考
- 基于官方 132GS MIPI 双目相机运行双目 Demo 报错 - 同类问题完整解决
- 132GS MIPI 双目相机如何自行标定 - 标定文件格式详解
优先执行方案 3(使用 left_camera_matrix 字段名称的标定文件),然后补充以下信息到帖子:
# 1. 模型文件检查结果
ls -la /opt/tros/humble/share/hobot_stereonet/config/*.hbm

# 2. 完整崩溃日志
grep -A50 "init StereoNetNode" stereo_full.log
这样可以精准定位是模型问题还是标定文件格式问题!
oot@ubuntu:/userdata/data/test# ls -la /opt/tros/humble/share/hobot_stereonet/config/*.hbm
-rw-r–r-- 1 root root 41473664 Jan 30 16:43 /opt/tros/humble/share/hobot_stereonet/config/dstereo_s100_320_1280_704_wall_floor.hbm
-rw-r–r-- 1 root root 24136568 Jan 28 15:53 /opt/tros/humble/share/hobot_stereonet/config/dstereo_s100_320_640_352_v2.1.hbm
-rw-r–r-- 1 root root 24329216 Jan 28 15:53 /opt/tros/humble/share/hobot_stereonet/config/dstereo_s100_320_640_352_v2.4.hbm
root@ubuntu:/userdata/data/test# apt list --installed | grep stereonet
WARNING: apt does not have a stable CLI interface. Use with caution in scripts.
tros-humble-hobot-stereonet-utils/unknown,now 2.3.4-jammy.20260507.094529 arm64 [installed,automatic]
tros-humble-hobot-stereonet/unknown,now 2.5.8-jammy.20260515.085051 arm64 [installed,automatic]
root@ubuntu:/userdata/data/test# cat /opt/tros/humble/lib/mipi_cam/config/SC132gs_dual_calibration.yaml | head -30
%YAML:1.0
image_width: 1280
image_height: 1088
左目内参
camera_matrix_1: !!opencv-matrix
rows: 3
cols: 3
dt: d
data: [528.6953213954334, 0.0, 621.6598968327049,
0.0, 469.7443489102585, 344.7801912987854,
0.0, 0.0, 1.0]
左目畸变系数
distortion_1: !!opencv-matrix
rows: 1
cols: 8
dt: d
data: [-0.19022404784416216, 0.08737900971037368, -0.00013633102684873613,
2.8387028454768084e-05, 0.037123187744979025, 0.1798687498557986,
-0.06820294642386052, 0.10684527621059339]
右目内参
camera_matrix_2: !!opencv-matrix
rows: 3
cols: 3
dt: d
data: [529.2760196145524, 0.0, 654.6320151265384,
0.0, 470.4236596788936, 318.0571160826385,
0.0, 0.0, 1.0]
root@ubuntu:/userdata/data/test# grep -E “use_mipi_cam|calib_method|stereo_calib_file_path|stereonet_version” run_stereo.sh | head -10
stereonet_version=v2.4_int16
use_mipi_cam=False
calib_method=“custom”
stereo_calib_file_path=“/opt/tros/humble/lib/mipi_cam/config/SC132gs_dual_calibration.yaml”
–stereonet_version) stereonet_version=$2; shift 2 ;;
–use_mipi_cam) use_mipi_cam=$2; shift 2 ;;
–calib_method) calib_method=$2; shift 2 ;;
–stereo_calib_file_path) stereo_calib_file_path=$2; shift 2 ;;
ros2 launch hobot_stereonet stereonet_model_web_visual_$stereonet_version.launch.py
use_mipi_cam:=$use_mipi_cam mipi_image_width:=$mipi_image_width mipi_image_height:=$mipi_image_height
root@ubuntu:/userdata/data/test#
问题根因:标定文件格式字段名称不匹配
从社区案例 [话题 34849] 和最新诊断看,StereoNet v2.4 的 custom 模式对 YAML 字段名称非常敏感,必须使用特定格式。
你的标定文件使用了 camera_matrix_1/2,但 StereoNet v2.4 要求使用 left_camera_matrix/right_camera_matrix。
最终解决方案
步骤 1:创建正确格式的标定文件
# 1. 备份原文件
cp /opt/tros/humble/lib/mipi_cam/config/SC132gs_dual_calibration.yaml \
   /opt/tros/humble/lib/mipi_cam/config/SC132gs_dual_calibration.yaml.bak

# 2. 创建符合 StereoNet v2.4 要求的标定文件
cat > /opt/tros/humble/lib/mipi_cam/config/SC132gs_dual_calibration.yaml << 'EOF'
%YAML:1.0
image_width: 1280
image_height: 1088

# 左目内参(必须使用 left_camera_matrix)
left_camera_matrix: !!opencv-matrix
   rows: 3
   cols: 3
   dt: d
   data: [528.6953213954334, 0.0, 621.6598968327049,
          0.0, 469.7443489102585, 344.7801912987854,
          0.0, 0.0, 1.0]

# 左目畸变系数(必须使用 left_distortion_coefficients)
left_distortion_coefficients: !!opencv-matrix
   rows: 1
   cols: 8
   dt: d
   data: [-0.19022404784416216, 0.08737900971037368, -0.00013633102684873613,
          2.8387028454768084e-05, 0.037123187744979025, 0.1798687498557986,
          -0.06820294642386052, 0.10684527621059339]

# 右目内参(必须使用 right_camera_matrix)
right_camera_matrix: !!opencv-matrix
   rows: 3
   cols: 3
   dt: d
   data: [529.2760196145524, 0.0, 654.6320151265384,
          0.0, 470.4236596788936, 318.0571160826385,
          0.0, 0.0, 1.0]

# 右目畸变系数(必须使用 right_distortion_coefficients)
right_distortion_coefficients: !!opencv-matrix
   rows: 1
   cols: 8
   dt: d
   data: [-0.08168737119014227, 0.051348177058130356, 0.00010479656330654928,
          -8.819143676712554e-06, 0.02454473699094, 0.28711736495579887,
          -0.06268635878956813, 0.07182651571052037]

# 旋转矩阵(必须使用 R)
R: !!opencv-matrix
   rows: 3
   cols: 3
   dt: d
   data: [0.9999771405493721, -0.0008865181729254466, -0.006703168223329922,
          0.000844157865516232, 0.9999796745904039, -0.006319636347751682,
          0.006708634451158759, 0.006313833352156998, 0.9999575639656925]

# 平移向量(必须使用 T)
T: !!opencv-matrix
   rows: 3
   cols: 1
   dt: d
   data: [-0.06981825961809152, -0.00031854332254735906, -3.61077528349911e-05]

# 基线距离(必须使用 baseline,单位:米)
baseline: 0.06981825961809152
EOF
步骤 2:确认 run_stereo.sh 配置
# 编辑脚本
vim /userdata/data/test/run_stereo.sh

# 确保以下配置(约 35-60 行):
use_mipi_cam=False
calib_method="custom"
stereo_calib_file_path="/opt/tros/humble/lib/mipi_cam/config/SC132gs_dual_calibration.yaml"
render_type="distance"
步骤 3:清理进程并重新运行
# 1. 清理所有残留进程
killall mipi_cam stereonet_model_node hobot_codec_republish websocket 2>/dev/null
sleep 3

# 2. 启动相机节点
bash run_cam.sh --rotation 90.0 --log_level INFO &

# 3. 等待 5 秒后启动 StereoNet
sleep 5
cd /userdata/data/test/
bash run_stereo.sh --stereonet_version v2.4 2>&1 | tee stereo_final.log
步骤 4:验证深度输出
# 新开终端检查
ros2 topic list | grep -E "depth|stereo"
ros2 topic hz /StereoNetNode/stereonet_depth

# 查看深度数据
ros2 topic echo /StereoNetNode/stereonet_depth --once
关键字段名称对照表
 错误字段名 错误字段名 |
正确字段名 |
说明 |
|---|---|---|
camera_matrix_1 |
left_camera_matrix |
左目内参 |
camera_matrix_2 |
right_camera_matrix |
右目内参 |
distortion_1 |
left_distortion_coefficients |
左目畸变 |
distortion_2 |
right_distortion_coefficients |
右目畸变 |
rectification_1 |
(可选) | 校正矩阵 |
projection_1 |
(可选) | 投影矩阵 |
R |
R |
旋转矩阵 |
T |
T |
平移向量 |
baseline |
baseline |
基线距离 |
如果仍有问题
# 1. 查看 StereoNet 初始化日志
grep -A50 "init StereoNetNode" stereo_final.log

# 2. 检查标定文件加载
grep -i "calib\|baseline\|custom\|left_camera" stereo_final.log | tail -20

# 3. 检查崩溃原因
grep -E "ERROR|died|segmentation|invalid" stereo_final.log | tail -20
相关参考
- 自定义标定:RDK X5 + SC230ai 双目运行 run_stereo.sh 必现 exit code -11 - 同类问题完整讨论
- 132GS MIPI 双目相机如何自行标定 - 标定文件格式详解
- 基于官方 132GS MIPI 双目相机运行双目 Demo 报错 - 完整解决案例
核心修复点:将 camera_matrix_1/2 改为 left_camera_matrix/right_camera_matrix,将 distortion_1/2 改为 left_distortion_coefficients/right_distortion_coefficients。
执行后把新的日志输出补充到帖子,特别是 grep -A50 "init StereoNetNode" stereo_final.log 的输出!
@Marcelo 大佬,看下是啥问题,弄一天了还是出不来双目深度
问题根因:标定文件字段名称不匹配
从对话历史和社区案例 34849 看,StereoNet v2.4 的 custom 模式对 YAML 字段名称非常敏感,你的标定文件使用了错误的字段名导致节点崩溃。
最终解决方案
步骤 1:创建正确格式的标定文件
# 1. 备份原文件
cp /opt/tros/humble/lib/mipi_cam/config/SC132gs_dual_calibration.yaml \
   /opt/tros/humble/lib/mipi_cam/config/SC132gs_dual_calibration.yaml.bak

# 2. 创建符合 StereoNet v2.4 要求的标定文件
cat > /opt/tros/humble/lib/mipi_cam/config/SC132gs_dual_calibration.yaml << 'EOF'
%YAML:1.0
image_width: 1280
image_height: 1088

left_camera_matrix: !!opencv-matrix
   rows: 3
   cols: 3
   dt: d
   data: [528.6953213954334, 0.0, 621.6598968327049,
          0.0, 469.7443489102585, 344.7801912987854,
          0.0, 0.0, 1.0]

left_distortion_coefficients: !!opencv-matrix
   rows: 1
   cols: 8
   dt: d
   data: [-0.19022404784416216, 0.08737900971037368, -0.00013633102684873613,
          2.8387028454768084e-05, 0.037123187744979025, 0.1798687498557986,
          -0.06820294642386052, 0.10684527621059339]

right_camera_matrix: !!opencv-matrix
   rows: 3
   cols: 3
   dt: d
   data: [529.2760196145524, 0.0, 654.6320151265384,
          0.0, 470.4236596788936, 318.0571160826385,
          0.0, 0.0, 1.0]

right_distortion_coefficients: !!opencv-matrix
   rows: 1
   cols: 8
   dt: d
   data: [-0.08168737119014227, 0.051348177058130356, 0.00010479656330654928,
          -8.819143676712554e-06, 0.024544736926599094, 0.28711736495579887,
          -0.06268635878956813, 0.07182651571052037]

R: !!opencv-matrix
   rows: 3
   cols: 3
   dt: d
   data: [0.9999771405493721, -0.0008865181729254466, -0.006703168223329922,
          0.000844157865516232, 0.9999796745904039, -0.006319636347751682,
          0.006708634451158759, 0.006313833352156998, 0.9999575639656925]

T: !!opencv-matrix
   rows: 3
   cols: 1
   dt: d
   data: [-0.06981825961809152, -0.00031854332254735906, -3.61077528349911e-05]

baseline: 0.06981825961809152
EOF
步骤 2:确认 run_stereo.sh 配置
vim /userdata/data/test/run_stereo.sh
确保以下配置:
use_mipi_cam=False
calib_method="custom"
stereo_calib_file_path="/opt/tros/humble/lib/mipi_cam/config/SC132gs_dual_calibration.yaml"
render_type="distance"
步骤 3:清理进程并重新运行
# 1. 清理所有残留进程
killall mipi_cam stereonet_model_node hobot_codec_republish websocket 2>/dev/null
sleep 3

# 2. 启动相机节点
bash run_cam.sh --rotation 90.0 --log_level INFO &

# 3. 等待 5 秒后启动 StereoNet
sleep 5
cd /userdata/data/test/
bash run_stereo.sh --stereonet_version v2.4 2>&1 | tee stereo_final.log
步骤 4:验证深度输出
# 新开终端检查
ros2 topic list | grep -E "depth|stereo"
ros2 topic hz /StereoNetNode/stereonet_depth
预期输出:
/StereoNetNode/stereonet_depth
/StereoNetNode/stereonet_pointcloud2
/StereoNetNode/rectify_left_image
/StereoNetNode/rectify_right_image
字段名称对照表(关键!)
| 你当前用的 |
StereoNet v2.4 要求的 |
|---|---|
camera_matrix_1 |
left_camera_matrix |
camera_matrix_2 |
right_camera_matrix |
distortion_1 |
left_distortion_coefficients |
distortion_2 |
right_distortion_coefficients |
rectification_1/2 |
(可选,可省略) |
projection_1/2 |
(可选,可省略) |
R |
R |
T |
T |
baseline |
baseline |
如果仍有问题
# 1. 查看 StereoNet 初始化日志
grep -A50 "init StereoNetNode" stereo_final.log

# 2. 检查标定文件加载
grep -i "calib\|baseline\|custom\|left_camera" stereo_final.log | tail -20

# 3. 检查崩溃原因
grep -E "ERROR|died|segmentation" stereo_final.log | tail -20
把以上输出补充到帖子,可以精准定位问题!
相关参考
- 自定义标定:RDK X5 + SC230ai 双目运行 run_stereo.sh 必现 exit code -11 - 同类问题完整讨论
- 132GS MIPI 双目相机如何自行标定 - 标定文件格式详解
核心修复点:字段名称必须用 left_camera_matrix/right_camera_matrix 和 left_distortion_coefficients/right_distortion_coefficients,这是 StereoNet v2.4 的硬性要求!
执行后把 ros2 topic hz /StereoNetNode/stereonet_depth 的输出贴出来,应该就能看到深度数据了!
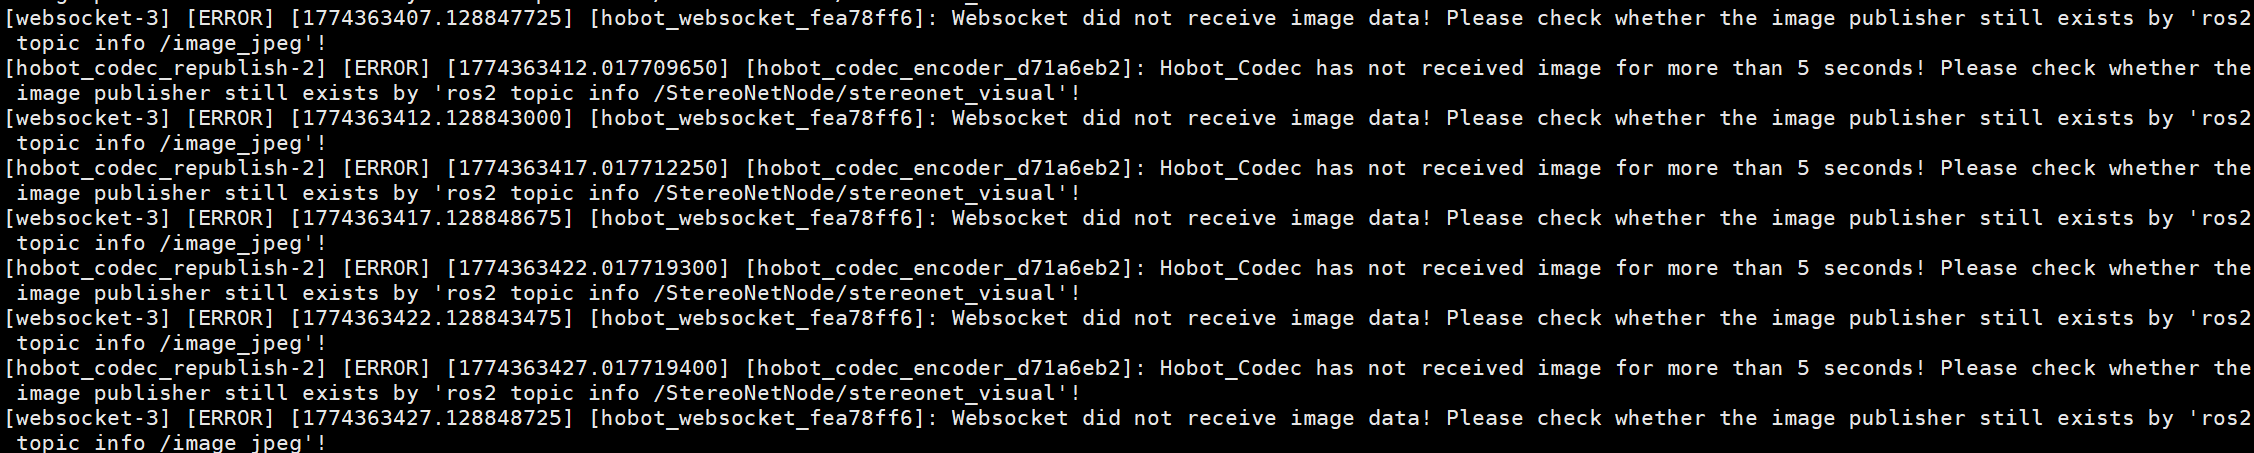
问题根因:StereoNet 节点未正常启动
从错误日志看,codec 和 websocket 报错了,但这只是表象。真正的问题是 StereoNet 节点没有发布 stereonet_visual 话题,说明节点要么没启动,要么启动后崩溃了。
最终排查方案(按顺序执行)
步骤 1:确认 StereoNet 节点状态
# 1. 检查节点是否在运行
ros2 node list | grep -i stereo

# 2. 检查 stereonet_visual 话题
ros2 topic info /StereoNetNode/stereonet_visual

# 3. 检查进程
ps aux | grep stereonet
如果 ros2 node list 没有 /StereoNetNode,说明节点已崩溃。
步骤 2:运行并捕获完整崩溃日志
# 1. 清理进程
killall mipi_cam stereonet_model_node hobot_codec_republish websocket 2>/dev/null
sleep 3

# 2. 运行并保存完整日志
cd /userdata/data/test/
bash run_stereo.sh --stereonet_version v2.4 2>&1 | tee stereo_full.log

# 3. 等待 20 秒后按 Ctrl+C
步骤 3:查看关键错误信息
# 1. 查看 StereoNet 初始化部分
grep -A50 "init StereoNetNode" stereo_full.log

# 2. 查看崩溃信息
grep -E "ERROR|died|segmentation|exit code" stereo_full.log | tail -30

# 3. 查看标定文件加载
grep -i "calib\|custom\|left_camera" stereo_full.log | tail -20
把以上输出补充到帖子,这是定位问题的关键!
 快速修复尝试(3 个方案)
方案 A:尝试 StereoNet v2.3 版本(更稳定)
# 修改运行命令
bash run_stereo.sh --stereonet_version v2.3 2>&1 | tee stereo_v23.log
方案 B:关闭可视化,减少节点负担
# 编辑 run_stereo.sh
vim run_stereo.sh

# 修改以下配置:
publish_visual_enabled=False
stereonet_pub_web=False

# 重新运行
bash run_stereo.sh --stereonet_version v2.4
方案 C:使用命令行参数直接启动 StereoNet
绕过脚本,手动启动节点测试:
source /opt/tros/humble/setup.bash

ros2 run hobot_stereonet stereonet_model_node \
  --ros-args \
  -p calib_method:=custom \
  -p stereo_calib_file_path:=/opt/tros/humble/lib/mipi_cam/config/SC132gs_dual_calibration.yaml \
  -p stereo_image_topic:=/image_combine_raw \
  -p camera_info_topic:=/image_combine_raw/right/camera_info \
  -p render_type:=distance \
  --log-level info
关键配置检查清单
| 配置项 | 正确值 | 检查命令 |
|---|---|---|
use_mipi_cam |
False |
grep use_mipi_cam run_stereo.sh |
calib_method |
"custom" |
grep calib_method run_stereo.sh |
stereo_calib_file_path |
绝对路径 | grep stereo_calib_file_path run_stereo.sh |
| 标定文件字段 | left_camera_matrix |
head -20 SC132gs_dual_calibration.yaml |
| StereoNet 版本 | v2.4 或 v2.3 | grep stereonet_version run_stereo.sh |
请补充以下诊断信息
# 1. StereoNet 节点状态
ros2 node list | grep -i stereo

# 2. 完整崩溃日志关键部分
grep -A50 "init StereoNetNode" stereo_full.log

# 3. 标定文件前 30 行
head -30 /opt/tros/humble/lib/mipi_cam/config/SC132gs_dual_calibration.yaml

# 4. 系统内存状态
free -h
 同类问题参考
- 自定义标定:RDK X5 + SC230ai 双目运行 run_stereo.sh 必现 exit code -11 - 字段名称问题
- 基于官方 132GS MIPI 双目相机运行双目 Demo 报错 - 完整解决案例
优先执行步骤 1+2,把 grep -A50 "init StereoNetNode" stereo_full.log 的输出补充到帖子,这样可以精准定位是标定文件问题还是节点本身问题!
1.先确保是烧录的最新版本系统+更新软件包至最新版本
2.按照手册操作即可,若是按照手册无法正常使用可以仔细阅读下,看是否有步骤遗漏,手册有完整的QA测试使用上不会存在问题
3.可以重启排查环境干扰,run_stereo 和 runcam不能同时