[图像算法][RDK X5][YOLOv26 量化后检测框严重偏移 / 不稳定问题]

【问题分类】图像算法
【板卡类型】RDK X5
【问题简述】YOLOv26量化为BIN后,检测框严重偏移/假阳性,浮点ONNX推理正常


问题背景

我在RDK X5上部署自定义YOLOv26模型,遇到量化后检测效果严重下降的问题:浮点ONNX推理正常,量化为BIN后框偏移、假阳性明显。

现象描述

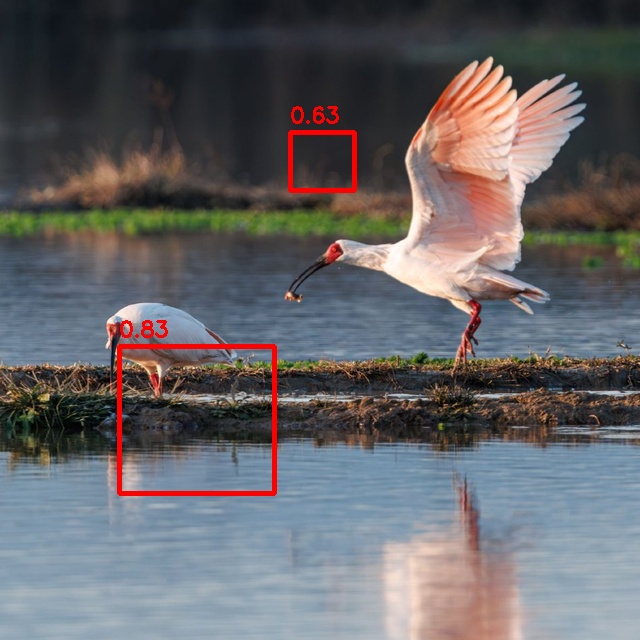
  1. **浮点ONNX模型(第二张图)**:
    • 检测效果正常,能准确框出两只朱鹮,无明显偏移,无假阳性框。
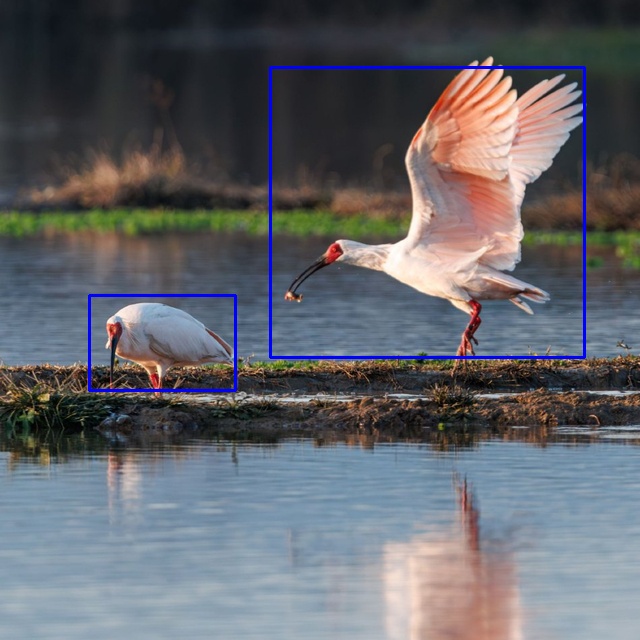
  2. **量化后BIN模型(第一张图)**:
    • 检测框严重偏移:真实目标的框位置错位;
    • 假阳性明显:在背景空地上生成置信度0.63的无效检测框;
    • 目标置信度受干扰,无法稳定输出有效框。

已排查信息

  • 输入预处理:已关闭量化yaml内置归一化,板端输入保持0~255原始值域,无双重归一化;
  • 模型导出:使用YOLOv26原生导出流程,未做额外结构修改;
  • 后处理:使用同一套后处理逻辑,分别对接ONNX和BIN输出;
  • 量化配置:当前使用INT8量化,可正常生成BIN文件,未成功尝试INT16量化。

求助方向

  1. 为什么YOLOv26模型在RDK X5上量化后,会出现检测框偏移、假阳性问题?
  2. 针对YOLOv26,量化配置中需要注意哪些细节,以缓解精度损失?
  3. 如何进一步排查量化过程中特征畸变的问题?

附:效果对比图(第一张为量化BIN推理效果,第二张为浮点ONNX推理效果)

我来帮你分析这个YOLOv26量化后检测框偏移的问题。先搜索一下社区中

问题分析与解决方案

根据你的描述,这是典型的PTQ(Post-Training Quantization)量化精度损失问题。结合社区已有案例,我给出以下排查路径:


:bullseye: 核心结论

YOLOv26 量化后检测框偏移 + 假阳性的主要原因通常是:

  1. 校准数据集分布与训练数据不匹配
  2. 关键层(YOLO Head)量化参数校准失败
  3. 前后处理归一化不一致导致数值畸变

:white_check_mark: 排查步骤

步骤 1:验证量化配置中的预处理参数

检查你的量化 YAML 配置,确保输入预处理与训练时完全一致:

# 关键配置项示例
model:
  input_type: "rgb"  # 或 "bgr",必须与训练时一致
  normalization: [0.0, 1.0, 0.0, 1.0, 0.0, 1.0]  # 如果训练时除以 255
  mean: [0, 0, 0]
  std: [255, 255, 255]

常见错误:

  • 训练时用 RGB,量化配置用 BGR
  • 训练时已归一化到 0-1,量化时重复归一化
  • 板端输入是 0-255,但 YAML 里又配置了归一化

步骤 2:检查校准数据集质量

校准数据集是量化精度的关键。请确认:

# 快速验证校准数据统计
python3 << 'EOF'
import cv2, numpy as np, os

cal_dir = "./calibration_data/"  # 你的校准数据路径
imgs = []
for f in os.listdir(cal_dir)[:100]:
    if f.endswith(('.jpg', '.png')):
        img = cv2.imread(os.path.join(cal_dir, f))
        if img is not None:
            imgs.append(img)

print(f"✅ 校准图片数量:{len(imgs)}")
print(f"📊 像素均值:{np.mean(imgs):.2f}")
print(f"📊 像素标准差:{np.std(imgs):.2f}")
print(f"📊 最小值:{np.min(imgs)}, 最大值:{np.max(imgs)}")
EOF

要求:

  • 数量:≥100 张,建议 200-500 张
  • 多样性:覆盖不同光照、角度、目标大小
  • 格式:与训练集预处理完全一致

步骤 3:尝试跳过 YOLO Head 量化(关键)

根据社区案例(topic 34915),YOLO 的 cls/box 输出层量化后容易失真。在量化配置中添加:

quantization:
  method: "default"
  calibration_dataset: "./calibration_data/"
  calibration_size: 200
  # 跳过关键层量化
  skip_layers:
    - "model.22/cv2"  # YOLO head 的 box 输出
    - "model.22/cv3"  # YOLO head 的 cls 输出

注意:层名需要根据你的模型结构调整,可以通过编译日志查看具体层名。


步骤 4:使用精度 Debug 工具定位问题层

# 生成精度对比报告
hb_mapper accuracy_debug \
  --original_model yolov26.onnx \
  --quantized_model yolov26_quantized.onnx \
  --calibration_data ./calibration_data/ \
  --output_dir ./debug_report/

查看生成的 cosine_similarity 报告,重点关注相似度 < 0.9 的层。如果 YOLO Head 层相似度低,说明需要跳过这些层的量化或改用 INT16。


步骤 5:尝试 INT16 混合精度

如果 INT8 损失过大,可以对敏感层使用 INT16:

quantization:
  method: "default"
  # 全局 INT8,部分层 INT16
  layer_precision:
    "model.22/*": "int16"  # YOLO Head 用 INT16

步骤 6:验证板端输入数据

确保板端输入与量化时一致:

# 板端推理前的输入验证
import cv2
import numpy as np

img = cv2.imread("test.jpg")
img = cv2.resize(img, (640, 640))

# 如果量化时配置了 normalization: [0,1,0,1,0,1]
# 板端应该传入 0-255 原始值,让 BPU 做归一化
input_data = img.astype(np.float32)  # 不要自己除以 255

# 如果量化时配置了 no_preprocess
# 板端需要自己归一化
# input_data = img.astype(np.float32) / 255.0

社区参考资源


:rocket: 建议行动

  1. 先执行步骤 1-2,确认配置和校准数据无误
  2. 尝试步骤 3,跳过 YOLO Head 量化看是否改善
  3. 如果仍有问题,在你的帖子中补充:
    • 完整的量化 YAML 配置
    • 编译日志中的 Cosine Similarity 报告
    • 校准数据集的来源和数量

这样社区可以更精准地帮你定位问题。

yaml_content = f’'‘model_parameters:
onnx_model: ‘{opt.onnx}’
march: “bayes-e”
layer_out_dump: False
working_dir: ‘{bpu_output_dir}’
output_model_file_prefix: ‘{output_prefix}’
input_parameters:
input_name: “”
input_type_rt: ‘nv12’
input_type_train: ‘rgb’
input_layout_train: ‘NCHW’
norm_type: ‘data_scale’
scale_value: 0.003921568627451
calibration_parameters:
cal_data_dir: ‘{cal_data_dir}’
cal_data_type: ‘float32’
calibration_type: ‘default’
optimization: set_Softmax_input_int8,set_Softmax_output_int8{int16_opt}
compiler_parameters:
jobs: {opt.jobs}
compile_mode: ‘latency’
debug: true
optimize_level: ‘{opt.optimize_level}’
‘’’
with open(os.path.join(opt.ws, “config.yaml”), “w”) as f:
f.write(yaml_content)
这是我开始用的yaml,就是官方配置

:magnifying_glass_tilted_left: 配置分析

看了你的 YAML 配置,这是官方标准模板,但有几个关键问题可能导致量化后精度崩塌:


:warning: 核心问题定位

问题 1:校准数据格式与配置不匹配

你的配置:

input_type_rt: 'nv12'      # 板端输入 NV12
input_type_train: 'rgb'    # 训练时 RGB
norm_type: 'data_scale'
scale_value: 0.003921568627451  # 1/255
cal_data_type: 'float32'   # 校准数据是 float32

关键矛盾:

  • cal_data_type: 'float32' 意味着校准数据应该是已经归一化到 0-1 的 RGB 浮点数据
  • 但你的校准数据如果是直接从训练集复制的 JPG 图片,可能是 0-255 的 uint8

验证方法:

import numpy as np
import os

cal_dir = "./calibration_data/"
for f in os.listdir(cal_dir)[:3]:
    if f.endswith('.npy'):
        data = np.load(os.path.join(cal_dir, f))
        print(f"{f}: shape={data.shape}, min={data.min():.4f}, max={data.max():.4f}")
        # ✅ 正确:min≈0, max≈1
        # ❌ 错误:min=0, max=255

问题 2:没有跳过 YOLO Head 关键层

根据社区案例 topic 34915,YOLOv26 量化后 cls 输出分布严重畸变(从 [-229, 82] 变成 [-14, -0.1]),导致置信度计算错误。

解决方案:在 optimization 中添加 skip 配置

optimization: set_Softmax_input_int8,set_Softmax_output_int8{int16_opt},set_conv_int16_pattern=model.22/cv2.*,model.22/cv3.*

或者在量化配置中指定部分层用 INT16:

# 在 calibration_parameters 后添加
compiler_parameters:
  jobs: {opt.jobs}
  compile_mode: 'latency'
  debug: true
  optimize_level: '{opt.optimize_level}'
  # 添加层精度控制
  layer_precision_config: |
    model.22/cv2/*: int16
    model.22/cv3/*: int16

问题 3:缺少精度验证步骤

建议在量化后立即验证输出分布:

# 验证量化后 ONNX 的输出分布
import onnxruntime as ort
import numpy as np

session = ort.InferenceSession('yolov26_quantized.onnx')
img = np.random.randn(1, 3, 640, 640).astype(np.float32)
outputs = session.run(None, {session.get_inputs()[0].name: img})

print("=== 量化后输出分布 ===")
for i, o in enumerate(outputs):
    print(f"Output {i}: shape={o.shape}, min={o.min():.4f}, max={o.max():.4f}")
    if o.min() < -20 or o.max() > 20:
        print(f"  ⚠️ 输出范围异常,可能是量化失真")

:white_check_mark: 推荐修改后的配置

model_parameters:
  onnx_model: '{opt.onnx}'
  march: "bayes-e"
  layer_out_dump: True  # 开启层输出,方便 debug
  working_dir: '{bpu_output_dir}'
  output_model_file_prefix: '{output_prefix}'

input_parameters:
  input_name: ""
  input_type_rt: 'nv12'
  input_type_train: 'rgb'
  input_layout_train: 'NCHW'
  norm_type: 'data_scale'
  scale_value: 0.003921568627451

calibration_parameters:
  cal_data_dir: '{cal_data_dir}'
  cal_data_type: 'float32'
  calibration_type: 'default'
  calibration_size: 200  # 建议增加到 200

optimization: set_Softmax_input_int8,set_Softmax_output_int8{int16_opt},set_conv_int16_pattern=model.22/cv2.*,model.22/cv3.*

compiler_parameters:
  jobs: {opt.jobs}
  compile_mode: 'latency'
  debug: true
  optimize_level: '{opt.optimize_level}'

:rocket: 立即执行排查

1. 验证校准数据格式

python3 -c "
import numpy as np, os
cal_dir = './calibration_data/'
for f in os.listdir(cal_dir)[:3]:
    if f.endswith('.npy'):
        d = np.load(os.path.join(cal_dir, f))
        print(f'{f}: [{d.min():.3f}, {d.max():.3f}]')
"

2. 查看编译日志中的层相似度

# 在编译日志中搜索 "Cosine Similarity" 或 "相似度"
# 重点关注 < 0.9 的层,尤其是 model.22 相关层
grep -i "similarity" compile.log

3. 如果仍有问题,补充以下信息到帖子:

  • 校准数据的生成方式(如何从训练集转换的)
  • 编译日志中的 Cosine Similarity 报告
  • 量化后 ONNX 的输出分布(min/max)

:pushpin: 社区参考

案例 问题 解决方案
topic 34915 YOLOv26 量化后 cls 输出畸变 跳过 YOLO Head 量化 + 更换校准数据
topic 34931 量化后几乎无法检测 校准数据与训练预处理不一致
topic 33350 threshold 非法导致精度崩塌 检查校准数据覆盖范围

先执行校准数据格式验证,这步最可能发现问题根源。

可以直接使用mapper.py 对输入校准数据也需要做一些处理